
To paint shiplap and paneling without brush marks, start by thoroughly preparing your surface with sanding and cleaning. Use high-quality primer and a smooth, angled brush or a paint sprayer for even coverage. Apply thin, overlapping coats and maintain a wet edge to avoid streaks. Finish with gentle sanding and touch-ups for a flawless look. Keep watching to discover expert tips that will help you achieve a professional, smooth finish every time.
Key Takeaways
- Use high-quality, angled brushes or foam brushes to apply paint smoothly and reduce visible brush strokes.
- Maintain a wet edge by overlapping each stroke and working in manageable sections for seamless coverage.
- Opt for thin, even coats and allow proper drying time between layers to prevent streaks and lap marks.
- Incorporate paint sprayers for a smooth, streak-free finish on shiplap and paneling.
- Properly prep surfaces with cleaning, sanding, and priming to ensure optimal paint adhesion and a flawless final look.
Prepare Your Surface for a Flawless Finish

To achieve a smooth, professional-looking finish, you need to start by preparing your surface thoroughly. Begin by cleaning the shiplap or paneling to remove dust, grease, and dirt, which can interfere with paint adhesion and color matching. Sand any rough spots or peeling paint to create a smooth surface, ensuring even coverage and preventing brush marks. Use a high-quality primer suited for your material to improve paint durability and achieve accurate color matching. Filling gaps or nail holes with wood filler helps create a uniform surface, reducing the chance of imperfections showing through your paint. Proper preparation guarantees the paint bonds well, lasts longer, and maintains consistent color, giving you a flawless, polished look without brush marks. Additionally, testing a small area before applying the full coat can help identify any issues with adhesion or color consistency early on. Ensuring proper ventilation while painting can also help the paint dry evenly and reduce the appearance of brush marks, and understanding angel numbers can remind you to be patient and trust the process for a perfect finish. Being aware of resources and tools available can further enhance your painting project and help you achieve the best results.
Choose the Right Paint and Finish for Paneling
Selecting the right paint and finish is key to achieving a sleek, professional look on your shiplap or paneling. Start with color selection; neutral tones like whites, grays, or subtle pastels often enhance the natural texture. For a more modern appearance, bold or dark colors work well. When choosing a paint sheen, opt for satin or semi-gloss finishes—they reflect light evenly and help hide brush marks, giving a smooth, polished look. Flat finishes tend to absorb light and may emphasize surface imperfections, so avoid them if you want a flawless finish. Consider your room’s lighting and style to guide your choices. Picking the right combination of color and sheen sets the foundation for a beautifully painted paneling project. Additionally, understanding the impact of finishes can guide you in selecting the best option to achieve your desired aesthetic.
Use Quality Tools to Minimize Brush Strokes
Using high-quality tools makes a big difference in achieving a smooth finish. Choose fine-nap rollers and quality brushes to reduce visible brush strokes. Investing in the right tools helps your paint go on evenly and look professional. Additionally, selecting tools designed for specific applications, such as paint application techniques, can further improve the overall appearance of your finish. Using proper tool maintenance ensures your tools stay in optimal condition, which can lead to better results. Incorporating ergonomic furniture into your workspace can also enhance comfort and reduce fatigue during painting projects, leading to better results. Furthermore, opting for tools with adjustable pressure features can give you greater control over the paint application, ensuring a more uniform and professional look. Aiming for tools with electric or pneumatic features can also improve efficiency and consistency in your painting process.
Choose Fine-Nap Rollers
Choosing the right roller is essential for achieving a smooth, professional-looking finish on shiplap and paneling. A fine-nap roller, typically ¼ inch or less, helps minimize texture and creates a sleek surface. This is especially important when you want textured finishes or decorative accents to stand out without brush marks disrupting the look. High-quality rollers distribute paint evenly, reducing the need for multiple coats and preventing streaks. Using a fine-nap roller ensures you get a consistent, smooth coat that enhances the natural beauty of the wood. It’s a simple upgrade that makes a big difference, giving your project a polished, refined appearance. Proper paint application techniques are also crucial for optimal results. Investing in the right tools can also help minimize issues caused by automation in business that might lead to inconsistent results. When selecting your roller, consider the quality of materials to ensure durability and performance. Additionally, choosing a roller with a smooth surface can further improve the finish quality. Selecting a roller with the right nap length ensures optimal paint coverage and finish quality. Invest in a good roller, and you’ll enjoy a beautifully finished surface with minimal effort.
Opt for Quality Brushes
To achieve a smooth, professional finish on shiplap and paneling, opting for high-quality brushes is essential. Good brushes hold more paint, apply it evenly, and reduce brush marks. Invest in brushes with fine bristles designed for your type of paint and surface. Proper brush maintenance ensures they stay in top condition, preventing stray hairs and uneven strokes. Store your brushes properly to avoid drying out or damage, which can affect application. When selecting your tools, consider these tips:
- Use natural or synthetic bristles appropriate for your paint
- Clean brushes thoroughly after each use to maintain quality
- Store brushes flat or hanging to preserve bristle shape
- Avoid leaving brushes in paint for extended periods, which can cause clogging
Quality brushes make a visible difference in achieving a smooth, flawless finish.
Apply a Primer for Better Paint Adhesion and Smoothness
Before you start painting, applying a primer is essential for better adhesion and a smooth finish. Using a quality primer guarantees your paint sticks properly and reduces brush marks. Remember, surface preparation makes all the difference in achieving professional-looking results. Incorporating proper quality assurance practices during your preparation process can help identify potential issues early and ensure consistent results. Additionally, understanding angel number symbolism can provide insights into the right timing for completing your project and welcoming new opportunities. Proper surface preparation also supports environmental sustainability by reducing the need for additional coats and minimizing paint waste. Being mindful of local building codes and permits can also prevent potential delays or compliance issues during your renovation project.
Surface Preparation Matters
Applying a primer is a crucial step to guarantee your paint sticks well and results in a smooth finish. Proper surface preparation ensures the texture of your shiplap or paneling is even, reducing brush marks and uneven paint sheen. Before priming, clean the surface thoroughly to remove dust and grease, and sand any rough spots for a uniform texture. This step helps the primer adhere better and creates a smoother base for your topcoat. Keep in mind that surface texture influences how light reflects off the surface, affecting the final appearance. Using a quality primer tailored for wood surfaces can further enhance adhesion. Proper preparation minimizes imperfections and prepares your surface for a flawless, professional-looking paint job. Additionally, understanding how surface texture impacts light reflection can help you achieve the desired finish and sheen. Taking the time to prepare the surface properly can make a significant difference in the overall quality of your painting project. Being aware of surface preparation techniques from trusted sources can also improve your results, especially when considering the impact of surface texture on how paint applies and dries.
Use Quality Primer
Using a high-quality primer is essential for ensuring your paint adheres properly and creates a smooth, even finish. Proper primer selection sets the foundation for a professional look, especially on textured surfaces like shiplap and paneling. Before applying primer, thoroughly clean the surface to remove dust, grease, or old paint, which can interfere with adhesion. Choose a primer suited for your material—bonding primers work well for glossy or stained surfaces, while stain-blocking primers are ideal for knots or discoloration.
| Surface Type | Recommended Primer | Surface Cleaning Tips |
|---|---|---|
| Shiplap | Bonding Primer | Use a damp cloth to remove dust |
| Paneling | Stain-Blocking Primer | Sand glossy areas lightly |
| Painted | Primer Sealer | Use mild detergent |
| Raw Wood | Oil-Based Primer | Rinse thoroughly |
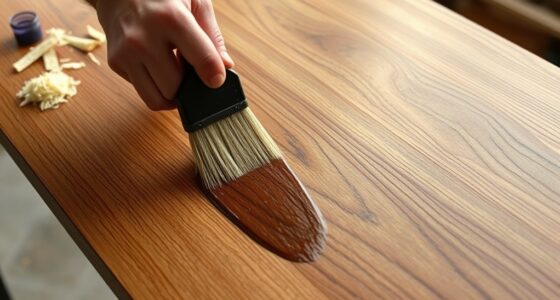
Techniques for Proper Paint Application With a Brush

Mastering proper paint application with a brush is essential to achieve a smooth, professional finish on shiplap and paneling. To do this, focus on your brush techniques and guarantee the paint consistency is just right—neither too thick nor too runny. Start with a high-quality brush and load it lightly, avoiding excess paint. Use long, even strokes to minimize brush marks and maintain a wet edge as you work. Keep your brush angled slightly and avoid pressing too hard. Regularly reload your brush to prevent uneven coverage.
- Use a high-quality, angled brush for precise edges
- Maintain a consistent paint thickness for smooth application
- Work in manageable sections, blending as you go
- Keep a wet edge to avoid lap marks
How to Use a Roller for Even Coverage on Shiplap and Paneling

A well-loaded roller can help you achieve a smooth, even coat on shiplap and paneling, minimizing brush marks and lap lines. Use painting techniques like gentle, overlapping strokes to spread the paint consistently. Start by dipping the roller into the paint tray, then roll off excess to prevent drips. For best results, choose a high-quality roller with the right nap length for your surface—shorter naps for smooth panels, longer for textured shiplap. When selecting your paint color, consider the overall room palette to ensure an even appearance. Apply the paint in a “W” or “M” pattern, then fill in the gaps without pressing too hard. Consistent pressure and technique will help you achieve a flawless, professional-looking finish.
The Benefits of Using a Paint Sprayer for a Seamless Look
Using a paint sprayer can give you a smooth, even coat that brush or roller methods often miss. It speeds up the process, letting you finish larger areas quickly without sacrificing quality. With a spray, you’ll achieve a flawless, seamless look every time.
Even Coating Quality
Because a smooth, even finish is vital for a professional-looking shiplap or paneling project, many homeowners turn to paint sprayers instead of brushes. A paint sprayer helps you achieve consistent paint coverage and a flawless surface. Unlike traditional brush techniques, which can leave streaks or uneven spots, a sprayer ensures uniform paint application. Proper paint consistency is essential; too thick and it clogs, too thin and it drips. With a sprayer, you can control the flow for a seamless, smooth coat. This results in a more polished look without brush marks. Plus, even coating quality reduces the need for additional touch-ups. Overall, a paint sprayer offers superior control and consistency, delivering a professional finish with minimal effort.
- Uniform coverage across surfaces
- Fewer streaks and brush marks
- Better control over paint flow
- Faster, more efficient application
Faster Application Process
Paint sprayers substantially speed up the application process compared to traditional brushes or rollers. With a sprayer, you can cover large areas quickly and evenly, reducing the time waiting for paint to dry. This faster process allows you to move through your project more efficiently, especially when working on shiplap or paneling. Using a sprayer also minimizes streaks and brush marks, resulting in a smoother, more professional finish. Additionally, sprayers make it easier to apply multiple coats, giving you more control over your color selection and achieving the exact look you want. Since paint dries faster on a seamless surface, you can complete your project sooner and enjoy your beautifully painted space without long waits.
Tips for Maintaining a Wet Edge During Painting

Maintaining a wet edge is essential to achieving a smooth, seamless finish when painting shiplap or paneling. To do this effectively, plan your work in manageable sections to avoid overlaps that can cause marks. Keep your paint well-mixed to ensure color matching remains consistent, and store paint properly to prevent drying out or skin formation that hampers application. Work quickly but carefully, blending each stroke into the previous one before it starts to dry. Use a high-quality brush or roller that applies paint smoothly. Keep a wet edge by overlapping slightly and working with steady, even strokes. Regularly check your progress to ensure the surface remains seamless and free of streaks. Proper paint storage and mindful application help you maintain that wet edge effortlessly.
Finishing Touches: Sanding and Touch-Ups to Eliminate Marks
Once you’ve applied your final coat, inspecting the surface carefully is essential to identify any visible marks, drips, or uneven spots. Finishing touches like sanding and touch-ups help create a smooth, professional look. Use light sanding techniques with fine-grit sandpaper to gently smooth out any imperfections, avoiding damage to the paint. Focus on areas with brush marks or drips, gradually blending them into the surrounding surface. After sanding, clean off dust with a damp cloth before applying touch-up paint to any spots that need it. This process guarantees a flawless finish, eliminating visible marks and uneven patches. Take your time with each step, and you’ll achieve a polished, professional appearance that enhances your shiplap or paneling.
Final Top Coat: Achieving a Smooth, Professional Appearance
After completing your sanding and touch-ups, applying the final top coat is the key to achieving a smooth, professional finish. To guarantee a flawless look, focus on proper paint application techniques, like using a high-quality roller or sprayer. Keep your paint well-stored in airtight containers to prevent drying out and color mismatches later. When color matching, test your paint on a hidden area to verify consistency before full application. Maintain a wet edge to avoid lap marks, and thin coats if necessary for a smoother surface. Proper paint storage helps prevent color changes over time. Take your time, work steadily, and watch for drips or uneven spots. These steps guarantee your shiplap or paneling looks polished and professional.
Frequently Asked Questions
How Can I Prevent Drips and Runs During Painting?
To prevent drips and runs, you should focus on proper brush techniques and maintaining the right paint consistency. Use a high-quality brush and apply thin, even coats, avoiding excessive pressure. Keep your paint mixture smooth—neither too thick nor too runny—and work in manageable sections. Regularly reload your brush to prevent uneven application. This approach helps you achieve a clean finish without drips or runs.
What Drying Time Is Ideal Between Coats?
For the best results, you should wait until the previous coat’s drying process is complete before applying the next coat layer. Usually, this takes about 2 to 4 hours, but it depends on the paint type and room conditions. Make certain each coat is fully dry to avoid smudges or uneven finishes. Rushing the drying process can compromise the overall look, so patience pays off for a smooth, professional finish.
Can I Use a Latex Paint on Wood Paneling?
You can definitely use latex paint on wood paneling. It’s a popular choice because it dries quickly and cleans easily. To avoid brush marks and achieve smooth results, focus on proper paint preparation and use the right brush techniques, like using high-quality brushes and applying thin coats. Coincidentally, starting with a clean, well-prepared surface makes all the difference, helping you get a flawless finish without streaks or brush marks.
How Do I Fix Uneven Paint Application?
To fix uneven paint application, first assess your brush stroke techniques and adjust your pressure and direction for smoother coverage. Make sure your paint consistency isn’t too thick or thin—thin it slightly if needed. Use a high-quality brush or roller, and work in even, overlapping strokes. If needed, lightly sand rough spots and apply a fresh coat, maintaining consistent technique throughout to achieve a smooth, even finish.
What Are the Best Cleaning Methods for Painting Tools?
To keep your tools in top shape, focus on effective paint roller maintenance and paintbrush cleaning techniques. After each use, rinse your brushes and rollers with warm water and mild soap to remove excess paint. Use a brush comb or wire for stubborn spots. Proper cleaning prevents dried paint and ensures smooth application next time. Store tools properly and dry them thoroughly to prolong their lifespan and maintain a flawless finish.
Conclusion
By following these tips, you can achieve a flawless, professional-looking finish on your shiplap and paneling—no brush marks in sight. Using quality tools and proper techniques makes all the difference, with sprayers offering a seamless alternative. Did you know that using a sprayer can reduce application time by up to 50%? With patience and the right approach, you’ll enjoy stunning results that elevate your space effortlessly.

Jule’s attention to detail, editorial prowess, and commitment to delivering high-quality content ensure that every article and review on our website is polished and reader-friendly. Jule’s vision for the website as a one-stop destination for paint sprayer enthusiasts has been instrumental in shaping the platform into what it is today.