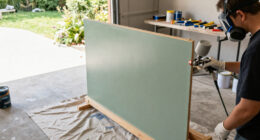
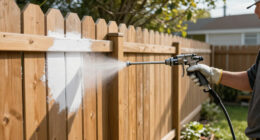
TL;DR
An airless paint sprayer uses a motor-driven pump to push paint through a small tip, creating a fan-shaped spray that covers large surfaces quickly. It suits jobs such as fences, siding, and walls, but masking, practice, and immediate cleanup take time. Check coating and tip compatibility, protect nearby surfaces, and follow the manufacturer’s pressure-relief and safety instructions.
Use an airless sprayer for large, relatively open surfaces such as fences, siding, walls, and decks; small detailed pieces may be faster to brush.
Check coating compatibility and the recommended tip size in the sprayer and coating instructions; flow rate alone is not enough.
Mask windows, trim, plants, cars, floors, and nearby furnishings because fine overspray can travel beyond the target.
Practice steady, perpendicular, overlapping passes on cardboard before spraying the finished surface.
Keep the tip guard installed, follow pressure-relief instructions before maintenance, and clean the system promptly after use.

Get business pricing on tools and workshop supplies
- Business-only prices and quantity discounts
- Tax-exempt purchasing
- Multiple users, one account, clear invoices
Know when an airless sprayer will save you time
An airless paint sprayer for DIY projects is a tool for applying a coating quickly across broad surfaces; a motor-driven pump sends paint through a small tip, which creates a fan of droplets without using an air stream to atomize the paint. Because the fan covers a wider area than a brush stroke, the advantage grows with the size and openness of the surface. Fences, siding, walls, ceilings, and decks can reward that speed when there are long, uninterrupted stretches to coat. The time savings depend on the whole job, though. A sprayer may coat a long run of fence much faster than a brush, but masking nearby surfaces, moving equipment, practicing passes, and cleaning the gun, hose, filters, and pump all take time. Those tasks are largely fixed overhead: they matter whether the job is one panel or an entire fence. That means a small job has less painted area over which to spread the setup and cleanup time. On a single chair with narrow legs and carved details, brushing may be quicker once you count the setup and the care needed to avoid coating adjacent surfaces. For example, imagine painting a large, open basement wall before moving furniture back in. A sprayer can lay down an even coat quickly, while a roller needs repeated trips across the wall. For a small bathroom with a toilet, vanity, mirror, and trim to protect, masking could eat up the time you hoped to save. The more edges, obstacles, and separate surfaces a room contains, the more time goes into shielding and repositioning rather than spraying. The basic decision is simple: choose a sprayer when the surface is large and relatively open, and compare it with a roller or brush when the job is small, intricate, or surrounded by things you don’t want coated. Estimate time across setup, application, and cleanup—not just the minutes spent pulling the trigger. The right tool is the one that saves time across the entire job, from setup to cleanup.Products Worth Considering

Bose SoundLink Plus Portable Bluetooth Speaker, Black

LG OLED evo C4 55-Inch 4K Smart OLED TV (OLED55C4PUA) with 144Hz Refresh Rate, HDMI Cable, 24-Month Protection Plan, and Streaming Bundle

Levoit Vital 100S-P Air Purifier with Washable Pre-Filter
As an affiliate, we earn on qualifying purchases.
Choose a sprayer that matches your paint and project
For DIY jobs, choose a sprayer by checking whether it supports your coating and the tip the coating calls for, then compare hose length, portability, and cleanup. A high maximum flow rate alone doesn’t tell you whether the machine can handle the paint you plan to spray. Flow describes how much material a unit can deliver under specified conditions; it doesn’t establish that a particular coating can pass through its passages and tip or produce the intended pattern. Compatibility is the first filter because an unsuitable combination can mean poor atomization, clogs, or a finish that needs correction. | What to compare | Why it matters | A practical example | |—|—|—| | Supported coatings | Models differ in which paints, primers, and stains they can spray. | Check the manual before using latex paint or a thick exterior coating. | | Compatible tip sizes | The sprayer and coating need to support the chosen tip. | Confirm the recommended tip in both the sprayer guide and coating instructions. | | Hose length and portability | Reach and weight affect how you move around the job. | A longer hose can help on a tall wall, while a lighter unit may be easier to carry between rooms. | | Cleaning method | Paint left to dry can clog parts. | Find out what flushing fluid and steps the manufacturer specifies. | Tip markings commonly describe the orifice size and fan width, but marking systems vary, so use the model’s guide instead of guessing. Tip size affects both the amount of material delivered and the shape of the spray. A tip that is too small for the coating can clog; one that is too large may deliver more paint than you can control on the surface. A worn tip can distort the spray pattern and waste paint; if cleaning doesn’t fix the pattern, check the manual about replacing it. Say you’re choosing a unit for a backyard fence and a future bedroom repaint. If the coating is compatible and the hose reaches your fence comfortably, the same sprayer may suit both. Compare those needs with the effort of carrying the unit and cleaning it between different coatings. A cordless or easier-cleaning feature may make handling more convenient, but it doesn’t remove the need to mask, protect yourself, or clean the system.Prepare the room or yard before you pull the trigger
Before spraying, prepare the surface and protect everything the paint mist could reach. An airless paint sprayer can throw fine droplets beyond the target; wind, surface shape, spray distance, pressure, and tip all affect how much travels. Because droplets can settle on surfaces well outside the visible wet edge, judging the risk by what you can see in the moment can leave you with a difficult cleanup. Masking isn’t a finishing touch. It’s part of the job. Use this sequence:- Read the sprayer manual and coating label; confirm compatibility and whether straining or thinning is recommended.
- Clean the surface, repair defects, and let it dry, as you would before brushing or rolling.
- Cover windows, trim, floors, plants, vehicles, and nearby furniture with suitable masking and drop cloths.
- For outdoor work, check conditions and account for wind before spraying.
- Practice on cardboard or scrap material before you aim at the finished surface.
Practice steady passes for a smoother finish
You can get a smooth finish with an airless paint sprayer by keeping the gun perpendicular to the surface, moving at a steady pace, and applying even overlapping passes. Consistency matters more than rushing: the tip deposits paint across a fan, so changes in angle or distance change how that paint lands. A slow, uneven pass can leave runs or stripes just as readily as an unpracticed brushstroke. Start on a piece of cardboard or scrap. Hold the gun at a consistent distance, begin moving before you pull the trigger, and release the trigger at the end of each pass. Starting motion first helps avoid a concentrated spot of paint where the pass begins; releasing at the end limits extra material collecting as you stop. Follow the sprayer maker’s guidance on pressure and overlap; the right settings depend on the unit, tip, and coating. Too little overlap can leave thin bands, while excessive overlap can build up paint and create an uneven coat. For example, on a fence panel, move smoothly across the board rather than stopping over a knot or gap. If you linger in one place, more paint collects there and can run; if your pace or overlap shifts, the finish may look striped. A few practice passes help you find a rhythm before coating the visible side of the fence. They also let you check whether the selected tip and distance produce a fan you can control. If the spray spits, clogs, or leaves an uneven pattern, stop and consult the manual and coating directions. Possible causes include a clogged or worn tip, dirty filters, an unsuitable tip, inadequate pressure, or coating that’s too thick for the unit. Changing settings without checking compatibility can mask the cause and lead to more uneven coverage. Don’t thin the paint unless the label or manufacturer recommends it; excessive thinning can affect coverage and finish.Treat high pressure as a serious safety hazard
An airless sprayer operates at high pressure, and a spray-injection injury can be a medical emergency even when the wound looks small. The force can drive paint through skin, so the size of the puncture does not reliably show the extent of the injury. Keep the tip guard installed, never point the gun at yourself or someone else, and follow the manufacturer’s pressure-relief procedure before changing tips, clearing clogs, or cleaning. Pressure relief matters because switching off the motor alone may not release pressure trapped in the system. A leak is not harmless. High-pressure paint can penetrate skin, so keep your hands clear of the tip and never try to check a leak with your fingers. If you suspect an injection injury, seek urgent medical care. Tell medical staff that paint or coating entered under pressure, even if the mark looks like a tiny puncture; that detail helps them assess the injury promptly. Imagine a tip clogging halfway through a fence. Don’t loosen the tip or put a hand over the nozzle while the system remains pressurized. Follow the manual’s pressure-relief instructions first, then use the clearing method specified for your model. A reversible tip may help clear certain clogs, but it doesn’t make it safe to skip pressure relief. Wear the protective equipment required by the product label, and take care with ventilation, ignition sources, and cleanup waste as directed. If your job involves electrical, gas, structural, or roof work, use a licensed professional for that work and follow applicable safety and permit requirements. Painting may seem straightforward, but the equipment’s pressure deserves respect.Make cleanup part of the plan, not an afterthought
An airless sprayer pays off only if you have time to clean it immediately after spraying. Paint that dries inside the gun, hose, filters, or pump can clog components and leave the machine unreliable for your next project. The narrow passages that help control the spray pattern also make dried coating difficult to remove. Cleanup adds work at the end, but treating it as part of the job helps protect the equipment and your finish next time. Follow the cleaning method and fluid specified for your coating and sprayer. Flush the system promptly, clean the gun and filters as the manual directs, and handle leftover paint and wash water according to the product label and local rules. Don’t guess that one cleaning fluid suits every coating. A method that works for one product may not clear another safely or effectively, so check before you start the job and allow time for the full procedure. For a real-world example, suppose you finish spraying a deck late in the afternoon and leave the hose until morning. Dried coating can turn a routine flush into a stubborn cleanup, while attending to the machine right away gives you a better chance of clearing its passages. The exact time varies by equipment and coating, so plan enough time to complete the specified steps before you begin. If you cannot make room for cleanup at the end, the apparent speed of spraying may not translate into a net time saving. Some newer homeowner models offer compact designs, cordless options, reversible tips, paint liners, or simplified flushing. Those features may make setup or cleanup easier, but they don’t eliminate masking, safe handling, or careful cleaning. Product specifications also change, so check current manufacturer information before choosing a model.Frequently Asked Questions
Is an airless sprayer worth it for a DIYer?
It can be worthwhile for large surfaces or several projects, such as a long fence or multiple walls. For one small room or a piece of furniture, masking and cleanup may outweigh the time saved.
Can I spray ordinary latex paint?
Many airless models can spray latex, but check your sprayer specifications and paint instructions first. Strain or prepare the coating only as directed, and don’t thin it unless the manufacturer or label recommends it.
How much overspray should I expect?
Enough to make masking important. Wind, pressure, tip, distance, and the shape of the surface affect how far paint mist drifts, so cover nearby plants, vehicles, trim, and furniture before you start.
Can I use an airless sprayer indoors?
Yes, when the equipment and coating suit the job and you protect the room carefully. Cover floors, furnishings, openings, and nearby rooms, provide ventilation appropriate to the coating, and follow its safety instructions.
How do I avoid runs and an uneven finish?
Practice on cardboard, keep the gun perpendicular and at a consistent distance, and move steadily with even overlapping passes. Start moving before pulling the trigger and release it at the end of each pass; follow your sprayer’s technique guidance.
Is an airless sprayer dangerous?
It can cause severe high-pressure injection injuries, even when the wound appears small. Keep the tip guard installed, never point the gun at anyone, and follow the manufacturer’s pressure-relief procedure before clearing a clog or cleaning; seek urgent medical care after any suspected injection injury.