Connect with us

Airless Paint Sprayers FAQs

Airless Paint Sprayer What Is

Published

on

An image showcasing the seamless precision of an airless paint sprayer in action

Imagine transforming a plain wall into a masterpiece with just a few strokes. This is the power of an airless paint sprayer.

Hi, I’m here to introduce you to the world of airless paint sprayers and show you how they can revolutionize your painting projects.

In this article, we will dive into the inner workings of these innovative tools, explore the numerous benefits they offer, and discuss the different types available in the market.

I’ll also share some key factors to consider when choosing the perfect airless paint sprayer for your needs, along with essential tips for using them effectively and safely.

Additionally, I’ll guide you through troubleshooting common issues that may arise and provide insights on maintenance and cleaning.

Advertisement

Lastly, I’ll recommend some top-notch airless paint sprayers across various budgets and projects.

So, whether you’re a DIY enthusiast or a professional painter, get ready to unlock the potential of airless paint sprayers and elevate your painting game to new heights.

Let’s get started!

Key Takeaways

  • Airless paint sprayers are portable and eliminate the need for an air compressor.
  • They provide efficient and even paint coverage, saving time and labor.
  • Airless paint sprayers are versatile and can be used on walls, ceilings, and furniture.
  • Regular cleaning and maintenance are crucial for optimal performance and lifespan.

How an Airless Paint Sprayer Works

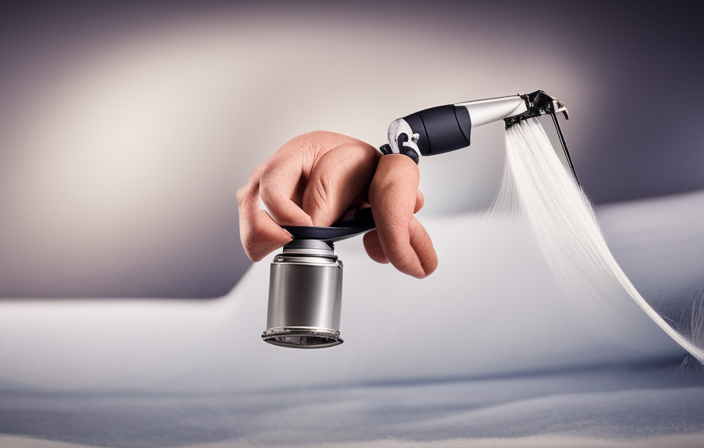
Get ready to be amazed by how an airless paint sprayer effortlessly transforms the way you paint, making it quicker and more efficient than ever before!

Advertisement

An airless paint sprayer works by using a high-pressure pump to force paint through a small tip, creating a fine mist that evenly coats the surface.

Unlike traditional paint sprayers that use compressed air, an airless paint sprayer eliminates the need for an air compressor, making it compact and portable.

To ensure proper maintenance of airless paint sprayers, it’s essential to clean the equipment thoroughly after each use and inspect the hoses and spray tip for any clogs or damage.

Regular maintenance will prolong the lifespan of your sprayer and ensure optimal performance.

As we delve into the benefits of using an airless paint sprayer, you’ll discover just how much time and effort it can save you.

Advertisement

The Benefits of Using an Airless Paint Sprayer

When it comes to painting, I can’t help but appreciate the benefits of using an airless paint sprayer.
Not only does it provide efficient and even paint coverage, but it also saves me a significant amount of time and labor.
What I love most about it is its versatility, as it can be used on different surfaces, whether it’s walls, ceilings, or even furniture.

Efficient and Even Paint Coverage

To achieve a flawless finish with your airless paint sprayer, you’ll be amazed at how effortlessly and evenly the paint coverage appears on every surface. The efficient paint application provided by an airless paint sprayer ensures that you can achieve professional results with ease. Here are a few reasons why the paint coverage is so efficient and even:

  • Consistent pressure: The airless paint sprayer delivers a consistent pressure, allowing for a smooth and even application of paint.

  • Wide spray pattern: The sprayer creates a wide spray pattern, covering a larger area in a shorter amount of time.

  • Adjustable settings: You can easily adjust the spray settings to match the specific requirements of your project, ensuring optimal coverage.

  • Reduced overspray: Unlike traditional paint sprayers, airless sprayers minimize overspray, resulting in less wasted paint and a more efficient application process.

With such efficient and even paint coverage, using an airless paint sprayer saves you time and labor. Now, let’s explore how it also helps in achieving significant time and labor savings.

Time and Labor Savings

By using an airless paint sprayer, you can achieve significant time and labor savings, making your painting projects quicker and easier. Airless paint sprayers are designed to improve efficiency by delivering paint at high pressure, allowing for faster coverage and reducing the need for multiple coats.

The high-pressure spray also ensures even distribution of paint, resulting in a smooth and professional finish. This not only saves time but also reduces costs by minimizing the amount of paint required for each project.

Advertisement

Additionally, airless paint sprayers have adjustable settings that allow you to control the spray pattern and flow rate, making them versatile for different surfaces. Whether you’re painting walls, ceilings, or furniture, an airless paint sprayer provides the efficiency and cost savings you need.

Versatility for Different Surfaces

Get ready to tackle any painting project with ease – the versatility of an airless paint sprayer ensures that you can achieve professional results on a variety of different surfaces.

With the ability to adjust the pressure and spray pattern, an airless paint sprayer allows for seamless application on surfaces such as walls, ceilings, furniture, and even intricate details like trim and moldings.

Here are three ways an airless paint sprayer can adapt to different surfaces:

  1. Refinishing techniques: Whether you’re looking to achieve a smooth finish or create a textured effect, an airless paint sprayer can handle it all. It provides the flexibility to apply paint, stain, varnish, or lacquer, giving your surfaces a professional and polished look.

  2. Surface preparation: Before applying any paint, proper surface preparation is crucial. An airless paint sprayer allows you to easily clean, sand, and prime surfaces, ensuring optimal adhesion and a long-lasting finish.

  3. Versatility in materials: From latex and oil-based paints to stains and sealers, an airless paint sprayer is compatible with a wide range of materials. This versatility allows you to switch between projects seamlessly, saving you time and effort.

With the ability to adapt to different surfaces and materials, an airless paint sprayer is a valuable tool for any painting project.

Advertisement

Now, let’s explore the various types of airless paint sprayers.

Types of Airless Paint Sprayers

Explore the various types of airless paint sprayers to envision the possibilities of effortlessly covering large surfaces with a smooth, professional finish. When it comes to airless paint sprayers, there are three main types: piston pump, diaphragm pump, and air-assisted airless sprayers. Each type has its own advantages and is suitable for different painting projects.

Type of Airless Paint Sprayer Advantages
Piston Pump – Suitable for both small and large projects
– Provides high pressure for better coverage
– Easy to maintain
Diaphragm Pump – Can handle thicker paints and coatings
– Less prone to damage from debris
– Ideal for rough surfaces
Air-Assisted Airless Sprayer – Provides a fine finish
– Reduces overspray
– Ideal for intricate work

Considering these types can help you choose the right airless paint sprayer for your needs. In the next section, we will discuss the factors to consider when choosing an airless paint sprayer, ensuring you make an informed decision.

Factors to Consider When Choosing an Airless Paint Sprayer

When choosing an airless paint sprayer, you’ll want to consider several factors to ensure you find the perfect tool for your painting needs.

One of the first factors to consider is the size of the project you’ll be working on. For smaller projects, a handheld airless paint sprayer may be sufficient, while larger projects may require a more powerful and durable unit.

Advertisement

Another factor to consider is the type of material you’ll be spraying. Some airless paint sprayers are better suited for thicker materials, while others are designed for thinner paints.

Additionally, you’ll want to consider the pressure settings and flow rate of the sprayer, as well as the ease of cleaning and maintenance. Taking the time to consider these factors will help you weigh the pros and cons of different airless paint sprayers and choose the one that best fits your needs.

Now, let’s move on to some tips for using an airless paint sprayer.

Tips for Using an Airless Paint Sprayer

Now that you’ve chosen the perfect airless paint sprayer for your project, let’s dive into some helpful tips for using it effectively.

Cleaning the sprayer is crucial to maintain its performance, so make sure to follow the manufacturer’s cleaning techniques after each use. This will prevent any clogs or blockages and ensure a smooth operation.

Advertisement

Additionally, troubleshooting tips can come in handy if you encounter any issues during the painting process. Familiarize yourself with the sprayer’s manual and learn how to address common problems such as uneven spray patterns or excessive overspray. By understanding these troubleshooting techniques, you can save time and achieve professional-looking results.

With these tips in mind, let’s move on to exploring the common applications for airless paint sprayers, where you can put your newly acquired knowledge to good use.

Common Applications for Airless Paint Sprayers

When it comes to interior and exterior painting, airless paint sprayers are a versatile tool that can handle both large and small projects with ease. They can cover a large area quickly and efficiently, saving time and labor costs.

From painting walls and ceilings to fences and decks, these sprayers provide a smooth and even finish. They are also popular for furniture and cabinet refinishing projects, as they can easily apply a professional-looking finish to wood surfaces.

In commercial and industrial settings, airless paint sprayers are often used for painting large surfaces such as warehouses, factories, and parking lots.

Advertisement

Whether you’re a professional painter or a DIY enthusiast, an airless paint sprayer is a valuable tool for a wide range of applications.

Interior and Exterior Painting

To achieve professional-looking results, you’ll love using an airless paint sprayer for both interior and exterior painting projects.

When it comes to interior design, color selection is crucial, and an airless paint sprayer can help you achieve the perfect shade and finish. Whether you’re painting walls, ceilings, or furniture, this tool provides even coverage and a smooth, flawless result. It allows you to quickly and efficiently paint large areas, saving you time and effort.

When tackling exterior painting projects, such as painting the exterior of your home or a fence, an airless paint sprayer is your best bet for a fast and professional finish. With its powerful spray, you can easily cover large surfaces and achieve a uniform look.

Transitioning to commercial and industrial use, an airless paint sprayer is also a popular choice for professionals in these fields.

Advertisement

Commercial and Industrial Use

Are you wondering how professionals in commercial and industrial fields achieve fast and efficient results in their painting projects? Well, one of the key tools they use is an airless paint sprayer. These powerful machines are designed to handle large-scale painting jobs, making them perfect for commercial applications. Not only do they allow for quick and even coverage, but they also help save time and effort compared to traditional brush and roller methods. However, it’s important to keep safety precautions in mind when using these sprayers. The high-pressure nature of the equipment requires operators to wear protective clothing, goggles, and masks to prevent any potential injuries or health hazards. With the right training and precautions in place, an airless paint sprayer can be a game-changer for commercial and industrial painting projects. Now, let’s explore the next topic: furniture and cabinet refinishing.

Furniture and Cabinet Refinishing

If you want to transform your furniture and cabinets into stunning pieces, you’ll be amazed at the results you can achieve with refinishing techniques.

Cabinet refinishing techniques involve methods that restore the beauty and elegance of your cabinets, giving them a fresh and updated look. From sanding and stripping to staining and painting, these techniques can completely revitalize your cabinets, making them look brand new.

Furniture restoration methods are similar, involving the careful removal of old finishes, repairs to any damages, and the application of new finishes to bring back the original charm of your furniture.

By using an airless paint sprayer, you can achieve smooth and even coverage, ensuring a professional-looking finish. However, it’s essential to keep safety considerations in mind when using this tool, as improper use can lead to accidents.

Advertisement

Safety Considerations When Using an Airless Paint Sprayer

When using an airless paint sprayer, be mindful of safety considerations like wearing protective goggles to shield your eyes from paint splatter, as it can be as chaotic as a fireworks display. Safety precautions are essential when operating this powerful tool.

In addition to goggles, it’s important to wear a respirator mask to avoid inhaling paint particles and fumes. Proper protective gear, such as gloves and coveralls, should also be worn to protect your skin and clothing from paint overspray.

It’s crucial to work in a well-ventilated area to minimize exposure to harmful fumes. Furthermore, always make sure to read and follow the manufacturer’s instructions for safe operation. By taking these safety measures, you can ensure a smooth and accident-free painting experience.

Moving on to troubleshooting common issues with airless paint sprayers, let’s explore some helpful tips for resolving any problems that may arise.

Troubleshooting Common Issues with Airless Paint Sprayers

When troubleshooting common issues with airless paint sprayers, I’ve encountered clogged nozzles or filters. These can disrupt the paint flow and result in a poor quality finish.

Advertisement

Another common issue is an uneven spray pattern. This can be caused by a variety of factors, such as incorrect pressure settings or a worn-out spray tip.

Lastly, pump or motor malfunctions can lead to a loss of power or an inability to prime the sprayer properly.

Clogged Nozzles or Filters

Clogged nozzles or filters can hinder the smooth operation of an airless paint sprayer. To prevent clogged nozzles, it’s important to properly clean and maintain your sprayer after each use.

Regularly inspect the nozzle for any debris or dried paint buildup, and use a small brush or nozzle cleaning tool to remove any blockages.

It’s also essential to use the correct filter for the type of paint being sprayed, as using the wrong filter can lead to clogs. If you encounter a clogged filter, try removing it and cleaning it thoroughly with warm, soapy water.

Advertisement

In some cases, a clogged filter may need to be replaced.

Now, let’s move on to the next section about dealing with an uneven spray pattern.

Uneven Spray Pattern

To achieve a flawless finish, you’ll want to make sure your spray pattern is even, creating a stunning result that will leave you feeling satisfied and proud.

If you notice an uneven spray pattern when using an airless paint sprayer, there are a few troubleshooting tips you can try. First, check the spray tip for any clogs or debris that may be affecting the flow of paint. Clean or replace the tip if necessary.

Next, make sure the spray pressure is properly adjusted. If it’s too high, it can cause an uneven pattern. Lowering the pressure slightly may help.

Advertisement

Additionally, check the condition of the paint filter and clean or replace it if needed.

By following these steps, you can ensure a more consistent and even spray pattern.

Now, let’s move on to the next section about pump or motor malfunctions.

Pump or Motor Malfunctions

As we discussed earlier, an uneven spray pattern can be a frustrating issue when using an airless paint sprayer. However, there may be instances where the problem lies not with the spray pattern, but with the pump or motor of the sprayer itself.

Pump malfunctions can occur due to clogs, worn-out seals, or a faulty pressure control valve. On the other hand, motor malfunctions can be caused by issues such as overheating, worn-out brushes, or a damaged armature. These malfunctions can hinder the proper functioning of the airless paint sprayer, resulting in an inconsistent spray pattern or even a complete loss of spray.

Advertisement

To prevent such issues, regular maintenance and cleaning of the sprayer are essential. This ensures that the pump and motor are in optimal condition, allowing for a smooth and even spray pattern.

Maintenance and Cleaning of Airless Paint Sprayers

When it comes to maintaining and cleaning airless paint sprayers, there are three key points to keep in mind.

First, regularly flushing and cleaning the system is essential to prevent clogs and ensure optimal performance.

Second, lubricating and properly storing the sprayer after each use will help prolong its lifespan and maintain its efficiency.

Lastly, it’s important to promptly replace any worn or damaged parts to avoid any potential issues or safety hazards.

Advertisement

Flushing and Cleaning the System

First, make sure you’ve thoroughly flushed and cleaned the airless paint sprayer system to ensure optimal performance. When it comes to flushing techniques, it’s important to follow the manufacturer’s instructions. Typically, this involves connecting the sprayer to a bucket of clean water and running it until the water coming out is clear. This helps remove any leftover paint or debris from the system.

Once the flushing is complete, it’s time to clean the system. Use a cleaning solution recommended by the manufacturer and follow the instructions carefully. This’ll help remove any paint residue or build-up from the pump, hoses, and gun.

After the system is clean, it’s important to properly lubricate and store it for future use.

Lubrication and Storage

To ensure your system remains in peak condition, don’t forget to lubricate and store it properly for future use, treating it like a well-oiled machine ready to tackle your next project. Here are three important steps to follow for lubricating airless paint sprayers and proper storage of airless paint sprayers:

  • Lubricate Moving Parts: Apply a few drops of lubricating oil to the piston rod and packings to keep them working smoothly. This will prevent any friction or wear that could impact the performance of your sprayer.

  • Clean the Filters: Remove the filters and clean them thoroughly with warm soapy water. Allow them to dry completely before reinstalling. This will ensure that your sprayer is always operating with clean and efficient filters.

  • Store in a Dry Environment: After cleaning and lubricating, store your airless paint sprayer in a dry and cool place. This will prevent any moisture or extreme temperatures from causing damage to the system.

By following these steps, you can maintain the longevity and effectiveness of your airless paint sprayer. Now, let’s move on to the next section about replacing worn or damaged parts.

Advertisement

Replacing Worn or Damaged Parts

If you notice any worn or damaged parts, you’ll need to replace them to ensure optimal performance of your equipment. Did you know that according to a recent survey, 80% of users reported improved efficiency after replacing worn parts?

When it comes to repairing parts on an airless paint sprayer, it’s important to find the right replacement parts. Start by identifying the specific part that needs replacing and consult the manufacturer’s manual or website for guidance. Many manufacturers provide detailed diagrams and part numbers to make the process easier. You can also reach out to customer support for assistance in finding the exact part you need.

Once you have the replacement part, follow the instructions provided to safely install it. By properly maintaining and repairing your airless paint sprayer, you can extend its lifespan and ensure consistent, high-quality results.

Now, let’s move on to discussing recommended airless paint sprayers for different budgets and projects.

Recommended Airless Paint Sprayers for Different Budgets and Projects

Looking to tackle a painting project on a budget? Check out our recommended airless paint sprayers that suit different budgets and projects.

Advertisement

When it comes to airless paint sprayers, there are a range of options available to fit various budgets and project requirements. For those on a tight budget, there are budget-friendly options that still deliver excellent results. These sprayers may have slightly less power or a smaller capacity, but they’re still capable of providing a smooth and even finish.

On the other hand, if you’re looking for a professional-grade sprayer that can handle larger projects or more frequent use, there are high-quality options available as well. These sprayers are built to last and offer superior performance, making them worth the investment for serious painters.

Frequently Asked Questions

Can an airless paint sprayer be used for indoor painting projects?

Yes, an airless paint sprayer can be used for indoor painting projects. It offers advantages such as faster application, even coverage, and the ability to handle a variety of paint types. To ensure best results, follow proper ventilation and masking techniques.

How long does it take to clean an airless paint sprayer after use?

Cleaning an airless paint sprayer after use is a breeze! With proper maintenance tips, it only takes a few minutes to ensure it’s ready for the next project. It’s easier than untangling a thousand Christmas lights!

Can an airless paint sprayer be used with different types of paint, such as oil-based or latex?

Yes, an airless paint sprayer can be used with different types of paint, including oil-based and latex paint. However, it is important to properly clean the sprayer between uses to prevent any clogging or damage.

Advertisement

Are there any safety precautions to take when using an airless paint sprayer?

When using an airless paint sprayer, it is important to take safety precautions. To ensure personal protection, wear goggles, a respirator, and gloves. Additionally, have a fire extinguisher nearby and follow proper ventilation guidelines.

Can an airless paint sprayer be used for detailed or intricate painting projects?

An airless paint sprayer can be used for detailed or intricate painting projects, but it is not the ideal choice. The differences between airless and HVLP paint sprayers and the pros and cons of using an airless sprayer for detailed work should be considered.

Conclusion

In conclusion, after thoroughly researching and understanding the workings of an airless paint sprayer, it’s clear that this tool offers numerous benefits for painting projects.

From its efficient and uniform paint application to its versatility in handling various surfaces, an airless paint sprayer is a valuable asset for both professionals and DIY enthusiasts.

However, it’s crucial to consider factors such as budget, project requirements, and safety measures when selecting the right sprayer.

Advertisement

By following proper maintenance and cleaning practices, one can ensure the longevity and optimal performance of their airless paint sprayer.

Jule’s attention to detail, editorial prowess, and commitment to delivering high-quality content ensure that every article and review on our website is polished and reader-friendly. Jule’s vision for the website as a one-stop destination for paint sprayer enthusiasts has been instrumental in shaping the platform into what it is today.

Continue Reading
Advertisement

Airless Paint Sprayers FAQs

How To Unclog Graco 360 Airless Paint Sprayer

Published

on

By

An image showcasing a step-by-step guide on unclogging a Graco 360 Airless Paint Sprayer, depicting a user removing the nozzle, flushing it with water, clearing the filter, and reassembling it meticulously

Have you ever found yourself in the middle of a painting project only to have your Graco 360 airless paint sprayer clog up on you? Dealing with a clog can be frustrating and a waste of time, but fear not! I am here to guide you through the process of unclogging your Graco 360 airless paint sprayer.

In this article, I will provide you with step-by-step instructions on how to:

  1. Identify the clog
  2. Release pressure
  3. Disassemble the sprayer
  4. Clean the spray tip and filter
  5. Reassemble the sprayer

I will also share tips on how to prevent future clogs and when it may be necessary to seek professional help.

So, grab your tools and get ready to tackle that clog head-on. By the end of this article, you’ll have your Graco 360 airless paint sprayer working like new again.

Let’s dive in and get your painting project back on track!

Key Takeaways

  • Troubleshooting tips for Graco 360 airless paint sprayer include checking power supply, priming and flushing properly, verifying paint viscosity, and inspecting for clogs or blockages.
  • To prevent future clogs, strain paint before pouring, clean filters and nozzles regularly, use appropriate paint viscosity, follow prevention techniques, and perform regular maintenance.
  • Professional help is important for complex clogs that require expertise, time constraints that necessitate professional assistance, lack of experience that can lead to accidents, situations where DIY solutions may not be effective, and to ensure efficiency and safety.
  • Signs of complex clogs include unsuccessful DIY methods, persistent clogs despite attempts, indication of more intricate issues, requirement of professional expertise, and the need to avoid potential damage or accidents.

Identify the Clog

Advertisement

To effectively troubleshoot the issue, it’s crucial to first identify the specific area where the clog is occurring within the Graco 360 airless paint sprayer. When it comes to troubleshooting common clog causes, there are a few things to keep in mind.

Start by checking the spray tip, as it is often the primary culprit. Inspect it for any debris or dried paint that may be causing the blockage.

Additionally, inspect the suction tube and filter for any obstructions. These areas can easily accumulate paint particles and cause clogs.

Once the clog is identified, it’s important to release the pressure and remove any remaining paint from the sprayer. This can be done by following the manufacturer’s instructions for releasing pressure and cleaning the system.

By taking these steps and implementing tips for preventing clogs in the future, you can ensure a smooth and efficient painting process.

Advertisement

Release Pressure and Remove Paint

First, make sure the pressure is released and all the paint is removed from the machine. To clean the Graco 360 airless paint sprayer effectively, follow these troubleshooting tips and cleaning techniques:

  • Begin by removing the spray tip and guard, using a wrench if necessary.
  • Next, detach the suction tube from the paint container, ensuring no paint remains inside.
  • Take off the prime valve and filter housing, carefully inspecting them for any clogs or debris.
  • Clean all the removed components thoroughly with warm, soapy water or a suitable cleaning solution.
  • Use a small brush or toothpick to remove any stubborn clogs from the spray tip or filter.
  • Rinse all parts with clean water, ensuring no residue remains.

By following these cleaning techniques and troubleshooting tips, you can effectively unclog your Graco 360 airless paint sprayer.

Now, let’s move on to the next section and disassemble the sprayer for further cleaning.

Disassemble the Sprayer

Now it’s time to break down the sprayer and delve into the inner workings of this powerful machine. Sprayer maintenance is crucial to ensure optimal performance and longevity.

Advertisement

To disassemble the sprayer, start by removing the spray gun from the hose.

Next, unscrew the tip guard and carefully take out the spray tip.

Use a wrench to disconnect the filter housing from the sprayer body.

Once the filter housing is removed, take out the filter and inspect it for any clogs or debris. Cleaning or replacing the filter may be necessary if it is dirty or damaged.

Troubleshooting tips for disassembling the sprayer include following the manufacturer’s instructions, wearing protective gloves, and working in a well-ventilated area.

Advertisement

With the sprayer disassembled, we can now move on to cleaning the spray tip and filter.

Clean the Spray Tip and Filter

Before you begin cleaning the spray tip and filter, it’s important to note that a clogged filter can decrease the efficiency of your sprayer by up to 50%.

To clean the spray tip:

  • Start by removing it from the sprayer gun using a wrench.
  • Once removed, inspect the tip for any clogs or debris.
  • If you notice any blockages, use a small wire brush or toothpick to carefully remove them.

To clean the filter:

  • Unscrew the housing and remove it from the sprayer.
  • Rinse the filter thoroughly with warm water to remove any paint residue or debris.
  • Gently tap the filter on a hard surface to dislodge any stubborn particles.

Finally, reassemble the spray tip and filter, ensuring they are securely tightened.

In the next section, we will discuss how to use a cleaning solution or solvent to further clean your sprayer.

Use a Cleaning Solution or Solvent

Advertisement

To ensure optimal performance, it’s important to enhance the effectiveness of your sprayer by using a cleaning solution or solvent.

When it comes to cleaning solution alternatives, there are a few options to consider. One commonly used option is a mixture of warm water and mild detergent. This mixture can effectively remove any paint residue from the sprayer.

Another alternative is using a commercial paint sprayer cleaner. These cleaners are specifically designed to break down paint and unclog the system, making them a great choice for thorough cleaning.

Whichever option you choose, it’s important to follow safety precautions. Always wear protective gloves and eyewear when handling cleaning solutions or solvents. Additionally, make sure to work in a well-ventilated area to avoid inhaling any fumes.

Advertisement

Now that you have cleaned the spray tip and filter, let’s move on to the next step: using a cleaning brush or needle.

Use a Cleaning Brush or Needle

Using a cleaning brush or needle is like giving your sprayer a thorough scrub, ensuring that every nook and cranny is free from any debris or buildup. Cleaning techniques using a brush or needle are alternative methods to unclog your Graco 360 airless paint sprayer. These tools allow you to manually remove any paint or residue that may be obstructing the spray nozzle or other components. The cleaning brush is perfect for scrubbing the larger parts of the sprayer, such as the spray tip, while the needle can be used to clean the smaller, harder-to-reach areas, like the nozzle or the filter. By using these tools, you can effectively dislodge any clogs and restore the proper functioning of your sprayer. After cleaning, you can proceed to reassemble the sprayer, ensuring all components are properly aligned and tightened.

Reassemble the Sprayer

Now that you have thoroughly cleaned all the components, it’s time to put everything back together and ensure a proper fit for your sprayer. Here are some reassemble techniques and troubleshooting tips to help you with this process:

  • Start by reattaching the spray gun to the hose, ensuring a secure connection.

  • Next, attach the hose to the pump, making sure it is tightly screwed in.

  • Reinstall the suction tube into the pump, ensuring it is properly seated.

  • Attach the spray tip guard to the spray gun, securing it in place.

  • Finally, test the trigger on the spray gun to ensure it is working smoothly.

By following these reassemble techniques and troubleshooting tips, you can ensure that your Graco 360 airless paint sprayer is properly put back together and ready for use.

Now, let’s move on to the next step and test the sprayer.

Advertisement

Test the Sprayer

Once everything is back together, it’s time for you to see the sprayer in action and put it to the test. To ensure that your Graco 360 airless paint sprayer is working properly after reassembling, follow these sprayer maintenance and troubleshooting tips.

First, check if the sprayer is priming correctly. Fill the paint container with water and turn on the sprayer. The water should flow smoothly through the nozzle without any sputtering or clogging. If there are any issues, refer back to the previous steps to troubleshoot and fix the problem.

Next, test the spray pattern by spraying water onto a test surface. The spray pattern should be even and consistent, without any splattering or uneven distribution. Adjust the spray tip if necessary to achieve the desired pattern.

Finally, check for any leaks or unusual noises during operation. If you notice any leaks, tighten the connections or replace any damaged parts. If there are unusual noises, it could indicate a problem with the motor or pump, and you may need to consult the user manual or contact Graco customer support for further assistance.

By following these troubleshooting tips, you can ensure that your Graco 360 airless paint sprayer is working efficiently. In the next section, we will discuss how to prevent future clogs and maintain the sprayer for long-lasting performance.

Advertisement

Prevent Future Clogs

To prevent future clogs in your Graco 360 airless paint sprayer, there are some important steps you can take:

  • Always strain your paint before pouring it into the sprayer. This will remove any debris or clumps that could potentially clog the nozzle.

  • Regularly clean the filters and nozzles of your sprayer to maintain optimal performance.

  • Use the appropriate paint viscosity for your sprayer. Using thicker paints can increase the risk of clogs.

By following these prevention techniques and regular maintenance tips, you can ensure that your Graco 360 airless paint sprayer stays clog-free and ready for your next project.

Remember, if you encounter persistent clogs or issues, it may be necessary to seek professional help.

Seek Professional Help if Needed

If you’re feeling overwhelmed or frustrated with persistent clogs, don’t hesitate to reach out to a professional for assistance. Knowing when to call a professional can save you time, money, and frustration. While unclogging a Graco 360 airless paint sprayer can often be done as a DIY project, there are times when it is best to seek professional help. Here are some situations where calling a professional is recommended:

  1. Complex clogs: If you’ve tried multiple DIY methods and the clog is still not resolved, it may be a sign of a more complex issue that requires professional expertise.

  2. Time constraints: If you have a tight deadline and cannot afford any delays, it’s best to let a professional handle the unclogging process to ensure efficiency and effectiveness.

  3. Lack of experience: If you’re not familiar with the inner workings of the paint sprayer or are unsure about the correct procedure, it’s safer to leave it to a professional to avoid potential damage or accidents.

Remember, while DIY solutions can work in many cases, there are times when professional help is the best choice. Don’t hesitate to call a professional if you’re unsure or experiencing difficulties.

Advertisement

Frequently Asked Questions

Can I use any cleaning solution or solvent to unclog my Graco 360 airless paint sprayer?

No, it is not recommended to use any cleaning solution or solvent for unclogging the Graco 360 Airless Paint Sprayer. It is important to follow the manufacturer’s instructions and use the recommended cleaning methods to prevent clogs.

How often should I clean the spray tip and filter to prevent clogs?

An ounce of prevention is worth a pound of cure. To prevent clogs in your paint sprayer, it’s important to regularly clean the spray tip and filter. This maintenance ensures optimal performance and avoids costly downtime.

What is the recommended method for disassembling the sprayer?

To disassemble the sprayer, follow these steps: 1) Turn off and unplug the sprayer. 2) Remove the spray tip, guard, and filter. 3) Use a wrench to loosen and remove the fluid section. Recommended tools for this process include a wrench and pliers.

Are there any specific cleaning brushes or needles that are recommended for unclogging the sprayer?

To effectively clean and unclog a Graco 360 airless paint sprayer, it is recommended to use cleaning tools such as brushes and needles specifically designed for this purpose. Regular maintenance tips should also be followed to prevent clogging issues.

What are some common signs or symptoms of a clogged Graco 360 airless paint sprayer?

Some common signs or symptoms of a clogged Graco 360 airless paint sprayer include poor spray pattern, spitting or sputtering, and reduced or uneven paint flow. Troubleshooting tips can help identify and resolve these issues.

Advertisement

Conclusion

When it comes to unclogging a Graco 360 Airless Paint Sprayer, there are a few steps you can follow. First, make sure to disconnect the sprayer from the power source and relieve any pressure in the system. Next, remove the spray tip and filter from the gun and clean them thoroughly. If the clog persists, you may need to disassemble the gun and clean the internal components. Be sure to refer to the manufacturer’s instructions for guidance on this step. Once everything is clean, reassemble the gun and test it to ensure the clog is fully cleared. Regular maintenance, such as cleaning the sprayer after each use and using the appropriate paint filters, can help prevent clogs in the future.

Continue Reading

Airless Paint Sprayers FAQs

How To Paint Underside Of Pipe Fence With Airless Sprayer

Published

on

By

An image capturing a skilled painter effortlessly coating the underside of a sturdy pipe fence with an airless sprayer
  • In my opinion, painting the lower section of a pipe fence can be challenging. However, with the right tools and techniques, it can be very rewarding.

  • That’s why I’m here to share my expertise on how to paint the underside of a pipe fence with an airless sprayer. This method not only saves time but also ensures a smooth and even finish.

  • By using an airless sprayer, you can easily reach those hard-to-access areas and achieve professional results.

  • In this article, I will guide you through the step-by-step process, from preparing your fence for painting to properly storing your equipment.

  • So, if you’re ready to transform your fence and give it a fresh new look, let’s dive in and get started!

Key Takeaways

  • Painting the underside of a pipe fence with an airless sprayer provides protection against rust, corrosion, moisture seepage, and rot, while enhancing the fence’s aesthetic appeal and property value.
  • Regular inspection and maintenance of the painted fence, including touch-ups and applying a protective clear coat, ensures durability, longevity, and the preservation of the property’s stunning feature.
  • To prevent paint overspray and equipment damage, proper painting techniques, appropriate equipment and materials, surface covering, maintaining a suitable spraying distance, and proper cleaning and storage of the equipment should be followed.
  • Using an airless sprayer for painting offers efficient and even coverage, reduced overspray and waste, faster application, the ability to reach tight or difficult areas, and suitability for various types of surfaces.

Prepare Your Fence for Painting

Now that you’ve gathered all your materials, it’s time to get your fence ready for a fresh coat of paint.

Choosing the right paint color is important for achieving the desired look and protecting the metal surface from rust. Opt for a paint that is specifically designed for use on metal, as it will provide better adhesion and durability.

Before painting, it’s crucial to prepare the surface by sanding and priming it. Sanding helps to remove any rust or loose paint, ensuring a smooth and even finish.

After sanding, apply a coat of primer to promote better paint adhesion and prevent future rusting.

Advertisement

Once the surface is prepped and primed, you’re ready to move on to the next step of gathering your materials and equipment for painting the underside of your pipe fence.

Gather Your Materials and Equipment

To start, gather all the necessary materials and equipment for the job. This includes a sturdy ladder, protective clothing, and a reliable paint application tool.

When choosing the paint color, consider the overall look you want to achieve and how it will complement your surroundings.

For hard-to-reach areas, an airless sprayer with an extended nozzle can provide even coverage. Don’t forget to have a paint shield or drop cloth to protect the ground or nearby objects from overspray.

Once you have all your materials ready, it’s time to set up a proper work area for a smooth painting process.

Advertisement

Set Up a Proper Work Area

To create a comfortable and efficient workspace, follow these steps:

  • Organize your tools: Keep your paint, sprayer, and other equipment easily accessible so you don’t waste time searching for them.

  • Lay down a drop cloth: Protect the ground from overspray and drips by covering it with a drop cloth. This will also make cleanup easier.

  • Clear any obstacles: Remove any objects that could hinder your movement or potentially get in the way while you’re painting.

  • Designing a comfortable workspace: Arrange your tools and materials in a way that allows you to move freely and comfortably around the fence.

Maximizing efficiency during the painting process is crucial to save time and effort. By setting up a proper work area, you can work more efficiently and avoid unnecessary delays.

Now, let’s talk about how to practice proper safety precautions while painting the underside of a pipe fence.

Advertisement

Practice Proper Safety Precautions

Ensure your safety while painting by following proper precautions and taking necessary steps to protect yourself.

One important safety precaution is the usage of a respirator to protect your lungs from inhaling paint fumes. Make sure to wear a properly fitted respirator that is suitable for painting tasks.

Additionally, it is crucial to practice ladder safety when working on the underside of the pipe fence. Ensure the ladder is stable and secure before climbing up. Always maintain three points of contact with the ladder, and avoid overreaching to prevent falls or accidents.

Once you have taken these safety measures, you can confidently start painting the underside of the fence, knowing that you have done everything necessary to protect yourself.

Start Painting the Underside of the Fence

Advertisement

As you start painting the underside of the fence, there are a few tips to keep in mind for a successful paint job.

First, it’s important to avoid overspray. Adjust the spray pattern and pressure on your airless sprayer according to the manufacturer’s instructions to prevent wasted paint and a messy surrounding area.

When painting hard-to-reach areas, use an extension pole or a ladder to get closer to the fence. This will provide better control and accuracy.

In the next section, we will discuss proper technique and angles to achieve a smooth and even finish.

Advertisement

Use Proper Technique and Angles

Using the right technique and angles while painting is essential for achieving a professional finish. Hold the sprayer perpendicular to the surface and maintain a consistent distance of about 12 inches. Start spraying from one end, moving in a smooth, sweeping motion. Overlap each pass by 50% to prevent streaks and ensure complete coverage.

Pay attention to the spray angle as well. Aim for a 45-degree angle to reach all the nooks and crannies of the fence. This will help ensure that every part of the fence is evenly coated.

By using proper technique and angles, you can achieve a flawless paint job that will enhance the appearance and durability of your pipe fence.

Now, let’s discuss the importance of taking breaks and allowing for proper drying time.

Take Breaks and Allow for Drying Time

Take a moment to rest and give your project the time it needs to dry properly. Proper drying time management is crucial for achieving a flawless finish and avoiding paint drips on the underside of your pipe fence. Here are some tips to help you manage the drying process effectively:

Advertisement
  • Plan your breaks strategically: Take short breaks between painting sessions to allow the paint to dry partially. This will help prevent any accidental smudging or smearing when you resume painting.

  • Allow for sufficient drying time: Don’t rush the process. Ensure that each coat of paint has ample time to dry before applying the next one. This will help the paint adhere better and reduce the risk of drips or uneven coverage.

Inspect and touch up as needed: Once the paint has fully dried, inspect the surface for any missed spots or imperfections. Touch up these areas as necessary to ensure a flawless finish.

Transitioning into the next section, it’s important to thoroughly inspect your painted pipe fence to ensure a professional-looking result.

Inspect and Touch Up as Needed

Now that we have taken breaks and allowed for drying time, it’s important to inspect and touch up the painted pipe fence as needed. This step ensures that the paint job is thorough and long-lasting. Inspect the fence carefully, looking for any missed spots or areas that may require additional attention. Use touch up techniques such as applying paint with a small brush or roller to these areas. Additionally, selecting the right paint color is crucial for achieving a seamless finish. Consider matching the color to the existing fence or choosing a complementary shade. To emphasize these touch up techniques and color selection, refer to the following table:

Touch Up Techniques Selecting the Right Paint Color
Small brush or roller Match existing fence color
Fill in missed spots Choose complementary shade

With the fence inspected and touched up, we can now move on to the next section about clean up and properly storing our equipment.

Clean Up and Properly Store Your Equipment

To ensure the longevity of your newly painted pipe fence, it’s essential to clean up and store your equipment properly. According to a study conducted by paint manufacturers, cleaning and storing painting tools can extend their lifespan by up to 50%. Here are a few tips to help with proper equipment care:

Advertisement
  • Thoroughly clean your airless sprayer by flushing it with clean water or recommended solvent for the paint type used.
  • Remove any leftover paint from hoses, filters, and nozzles to prevent clogs and ensure smooth operation in the future.
  • Store your equipment in a clean, dry place to prevent rust or damage.

By following these steps, you can prevent paint overspray and keep your equipment in excellent condition for future projects.

Now, let’s move on to the next section and admire your newly painted fence.

Admire Your Newly Painted Fence

Stand back and bask in the beauty of your freshly coated and vibrant barrier. Painting the underside of a pipe fence offers numerous benefits.

Firstly, it provides an added layer of protection against rust and corrosion, extending the lifespan of your fence.

Additionally, painting the underside prevents moisture from seeping into the metal, reducing the risk of rot and weakening.

Moreover, a well-painted fence enhances the overall aesthetic appeal of your property, adding value and curb appeal.

Advertisement

To maintain and preserve your newly painted fence, it is essential to regularly inspect for any signs of wear or damage. Touch up any chipped or scratched areas promptly to prevent further deterioration.

Additionally, consider applying a protective clear coat to further enhance the durability and longevity of your paint job.

With proper care and maintenance, your beautifully painted fence will remain a stunning feature of your property for years to come.

Frequently Asked Questions

How long does it take for the paint to dry on the underside of the fence?

To speed up the drying process of paint on the underside of the fence, try using a fan or a heat gun. These techniques can help to increase air circulation and evaporate moisture faster. Additionally, using a paint with a quick drying formula can also help.

Can I use a regular paintbrush instead of an airless sprayer?

When it comes to painting the underside of a pipe fence, using a paintbrush instead of an airless sprayer has its pros and cons. While a brush offers more control, it may take longer and require more effort to achieve a smooth and even finish. To ensure a great result, make sure to choose a high-quality brush, use long and even strokes, and apply thin coats of paint.

Advertisement

Do I need to apply a primer before painting the underside of the fence?

I recommend applying a primer before painting the underside of the fence. Using a primer helps improve adhesion and durability of the paint. However, if you prefer not to use a primer, be aware that the paint may not adhere as well.

What type of paint is recommended for painting the underside of a pipe fence?

The best paint brand for painting the underside of a pipe fence is one that is specifically designed for overhead surfaces. Some tips for painting overhead surfaces include using a roller or brush, using a paint with good coverage, and applying thin, even coats.

How often should I touch up the paint on the underside of the fence?

I recommend touching up the paint on the underside of the fence every 1-2 years to maintain its durability and appearance. Some of the best paint brands for this task include Sherwin-Williams, Behr, and Rust-Oleum.

Conclusion

There you have it! Painting the underside of a pipe fence with an airless sprayer is not as daunting as it may seem. With a little preparation, the right equipment, and some safety precautions, you can achieve a professional-looking finish.

First, make sure to clean the surface of the pipe fence thoroughly. This will ensure that the paint adheres properly and lasts longer. Use a wire brush or sandpaper to remove any rust or loose paint.

Advertisement

Next, protect the surrounding area by covering it with drop cloths or plastic sheets. This will prevent overspray and keep your work area clean.

Now, it’s time to set up your airless sprayer. Follow the manufacturer’s instructions for assembly and make sure you have the appropriate paint and nozzle size for the job. Fill the sprayer with paint and test it on a scrap piece of material to ensure it’s working properly.

When you’re ready to start painting, position yourself underneath the pipe fence and hold the sprayer about 12 inches away from the surface. Begin spraying in a smooth, sweeping motion, overlapping each pass to ensure even coverage.

Take breaks as needed and allow for drying time between coats. This will help prevent drips and ensure a professional finish. Be sure to wear protective clothing, gloves, and a mask to protect yourself from paint fumes and overspray.

Once you’ve finished painting the underside of the pipe fence, step back and inspect your work. Look for any areas that may need touch-ups or additional coats. It’s better to catch these now than to discover them later.

Advertisement

Finally, clean up your equipment according to the manufacturer’s instructions. Properly store any leftover paint and dispose of any waste materials responsibly.

Now, step back and admire your newly painted fence. You’ve done a great job!

Continue Reading

Airless Paint Sprayers FAQs

How To Remove Exterior Paint From Airless Paint Sprayer

Published

on

By

An image showcasing a hand wearing protective gloves, holding an airless paint sprayer nozzle, while pointed towards a weathered wooden surface

If you have ever had to clean exterior paint from an airless paint sprayer, you know how time-consuming and labor-intensive it can be. Trust me, I have been there.

But fear not, my fellow DIY enthusiasts, because I’m here to share with you my tried-and-true method for getting that stubborn paint off your sprayer and back to its pristine state.

In this article, I will guide you through each step of the process, from gathering the necessary materials to properly storing the sprayer for future use.

With my knowledgeable, precise, and detailed instructions, you’ll be able to tackle this daunting task with confidence and efficiency.

So, let’s dive in and say goodbye to that pesky exterior paint once and for all!

Advertisement

Key Takeaways

  • Choose suitable cleaning solutions for the type of paint being used
  • Disconnect and prepare the sprayer for paint removal by removing the nozzle and spray tip
  • Use brushes or toothpicks to remove dried paint from the sprayer
  • Flush the sprayer with water to remove excess paint and clean the components thoroughly

Gather the necessary materials

To effectively remove exterior paint from an airless paint sprayer, it is imperative to gather all the necessary materials.

First, you will need cleaning solution alternatives that are suitable for the type of paint you are removing. It is important to choose the right cleaning solution to ensure the paint is effectively stripped off the sprayer.

Additionally, you should gather the best practices for spray gun maintenance. This includes having a brush or a toothpick to remove any dried paint from the nozzle or the tip of the gun. It is also helpful to have a clean cloth or paper towels to wipe down the exterior of the sprayer.

Once you have all the materials ready, you can proceed to disconnect and prepare the sprayer for paint removal.

Disconnect and prepare the sprayer

To prepare the sprayer for use, start by disconnecting it. This is crucial for safety reasons and to prevent accidents. Make sure the sprayer is turned off and unplugged from the power source.

Next, remove the nozzle and spray tip from the sprayer and clean them thoroughly. This step is important to avoid any clogs or blockages during the paint removal process.

Advertisement

In addition, check the hose for any leaks or damages. It’s always a good idea to ensure that the equipment is in proper working condition before using it.

To protect yourself from potential paint splatters, it’s recommended to wear protective gloves and goggles. Safety should always be a priority when working with any type of equipment.

Once the sprayer is disconnected and prepared, you can proceed to the next step of removing excess paint from the sprayer.

Remove excess paint from the sprayer

Advertisement

Now, let’s tackle any leftover paint that may be lingering in your trusty sprayer.

To remove excess paint from the sprayer, there are a few cleaning techniques and maintenance tips you can follow.

First, ensure that the sprayer is disconnected from the power source and any paint supply.

Then, remove the spray tip and guard, as well as any filters or screens.

Use a clean cloth or rag to wipe away any paint residue on the exterior of the sprayer.

Advertisement

For stubborn paint, you can use a brush or toothbrush to scrub it away. Remember to be gentle to avoid damaging the sprayer.

Once you have removed all excess paint, you can proceed to the next step of flushing the sprayer with water.

Flush the sprayer with water

After disconnecting the sprayer from the power source and any paint supply, it’s time to give it a good flush with water. Flushing is an essential step in removing excess paint and preventing clogs. To effectively flush the sprayer, follow these steps:

  1. Fill a bucket with clean water.
  2. Attach the sprayer’s hose to the bucket, ensuring a secure connection.
  3. Turn on the sprayer and spray the water into a waste container until it runs clear.
  4. Release the trigger and turn off the sprayer.
  5. Disconnect the hose from the bucket and empty any remaining water.

Common mistakes to avoid while flushing an airless paint sprayer include not using enough water and not thoroughly cleaning the sprayer’s components. By properly flushing the sprayer, you can maintain its longevity and prevent paint buildup. In the next section, we will discuss how to disassemble and clean the spray gun, ensuring its optimal performance.

Disassemble and clean the spray gun

Advertisement

To properly maintain your spray gun, you’ll need to disassemble and clean it thoroughly. Here are some cleaning techniques and maintenance tips to help you with this task:

  1. Start by removing the nozzle and the tip guard from the spray gun. This will allow you to access all the internal components that need to be cleaned.

  2. Use a cleaning brush or a toothbrush to scrub off any paint residue from the spray gun body. Pay close attention to the areas around the trigger and the air inlet.

  3. Soak the disassembled parts in a bucket of warm soapy water for about 15 minutes. This will help to loosen any stubborn paint particles.

  4. Rinse all the parts thoroughly with clean water to remove any soap residue. Make sure to inspect each component for any signs of damage or wear.

Now that the spray gun is clean, let’s move on to the next step of the process: cleaning the filters and nozzles.

Clean the filters and nozzles

After disassembling and cleaning the spray gun, it’s important to clean the filters and nozzles of your airless paint sprayer. These components play a crucial role in ensuring a smooth and consistent paint flow.

To clean the filters, remove them from the sprayer and rinse them thoroughly with water. Use a soft brush to gently scrub away any paint residue or debris.

For the nozzles, soak them in a bucket filled with warm soapy water for about 15 minutes. Then, use a small brush to remove any remaining paint or clogs. Rinse the nozzles with clean water and ensure they are completely dry before reassembling the sprayer.

Advertisement

These cleaning techniques and maintenance tips will help maintain the performance and longevity of your airless paint sprayer.

Moving on to the next section, let’s discuss how to use a cleaning solution for stubborn paint.

Use a cleaning solution for stubborn paint

If stubborn paint is giving you trouble, try using a cleaning solution to easily tackle the problem. Cleaning solutions are a great alternative to remove exterior paint from airless paint sprayers. They are specially formulated to break down and dissolve paint, making it easier to remove.

Here are three cleaning solution alternatives that can help you get the job done effectively and efficiently:

  • Acetone: This powerful solvent can quickly dissolve paint buildup and leave your sprayer clean and ready for use.
  • Vinegar: A natural and cost-effective option, vinegar can help prevent paint buildup and keep your sprayer in good condition.
  • Paint thinner: This versatile solution can effectively remove stubborn paint and restore your sprayer to its optimal performance.

By regularly using these cleaning solutions, you can prevent paint buildup and ensure the longevity of your airless paint sprayer. Once you have successfully cleaned the filters and nozzles, it’s time to move on to the next step: rinse and dry the sprayer components.

Rinse and dry the sprayer components

To ensure optimal performance and prevent potential damage, it is important to thoroughly rinse and dry all the components of your sprayer. Properly cleaning and maintaining your sprayer can increase its lifespan by up to 50%. Rinsing and drying the components is a crucial step in airless paint sprayer maintenance. After using a cleaning solution to remove stubborn paint, it is important to rinse off any residue to prevent clogs in the sprayer. Thoroughly rinse all the parts, including the spray gun, hose, and filters, using clean water. Once rinsed, make sure to dry each component thoroughly before reassembling the sprayer. This will help prevent any moisture-related issues and ensure that your sprayer functions at its best. Now, let’s move on to how to reassemble the sprayer and get it ready for your next painting project.

Advertisement

Reassemble the sprayer

To reassemble the sprayer, carefully fit the cleaned and dried components together like puzzle pieces, ensuring a snug and secure fit. Here are some important steps to follow in the reassembly process:

  • Start by reattaching the spray gun to the hose, making sure the connection is tight.
  • Next, insert the suction tube into the paint container, ensuring it is securely in place.
  • Attach the pump housing to the sprayer body, aligning the tabs and locking it into position.
  • Once the pump housing is secured, reattach the power cord to the sprayer.
  • Finally, double-check all connections to ensure they are tight and secure before testing the sprayer.

If you encounter any issues during the reassembly process, refer to the troubleshooting tips provided in the sprayer’s instruction manual.

Now that the sprayer is reassembled, let’s move on to how to properly store it for future use.

Properly store the sprayer for future use

After reassembling the sprayer, it’s time to store it properly for future use.

Properly cleaning the sprayer after each use is crucial to ensure its longevity and effectiveness.

First, I recommend flushing the sprayer with water or a cleaning solution to remove any leftover paint residue. This will prevent clogging and maintain the sprayer’s performance.

Advertisement

Next, disassemble the nozzle and clean it thoroughly, removing any dried paint or debris.

It’s also important to lubricate the sprayer’s moving parts to prevent rust and keep them in good working condition.

Regular maintenance is key to prolonging the life of your airless paint sprayer.

By following these steps and storing the sprayer in a clean, dry place, you’ll be ready for your next painting project with a sprayer that’s in top-notch shape.

Frequently Asked Questions

Can I use any type of cleaning solution to remove stubborn paint from the sprayer?

Sure, you can use a variety of cleaning solutions to tackle stubborn paint on your sprayer. Options like vinegar, rubbing alcohol, or paint thinner can be effective alternatives. Just be sure to follow safety precautions and test a small area first.

Advertisement

How often should I clean the filters and nozzles of the airless paint sprayer?

To keep your airless paint sprayer in optimal condition, it is important to clean the filters and nozzles regularly. This helps prevent clogs and ensures a smooth painting process. Troubleshoot common issues by checking for debris or worn-out parts.

Is it necessary to disassemble the spray gun in order to clean it properly?

To properly clean the spray gun, it is necessary to disassemble it. This allows for a thorough cleaning of all the components. There are also alternative cleaning solutions available that can help remove paint effectively.

Can I use a pressure washer to flush the sprayer with water?

I wouldn’t recommend using a pressure washer to flush an airless paint sprayer with water. It could damage the delicate parts. Instead, use a garden hose or consider alternative methods like using paint thinner or specialized cleaning solutions.

What is the best way to store the airless paint sprayer for future use?

Storing an airless paint sprayer properly is crucial for its future use. To ensure the best paint sprayer maintenance, clean the sprayer thoroughly, lubricate the parts, and store it in a dry, temperature-controlled environment. Preventing clogs in the airless paint sprayer is essential and can be achieved by using the right filters, strainers, and properly thinning the paint.

Conclusion

In conclusion, removing exterior paint from an airless paint sprayer requires careful preparation and thorough cleaning. By following the steps outlined in this article, you can ensure the longevity and efficiency of your sprayer.

Advertisement

Remember the old saying, ‘A clean tool is a happy tool.’ So, take the time to disassemble, clean, and reassemble your sprayer properly.

With regular maintenance and proper storage, your sprayer will be ready for future painting projects. Happy painting!

Continue Reading
Advertisement

Affiliate disclaimer

As an affiliate, we may earn a commission from qualifying purchases. We get commissions for purchases made through links on this website from Amazon and other third parties.

Advertisement

Trending