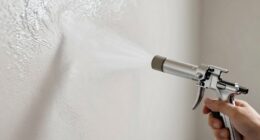
The thought of repainting a room can seem overwhelming, especially if you want a perfect finish. Have you ever felt annoyed by small pinholes appearing in your walls right after painting? Don’t worry! In this tutorial, I will show you how to prevent those pesky pinholes by using an airless paint sprayer.
Just like a skilled surgeon with a precision instrument, we will dive into the causes of pin holes and how to prevent them.
We will explore the importance of choosing the right paint, preparing the surface properly, and using the correct sprayer technique.
Adjusting the sprayer settings and applying multiple thin coats are also crucial steps in achieving a seamless finish.
So, grab your airless paint sprayer and let’s embark on this journey together. By the end, you will have all the knowledge and tools necessary to conquer those pin holes and create a flawless paint job.
Key Takeaways
- Practice and adjust settings to achieve desired coverage without pin holes
- Apply multiple thin coats with a narrow fan pattern and consistent distance from the surface
- Properly clean and maintain the sprayer to prevent clogs and equipment malfunction
- Work in a well-ventilated area, wear a mask, and choose a high filtration mask to protect against harmful fumes
Understanding the Causes of Pin Holes
To avoid those pesky pin holes, you need to understand what causes them. Pin holes occur when air becomes trapped in the paint film during application, resulting in small, raised bumps on the surface.
There are a few factors that contribute to the formation of pin holes. First, using a paint that has a high viscosity or thick consistency can make it difficult for air to escape, leading to trapped air pockets.
Second, inadequate surface preparation, such as failing to remove dirt, dust, or old paint, can create a barrier between the paint and the surface, causing air to be trapped.
Lastly, spraying at too high of a pressure can also contribute to the formation of pin holes.
By troubleshooting these causes of bubbles, you can minimize the occurrence of pin holes in your paint job.
Now let’s move on to the next section about choosing the right paint.
Choose the Right Paint
When it comes to choosing the right paint for your project, I always recommend using a high-quality paint. This ensures better coverage and a smoother finish, reducing the likelihood of pin holes.
Additionally, considering using a primer can provide an extra layer of protection and improve adhesion, helping to prevent pin holes from forming.
It’s important to invest in the right materials to achieve the best results and avoid any potential issues down the line.
Use a high-quality paint
Using a high-quality paint ensures a smoother application, reducing the risk of pin holes when using an airless paint sprayer. Not all paints are created equal, and using a low-quality paint may result in a less than desirable finish. High-quality paints are formulated with better ingredients that provide better coverage and adhesion. They also have a higher concentration of pigments, which means better color saturation. When using an airless paint sprayer, it’s important to choose a paint that is specifically designed for spray application. This type of paint has a thinner consistency, allowing it to flow smoothly through the sprayer without clogging or creating pin holes. Additionally, using proper paint application techniques, such as maintaining the correct distance from the surface and applying multiple thin coats, can also help prevent pin holes. Consider using a primer to further enhance the smoothness of the finish and improve paint adhesion.
Consider using a primer
For a smoother and more professional finish, you should definitely consider applying a primer before painting. Using a roller instead of a brush when applying the primer can help to achieve an even and seamless coat.
Additionally, experimenting with different primers can make a difference in the final outcome. Look for a primer that is specifically designed to fill in small imperfections and promote adhesion. It’s important to choose a primer that is compatible with the paint you will be using.
Applying the primer in thin, even coats will help to prevent pin holes from forming. By taking the time to properly prepare the surface and apply a primer, you can ensure a flawless finish for your paint job.
Transitioning into the next section about preparing the surface properly, it is crucial to remove any dirt or debris that may interfere with the paint application.
Prepare the Surface Properly
To properly prepare the surface, it’s important to follow these steps:
-
Thoroughly clean the surface using a mild detergent and water solution. Remove any dirt, grease, or loose particles. Allow it to dry completely before proceeding.
-
Sand the surface using fine-grit sandpaper. Move in a circular motion to smooth out any rough areas. Be thorough and pay attention to detail, ensuring that the entire surface is evenly sanded.
-
Once finished, gently wipe away any dust with a clean cloth.
With a properly prepared surface, you can now move on to the subsequent section about ‘use the correct sprayer technique’ to achieve a flawless paint job.
Use the Correct Sprayer Technique
After properly preparing the surface, it is crucial to use the correct sprayer technique to avoid any pin holes when using an airless paint sprayer. This involves not only using the sprayer correctly, but also ensuring its maintenance and troubleshooting techniques.
It is important to regularly clean and maintain the sprayer to prevent any clogs or blockages that could result in uneven paint application and potential pin holes.
Additionally, troubleshooting techniques such as adjusting the pressure, nozzle size, and spray pattern can help achieve a smooth and flawless finish.
By taking the time to properly maintain and troubleshoot the sprayer, you can minimize the risk of pin holes and achieve a professional-looking paint job.
Now, let’s move on to the next section where we will discuss how to adjust the sprayer settings for optimal results.
Adjust the Sprayer Settings
When adjusting the sprayer settings, it’s crucial to choose the right pressure for the paint. This ensures smooth and even coverage without any splattering or overspray.
Additionally, adjusting the nozzle size is important for achieving the desired coverage. A larger nozzle size is ideal for larger surfaces, while a smaller nozzle size is more suitable for detailed work.
Choose the right pressure for the paint
First things first, make sure you’ve got the right pressure for your paint when using an airless paint sprayer. Pressure control is crucial in achieving a smooth, even finish and avoiding pin holes. The paint viscosity plays a key role in determining the appropriate pressure setting.
Here are some tips to help you choose the right pressure for your paint:
- Consult the paint manufacturer’s guidelines or technical data sheet for recommended pressure ranges.
- Start with a lower pressure setting and gradually increase it until you achieve the desired atomization and coverage.
- Pay attention to the paint’s flow and texture while adjusting the pressure. If it appears too thick or thin, adjust accordingly.
By choosing the correct pressure, you ensure that the paint is properly atomized and applied without any pin holes.
Now, let’s move on to the next step of the process: adjusting the nozzle size for the desired coverage.
Adjust the nozzle size for the desired coverage
Now that we have discussed the importance of choosing the right pressure for the paint, let’s move on to the next step in avoiding pin holes with an airless paint sprayer.
It’s crucial to adjust the nozzle size for the desired coverage. This not only ensures a smooth and even finish but also prevents the occurrence of pin holes.
To achieve optimal results, it is essential to regularly maintain the nozzle. This includes cleaning it thoroughly after each use and inspecting for any clogs or damage.
Additionally, troubleshooting tips such as checking the paint viscosity and adjusting the spray pattern can help prevent pin holes.
By taking these measures, you can ensure that your paint sprayer performs at its best.
Now, let’s move on to the next section and discuss the importance of practicing on a test surface.
Practice on a Test Surface
To avoid pin holes with an airless paint sprayer, start by giving yourself some practice on a test surface.
Before diving into your actual project, it’s important to prepare a test surface that closely resembles the material you’ll be painting. This allows you to familiarize yourself with the sprayer’s settings and get a feel for the paint flow.
By practicing on a test surface, you’ll be able to adjust the nozzle size, pressure, and spray pattern to achieve the desired coverage without creating pin holes.
Additionally, practicing helps you identify any potential issues with the paint consistency or equipment malfunction before starting on your main project.
Once you feel confident with your technique, you can then apply multiple thin coats to ensure a smooth and flawless finish.
Apply Multiple Thin Coats
To achieve a flawless finish with an airless paint sprayer, it is important to apply multiple thin coats. This technique ensures even distribution of the paint and reduces the visibility of pin holes. Here are some tips to help you achieve the best results:
-
Start with a clean surface: Before applying the first coat, make sure to remove any dust, debris, or loose paint.
-
Adjust the spray pattern: Set the sprayer to a narrow fan pattern to avoid overspray and ensure precise application.
-
Maintain a consistent distance: Keep the sprayer approximately 12 inches away from the surface to achieve an even coat without creating puddles or drips.
-
Allow proper drying time: It is important to wait for each coat to dry completely before applying the next one. This helps to avoid smudging or unevenness.
By following these guidelines and applying multiple thin coats, you can achieve a professional-looking finish while minimizing the appearance of pin holes and overspray. Now, let’s move on to discussing how to properly clean and maintain your airless paint sprayer to ensure its optimal performance.
Maintain a Clean Sprayer
Keep your sprayer in tip-top shape by ensuring it stays sparkling clean. Regularly cleaning your airless paint sprayer is crucial for preventing clogs and maintaining its performance. Here is a simple cleaning technique that will keep your sprayer running smoothly:
| Cleaning Technique | Steps |
|---|---|
| Flush with Water | After each use, flush the sprayer with clean water to remove any paint residue. |
| Disassemble and Clean | Take apart the sprayer and clean each component thoroughly using a brush and water. Pay special attention to the nozzle and filter. |
| Remove Clogs | If you encounter any clogs, use a small brush or needle to carefully remove the blockage. |
| Lubricate Moving Parts | Apply a few drops of lubricant to the moving parts of the sprayer to keep them functioning properly. |
| Store Properly | When not in use, store the sprayer in a clean, dry place to prevent dust and dirt from accumulating. |
Maintaining a clean sprayer is essential for achieving a flawless finish and avoiding pinholes. In the next section, we will discuss the importance of proper ventilation during the painting process.
Use Proper Ventilation
When using an airless paint sprayer, it’s crucial to ensure that you are working in a well-ventilated area. This will help prevent the buildup of fumes and ensure that you are breathing in clean air.
Additionally, it’s important to wear a mask to further protect yourself from any potentially harmful fumes that may be released during the painting process.
By following these precautions, you can ensure a safe and healthy painting experience.
Paint in a well-ventilated area
To ensure your safety and breathe in fresh air while painting, it’s crucial to work in a space that is well-ventilated. Proper ventilation is essential for painting safety, as it helps dissipate harmful fumes and prevents the accumulation of volatile organic compounds (VOCs).
Here are three important aspects to consider when painting in a well-ventilated area:
- Open windows and doors: By allowing fresh air to circulate, you can create a healthier painting environment.
- Use fans or exhaust systems: Positioning fans strategically or using exhaust systems can help remove fumes and improve air quality.
- Choose outdoor painting locations: If possible, consider painting outdoors where natural ventilation is abundant.
By taking these ventilation options into account, you can significantly reduce the risk of inhaling toxic fumes and ensure a safer painting experience.
Moreover, wearing a mask to protect yourself from fumes is another crucial step in maintaining your well-being throughout the painting process.
Wear a mask to protect yourself from fumes
To ensure a smooth and flawless paint job, it’s crucial to consider the health hazards associated with paint fumes. When using an airless paint sprayer, it is important to protect yourself by wearing a mask.
This simple safety precaution can greatly reduce your exposure to harmful fumes and safeguard your health.
But not all masks are created equal; it’s essential to choose a mask that is effective in filtering out paint fumes. Look for masks with a high filtration rating, such as N95 or N99, to ensure maximum protection.
By wearing a mask, you not only shield yourself from the noxious fumes but also minimize the risk of respiratory issues or other health complications.
Now, let’s move on to the next section and discuss some finishing touches that will give your paint job that professional look.
Finishing Touches
As the final brushstroke is applied, the room comes alive with a vibrant burst of color, leaving no room for pin holes to mar the flawless finish. Achieving a seamless and professional look with an airless paint sprayer requires attention to detail during the finishing touches. Here are four key steps to ensure a pinhole-free paint job:
-
Color selection: Choose a high-quality paint that provides excellent coverage and adheres well to the surface. This will help prevent pinholes from forming due to inadequate paint thickness.
-
Drying time: Allow each coat of paint to dry completely before applying the next one. Rushing the process may result in pinholes as the trapped air tries to escape.
-
Proper pressure: Adjust the airless paint sprayer pressure according to the manufacturer’s recommendations. Too high pressure can create pinholes, while too low pressure may result in an uneven finish.
-
Smooth strokes: Apply the paint evenly using smooth and controlled strokes. Avoid overloading the sprayer, as excessive paint can lead to pinholes and drips.
By following these steps, you can achieve a flawless finish without any pinholes using an airless paint sprayer.
Frequently Asked Questions
What are the common mistakes that lead to pin holes when using an airless paint sprayer?
To fix pin holes caused by an airless paint sprayer, it’s important to use the right techniques for achieving a smooth finish. This involves properly preparing the surface, using the correct spray tip size, and maintaining consistent pressure while spraying.
How can I prevent pin holes when using an airless paint sprayer on textured surfaces?
To prevent pin holes on textured surfaces when using an airless paint sprayer, I recommend using a thicker paint and adjusting the pressure to a lower setting. Troubleshooting pin holes on uneven surfaces involves applying multiple thin coats and using a brush or roller for touch-ups.
Is it necessary to sand the surface before using an airless paint sprayer to avoid pin holes?
It is necessary to sand the surface before using an airless paint sprayer to avoid pin holes. Sanding helps to create a smooth and even surface, ensuring that the paint adheres properly and reduces the likelihood of pin holes forming.
Can using a high-pressure setting on the airless paint sprayer cause pin holes?
Using a high-pressure setting on an airless paint sprayer can contribute to the formation of pin holes. It’s important to adjust the pressure according to the manufacturer’s guidelines to avoid this issue. Troubleshooting pin holes involves examining the paint consistency and adjusting the spray pattern.
Are there any specific types of paint that are more prone to causing pin holes when used with an airless paint sprayer?
Certain types of paint, like high-gloss or oil-based paints, are more prone to causing pin holes when used with an airless paint sprayer. To avoid this, it’s important to use the correct nozzle size and maintain the proper spraying distance.
Conclusion
In conclusion, my journey to painting perfection with an airless paint sprayer has been like a thrilling adventure through a pristine landscape. By understanding the causes of pin holes and choosing the right paint, I’ve equipped myself with the tools to conquer any imperfections.
With proper surface preparation, the correct sprayer technique, and adjustments to the sprayer settings, I’ve navigated the treacherous terrain of pin hole prevention.
By applying multiple thin coats and maintaining a clean sprayer, I’ve reached the pinnacle of flawless finishes. And with proper ventilation and finishing touches, I’ve emerged victorious, leaving behind a masterpiece for all to admire.
So go forth, fellow painters, armed with this knowledge, and conquer the pin hole demons with your airless paint sprayer, creating beautiful works of art with ease.
