Changing colors in a non-air paint sprayer is quick and easy. Here are the steps to follow:
-
Prepare the paint sprayer for the color change by ensuring it is clean and ready to use.
-
Carefully choose the right paint color for your project, making sure it matches your desired outcome.
-
Gather all the necessary supplies and empty the paint reservoir.
-
Flush the paint sprayer system to remove any remaining paint from the previous color.
-
Install the new paint color and test it to ensure it sprays evenly.
-
Finally, you will be ready to start painting with your new color.
By following these step-by-step instructions, you will be able to change colors in your airless paint sprayer with confidence and precision. So, let’s dive in and get started!
Key Takeaways
- Prepare the paint sprayer by cleaning it.
- Choose the right paint color for the project.
- Gather necessary supplies and empty the paint reservoir.
- Flush the paint sprayer system to remove previous paint.
Prepare the Paint Sprayer for Color Change
To prepare the airless paint sprayer for a color change, follow these steps:
-
Disconnect the sprayer from the power source and empty any remaining paint from the container.
-
Replace the filters with new ones to ensure optimal performance.
-
Thoroughly clean the gun and nozzle using a suitable cleaning solution and a brush to remove any dried paint or debris.
-
Once the sprayer is clean and the filters are replaced, it is ready for the next step in the process: choosing the right paint color.
Choose the Right Paint Color
When choosing the right paint color, it’s important to consider the existing color scheme to ensure a cohesive look. I always recommend testing the new color on a small area before committing to it. It can look different on your walls than it does on a paint chip.
By following these steps, you can make an informed decision and achieve the desired result for your paint project.
Consider the existing color scheme
Ponder the present palette before proceeding with paint sprayer color changes. When considering the existing color scheme, it is important to choose complementary colors that will enhance the overall aesthetic of your space. To make an informed decision, take into account the current colors and their undertones. A helpful way to visualize this is by using a 3 column and 4 row table:
| Main Color | Undertone | Complementary Color |
|---|---|---|
| Blue | Cool | Orange |
| Green | Warm | Red |
| Yellow | Warm | Purple |
| Gray | Neutral | Brown |
By analyzing this table, you can determine which colors will work harmoniously together. Once you have selected your new color, it is crucial to test it on a small area before proceeding further. This will ensure that the new color complements the existing scheme seamlessly.
Test the new color on a small area
Before proceeding, it’s important to test the new color on a small area. This will ensure that it seamlessly complements the existing scheme.
To begin, try different color combinations. Apply a small amount of the new paint onto a discreet section of the surface. This will allow you to visually assess how the new color interacts with the surrounding colors.
Additionally, experiment with different paint finishes. Determine which one best suits the desired aesthetic. Matte, satin, or glossy finishes can drastically alter the appearance of the color, so it’s crucial to test each option.
Once you have found the ideal color combination and finish, you can confidently move on to the next step. This involves gathering the necessary supplies to begin the airless paint sprayer process.
Gather the Necessary Supplies
To get started, all you need are a few essential supplies. Here is a list of what you will need:
| Supplies | Purpose |
|---|---|
| New paint color | To change the color of your airless paint sprayer |
| Paint strainer | To remove any debris from the paint before spraying |
| Paint thinner | To clean the sprayer after use and maintain its performance |
| Safety goggles | To protect your eyes from paint splatter |
| Disposable gloves | To keep your hands clean and protected |
Now that you have gathered the necessary supplies, it’s time to proceed with changing the colors in your airless paint sprayer. But before moving forward, let’s quickly go over some important tips for maintaining an airless paint sprayer. Regularly clean the sprayer and its parts, and always follow the manufacturer’s instructions. Troubleshooting common issues with paint sprayers can save you time and frustration. Now, let’s move on to the next step: emptying the paint reservoir.
Empty the Paint Reservoir
Now that you’ve gathered all the necessary supplies, it’s time to empty out the paint reservoir and prepare for the next step.
To properly dispose of leftover paint in an airless paint sprayer, follow these steps:
- Detach the suction tube and hold it over a container or a drop cloth to catch the paint.
- Release the pressure in the sprayer by triggering the gun until no more paint comes out.
Next, remove the filter and clean it thoroughly to prevent clogs in the paint sprayer.
Dispose of the excess paint and the filter in accordance with local regulations for hazardous waste disposal. Remember to always wear protective gloves and eyewear when handling paint and cleaning the sprayer.
Now that the paint reservoir is empty and the filter is clean, you can move on to the next section to flush the paint sprayer system.
Flush the Paint Sprayer System
Once you’ve successfully cleared out the paint reservoir, it’s time to give the paint sprayer system a powerful and thorough flush to ensure optimal performance. The flushing procedure is a critical step in the color change process as it removes any residual paint from the system, preventing color contamination and clogging.
To begin, attach a clean bucket or container to the sprayer and fill it with an appropriate flushing solution, such as water or a cleaning agent recommended by the manufacturer. Turn on the sprayer and trigger the gun, allowing the solution to circulate through the system for a few minutes. This will effectively clean out any remaining paint particles.
Finally, transition into the subsequent section about disassembling and cleaning the spray gun by emphasizing the importance of proper cleaning to maintain the sprayer’s longevity and performance.
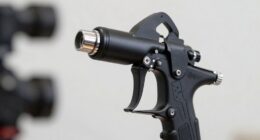
Disassemble and Clean the Spray Gun
Before diving into the disassembly and cleaning process, let’s take a moment to explore how you can ensure your spray gun remains in top-notch condition for optimal performance.
To disassemble the spray gun, follow these steps:
-
Start by removing the spray tip and guard. This will allow you to access the internal components of the gun more easily.
-
Next, unscrew the fluid nozzle and needle. These parts are crucial for controlling the paint flow and should be cleaned thoroughly.
-
Finally, remove the air cap and air cap ring. These components can accumulate paint residue, affecting the spray pattern.
Once you have disassembled the spray gun, cleaning it becomes easier and more effective. By disassembling the gun, you can access every nook and cranny, ensuring a thorough cleaning. This will remove any dried or clogged paint, preventing it from affecting the performance of your airless paint sprayer.
Now that the spray gun is disassembled and cleaned, we can move on to the next step: installing the new paint color.
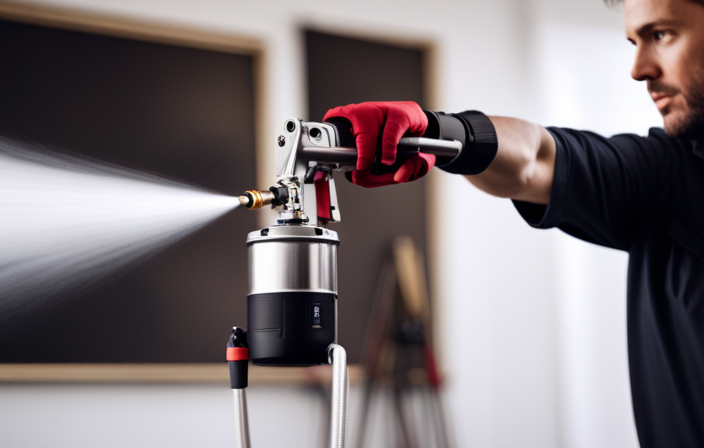
Install the New Paint Color
To give your spray gun a fresh new look, it’s time to add the vibrant hue of your choice. Installing new paint in an airless paint sprayer is a straightforward process that requires attention to detail.
First, ensure that the spray gun is disassembled and cleaned properly, as mentioned in the previous subtopic.
Once you have prepared the gun, carefully pour the new paint into the paint container, making sure to avoid any spills or drips. Secure the container tightly to prevent any leaks during operation.
If you encounter any color issues, such as improper color distribution or inconsistent spray patterns, troubleshoot by checking the paint viscosity and adjusting the spray gun settings accordingly.
With the new paint installed, it’s time to move on to the next step and test the new color.
Test the New Color
Now that you’ve added the vibrant hue of your choice to your spray gun, it’s time to see the new color in action and test it out.
To ensure the durability of the color, it is important to conduct a test before starting the actual painting process. Begin by spraying a small amount of the new color onto a scrap piece of material or a test surface. This will allow you to observe how the color appears once it dries and how it holds up against the surface.
Additionally, compare the new color with the existing color scheme to ensure it complements the overall aesthetic.
Once you are satisfied with the color durability and its compatibility with the existing scheme, you can proceed to the next section and start painting.
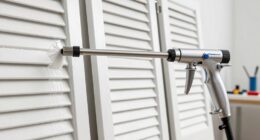
Start Painting
Get ready to unleash your creativity and transform your space with a splash of vibrant color as we dive into the exciting world of painting! When it comes to using an airless paint sprayer, employing the right techniques is crucial to achieving a smooth finish. Here are some key points to keep in mind as you start painting:
-
Maintain a consistent distance: Hold the sprayer approximately 12-16 inches away from the surface you are painting to ensure an even coat.
-
Overlap each stroke: Overlapping each pass by about 50% will eliminate any streaks or lines, resulting in a professional-looking finish.
-
Keep a steady pace: Move the sprayer in a smooth, continuous motion to prevent pooling or uneven coverage.
By following these techniques, you can achieve a flawless and smooth finish that will enhance the overall appearance of your space. Now, let’s move on to the next step of cleaning and storing the paint sprayer.
Clean and Store the Paint Sprayer
To maintain the longevity and optimal performance of your painting equipment, it is crucial to clean and store it properly. Cleaning your airless paint sprayer is essential for preventing clogs and maintaining its functionality. Here are some cleaning techniques and maintenance tips to keep in mind:
- Start by disconnecting the sprayer from the power source and relieving any built-up pressure.
- Remove the spray tip, filter, and guard, and clean them with warm soapy water or a solvent recommended by the manufacturer.
- Flush the sprayer with clean water or a cleaning solution to remove any remaining paint residue.
- Use a brush or toothbrush to scrub any stubborn paint buildup from the sprayer components.
- Dry all the parts thoroughly before reassembling them.
Store the sprayer in a clean, dry area, away from extreme temperatures and direct sunlight.
Following these cleaning techniques and maintenance tips will ensure that your airless paint sprayer remains in good condition and ready to use for your next painting project.
Frequently Asked Questions
How do I choose the right paint color for my project?
To choose the right paint color for your project, consider your existing decor and the desired atmosphere. Look for color schemes that harmonize with the room’s style and furniture. Test paint samples on the wall to ensure a perfect match.
Can I use different types of paint colors in an airless paint sprayer?
Yes, different types of paint colors can be used in an airless paint sprayer. It is important to choose the best paint colors for your project and ensure compatibility with the sprayer’s specifications.
What supplies do I need to gather before changing the paint color in my sprayer?
Before changing the paint color in my sprayer, I need to gather a few supplies. Firstly, I must ensure paint color compatibility by checking the manufacturer’s recommendations. Secondly, I’ll need to thoroughly clean the sprayer after changing colors to avoid any color mixing or clogging issues.
How do I properly empty the paint reservoir before changing the color?
To properly empty the paint reservoir and prevent color contamination, first, disconnect the sprayer from the power source. Then, remove the suction tube and filter. Empty any remaining paint into a waste container. Clean the reservoir thoroughly before changing colors.
Is it necessary to disassemble and clean the spray gun when changing paint colors?
Yes, it is necessary to disassemble and clean the spray gun when changing paint colors. This ensures that no residue or color mixtures are left behind, preventing any potential issues with the new color application.
Conclusion
In conclusion, changing colors in an airless paint sprayer is a meticulous process that requires careful preparation and execution. By following the steps outlined in this article, you can seamlessly transition from one paint color to another, ensuring a flawless finish every time.
Remember to gather all the necessary supplies, flush out the system thoroughly, and test the new color before diving into your painting project.
With these tips, you’ll be able to transform your space with precision and ease, like a skilled artist wielding their brush.