Are you ready to transform your room with a beautiful new look? An airless sprayer is the perfect tool to achieve a flawless finish! Painting a room may seem daunting, but with the right tools and skills, it can be a breeze. Follow along in this article as I guide you through the process of using an airless sprayer to paint your room from start to finish.
First, we’ll prepare the room, ensuring that all surfaces are clean and protected.
Then, we’ll gather the necessary materials and equipment, including the airless sprayer.
Practice makes perfect, so we’ll take some time to get comfortable with using the sprayer before we dive into the painting process.
Once we’re confident, we’ll start painting, maintaining a consistent technique for a professional-looking result.
After the paint has dried, we’ll assess if a second coat is necessary, ensuring a vibrant and even color.
Finally, we’ll clean up the sprayer, leaving it ready for future projects.
Get ready to enjoy your newly painted room and the satisfaction of a job well done!
Key Takeaways
- Applying a second coat enhances color and durability, especially if the first coat is uneven or painted over a darker color.
- It is important to address drips or runs immediately during the second coat to achieve a smooth finish.
- Cleaning the sprayer properly after the second coat is essential for future use and to ensure optimal performance.
- Using an airless sprayer for painting a room offers benefits such as faster application, consistent and streak-free coverage, versatility for various surfaces, and cost-effectiveness by using less paint.
Prepare the Room for Painting
To prepare the room for painting, follow these steps:
-
Clean all surfaces: Wipe down walls and ceiling with a damp cloth or sponge to remove dirt, dust, and grease.
-
Inspect for imperfections: Check for cracks or holes on the surfaces. Patch them up using spackling compound.
-
Choose the right paint: Consider the type of surface, desired finish, and room’s color scheme when selecting paint.
-
Gather materials and equipment: Get all the necessary tools and supplies ready for the next step.
Double new line.
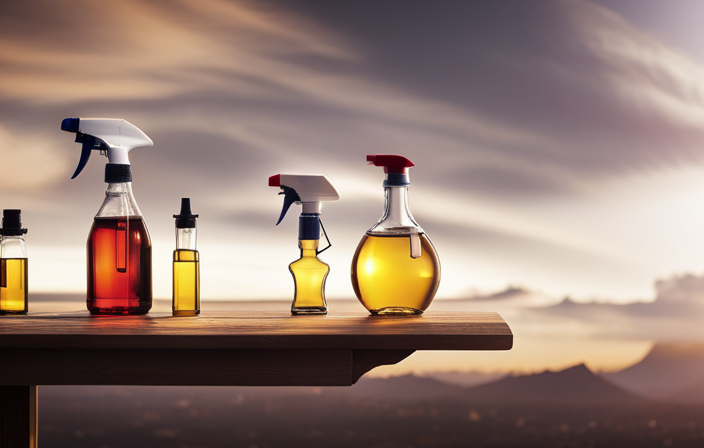
Gather Your Materials and Equipment
First, make sure you’ve got all your stuff ready, because you’re gonna need a whole bunch of things to pull off this epic painting extravaganza. Start by choosing the right paint color for your room. Consider the lighting and the mood you want to create.
Once you have your paint color chosen, gather your materials and equipment. You’ll need an airless sprayer, paint filters, a paint container, a paint strainer, a paint roller, a drop cloth, and painter’s tape. It’s important to have all these items handy before you start painting to avoid any delays.
Additionally, here are a few tips for avoiding overspray: make sure to cover furniture and other items in the room, use a small spray pattern, and keep the sprayer at the right distance from the walls.
Now that you’ve gathered all your materials and know how to avoid overspray, it’s time to practice using the sprayer and perfect your technique.
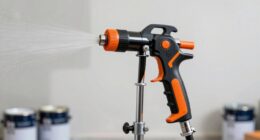
Practice Using the Sprayer
Before starting to paint a room with an airless sprayer, it’s essential to practice using the sprayer.
First, adjust the spray pattern and pressure to achieve the desired coverage and finish.
Then, test the sprayer on a scrap surface to ensure it’s functioning properly and to familiarize yourself with its operation.
This practice will help you gain confidence and ensure a smooth and efficient painting process.
Adjust the Spray Pattern and Pressure
Now that you’ve got your airless sprayer set up, let’s dive right into adjusting the spray pattern and pressure to achieve the perfect paint finish.
Adjusting the spray pattern is crucial to ensure even coverage and avoid any streaks or blotches on the walls. To do this, start by adjusting the nozzle on the sprayer. Twist it clockwise or counterclockwise to widen or narrow the spray pattern, depending on the size of the room and the desired effect.
Next, troubleshoot the spray pressure by adjusting the pressure control knob on the sprayer. Increase or decrease the pressure until you achieve a steady and consistent flow of paint.
With the spray pattern and pressure adjusted, it’s time to test the sprayer on a scrap surface to ensure everything is working smoothly.
Test the Sprayer on a Scrap Surface
Once you’ve got your setup dialed in, go ahead and give the sprayer a test run on a scrap surface to see how it performs. Sprayer maintenance is crucial to ensure optimal performance and avoid common issues. Before starting, it’s important to check for any clogs in the nozzle or hose, and clean or replace them if necessary. Additionally, make sure the sprayer’s filters are clean and free of debris. Once you’re ready to test, adjust the spray pattern and pressure according to your desired coverage. Start by spraying a small area on the scrap surface, moving the sprayer in a steady and controlled manner. Take note of any uneven coverage or drips, as these may indicate problems with the sprayer. Troubleshoot any issues before moving on to painting your room. Now that you’ve tested the sprayer, it’s time to start painting.
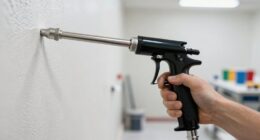
Start Painting
To get the perfect finish, it’s essential to begin painting the room with an airless sprayer. This technique allows for a smooth and even application, ensuring a professional-looking result.
When using an airless sprayer, it’s important to follow best practices for cutting in edges. Start by using a steady hand and maintaining a consistent distance from the surface. This will help to create clean and sharp lines along the edges of the walls and ceiling.
Additionally, make sure to overlap each pass slightly to avoid any streaks or uneven coverage.
By mastering these techniques for achieving smooth finishes and cutting in edges, you’ll be well on your way to a beautifully painted room.
As we move into the next section, let’s discuss how to maintain a consistent technique throughout the entire painting process.
Maintain a Consistent Technique
Maintaining a consistent technique throughout will ensure a satisfying and professional-looking result for your painting project. Consistency is key when using an airless sprayer to paint a room. By maintaining a steady hand and keeping a consistent distance from the surface, you can achieve an even and smooth coat of paint.
This technique also helps to minimize any overspray or drips, resulting in a cleaner finish. One of the benefits of using an airless sprayer is its ability to cover large areas quickly, but this can also lead to common mistakes if not done with a consistent technique. Rushing or moving too quickly can cause uneven coverage or streaks in the paint.
Take your time and maintain a consistent speed and distance from the surface for the best results.
To deal with any drips or mistakes, we’ll move onto the next section and address how to fix them effectively.
Deal with any Drips or Mistakes
Don’t worry if you make a few boo-boos, I’ll show you how to fix any drips or mistakes like a pro. Here’s how to correct painting mistakes and fix paint drips:
-
Assess the damage: Take a step back and evaluate the extent of the mistake. Is it a small drip or a larger smudge? Knowing the scale will help determine the best course of action.
-
Blot the drip: If you spot a fresh drip, quickly blot it with a clean cloth or paper towel. Gently dab the area until the excess paint is absorbed, being careful not to smear it further.
-
Sand it smooth: For more stubborn mistakes, lightly sand the affected area with fine-grit sandpaper. This will create a smooth surface for touch-ups.
-
Touch up the paint: Use a small brush or a sponge brush to carefully apply a thin layer of matching paint over the corrected area. Feather the edges to blend it seamlessly with the surrounding surface.
Now that you know how to fix paint drips and correct painting mistakes, let the paint dry before moving on to the next step.
Let the Paint Dry
Once you’ve finished fixing any drips or mistakes, it’s time to patiently wait for the paint to dry. This step is crucial to achieving a professional-looking finish. To ensure a smooth and streak-free result, here are a few tips on how to prevent paint streaks. First, make sure to use a high-quality paint with a satin or semi-gloss finish, as these types tend to dry more evenly. Additionally, avoid overloading the sprayer with paint and maintain a consistent distance from the wall while spraying. Now is also a good time to consider how to choose the right paint color. Take into account the room’s lighting and existing decor when making your selection. Once the paint is dry, you can assess if a second coat is necessary for complete coverage. Transitioning into the next section, applying a second coat can help achieve a more vibrant and durable finish.
Apply a Second Coat (if necessary)
To truly enhance the color and durability of your freshly painted walls, it may be necessary to add another coat for a more vibrant and long-lasting finish. Applying a second coat is especially important if the first coat appears uneven or if you’re painting over a darker color.
Before starting, make sure the first coat is completely dry to avoid any smudging or streaking. When applying the second coat, use the same technique as before, starting from the top and working your way down. To achieve a smooth finish, be sure to overlap your strokes and maintain a consistent pressure on the sprayer trigger.
If you encounter any common painting problems such as drips or runs, stop immediately and address the issue before continuing. Once the second coat is complete, you can move on to cleaning up the sprayer, ensuring it’s ready for future use.
Clean Up the Sprayer
After you have finished applying the second coat, it’s time to tidy up the sprayer and ensure it is ready to use in the future. Sprayer maintenance is crucial for its longevity and optimal performance. Cleaning the sprayer may seem like a daunting task, but with a few simple cleaning tips, it can be done quickly and efficiently.
To clean the sprayer, start by emptying any remaining paint from the container and flushing it with water or an appropriate cleaning solution. Use a brush to remove any dried paint or debris from the sprayer’s components. Make sure to disassemble the nozzle and clean it thoroughly. Refer to the manufacturer’s instructions for specific cleaning guidelines.
Once everything is clean, reassemble the sprayer and store it in a safe place. Regularly inspect and maintain the sprayer to prevent clogging and ensure it is always ready for your next painting project.
With the sprayer cleaned and stored properly, you can now enjoy your newly painted room!
Enjoy Your Newly Painted Room!
Now that the sprayer is all cleaned up, it’s time to step back and enjoy your newly painted room! There’s something truly satisfying about seeing the transformation that a fresh coat of paint can bring to a space.
With the use of an airless sprayer, you’ll not only achieve a professional-looking finish, but you’ll also reap a number of benefits.
- Time-saving: The airless sprayer allows for faster application, cutting down on painting time.
- Smooth and even coverage: The high-pressure system ensures a consistent coat of paint, eliminating streaks and brush marks.
- Versatility: Whether you’re painting walls, ceilings, or furniture, the airless sprayer can handle it all.
- Cost-effective: By using less paint, you’ll save money in the long run.
So kick back, relax, and take pride in your newly painted room, knowing that you achieved a beautiful finish with the help of an airless sprayer.
Frequently Asked Questions
How long does it take for the paint to dry after applying the first coat?
Once the first coat is applied, it usually takes about 2-4 hours for the paint to dry completely. To speed up the process, ensure proper ventilation and consider using a fan. Factors like humidity and temperature can also affect drying time.
Can I use an airless sprayer to paint ceilings?
Yes, an airless sprayer can be used to paint ceilings. It offers several advantages, such as faster application and even coverage. To achieve a smooth finish, make sure to use the correct nozzle size and maintain a consistent spraying distance.
How do I prevent overspray when using an airless sprayer?
To prevent overspray when using an airless sprayer, adjust the sprayer settings to control the spray pattern and pressure. This helps to ensure a more precise and controlled application of paint, minimizing the risk of overspray.
What type of paint is best for an airless sprayer?
The best paint brands for an airless sprayer are Sherwin-Williams, Behr, and Benjamin Moore. To achieve smooth finishes, use high-quality paint, thin it if necessary, and maintain a consistent spray pattern.
How do I clean the airless sprayer after painting?
To properly maintain an airless sprayer, it’s important to clean it thoroughly after painting. This helps prevent clogs and ensures optimal performance. Troubleshooting common issues includes checking for worn or damaged parts and adjusting spray settings as needed.
Conclusion
And there you have it, folks! With the help of an airless sprayer, transforming your room has never been easier.
From prepping the space to applying the final coat, I’ve shown you the steps to achieve a beautiful and professional-looking paint job.
So go ahead, bask in the glory of your newly painted room, and let the colors dance on the walls like a breathtaking masterpiece.
It’s time to enjoy the fruits of your labor and revel in the ambiance you’ve created.