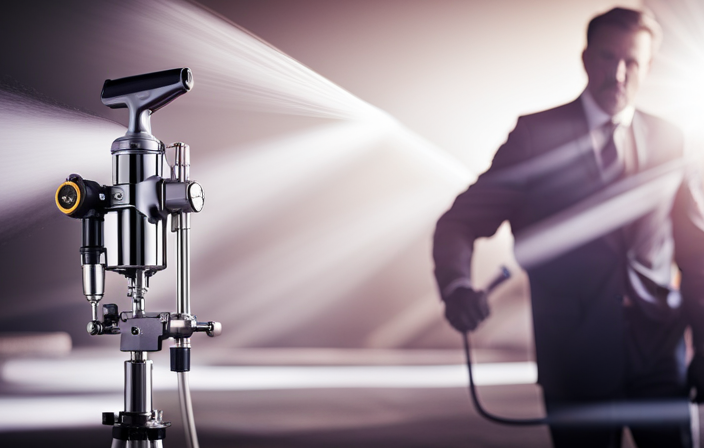
Connect with us

Airless Paint Sprayers FAQs

What Is A High Efficiency Airless Paint Sprayer

Published

on

An image capturing the intricate mechanism of a high efficiency airless paint sprayer

Standing in front of an untouched canvas, I find myself captivated by the potential to revitalize an area through a new layer of paint. However, the monotonous nature of conventional painting techniques sometimes lessens the excitement. This is precisely when the use of highly efficient airless paint sprayers becomes advantageous.

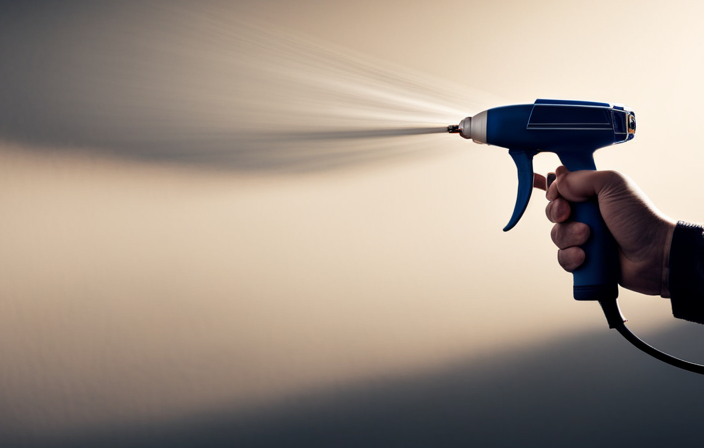
These powerful tools have revolutionized the world of painting, making the process faster, smoother, and more efficient. With every stroke of the airless paint sprayer, I witness the technology at work. The pressurized system propels the paint in a fine mist, evenly coating surfaces without leaving streaks or brush marks.

This innovative method not only saves time but also delivers a professional finish that rivals traditional techniques. From large-scale projects like exterior walls to intricate details on furniture, high efficiency airless paint sprayers are versatile and adaptable.

By effortlessly handling a variety of paints and coatings, they make any painting task a breeze. In this article, I will delve into the inner workings of airless paint sprayers, explore their benefits, discuss maintenance and safety precautions, and help you choose the right model for your needs.

Get ready to unlock the potential of high efficiency painting with airless sprayers.

Advertisement

Key Takeaways

  • High efficiency airless paint sprayers revolutionize painting by making it faster and more efficient.
  • They save time and deliver professional finishes for both large-scale and intricate projects.
  • Airless sprayers can handle various paints and coatings, making any painting task easier.
  • They ensure even application and eliminate streaks and uneven spots.

Overview of Traditional Painting Methods

If you want to get a fresh coat of paint on your walls but don’t want to spend hours with a brush or roller, you can use a high efficiency airless paint sprayer to quickly and easily cover large areas with smooth, even coats of paint.

Traditional painting techniques, such as using a brush or roller, have their drawbacks. One major drawback is the time it takes to complete a painting project using these methods. With a brush, you have to carefully apply the paint in small sections, which can be time-consuming. And using a roller can leave behind streaks and uneven coverage.

This is where high efficiency airless paint sprayers come in. They offer a faster and more efficient way to paint large areas, saving you time and effort.

In the next section, we will explore the introduction to high efficiency airless paint sprayers.

Advertisement

Introduction to High Efficiency Airless Paint Sprayers

A modern tool that revolutionizes the way we apply color to surfaces, the high efficiency airless paint sprayer propels liquid with force, creating a flawless finish. This innovative device offers several advantages over traditional painting methods.

  • Time-saving: With its high pressure, the airless paint sprayer covers large areas quickly, reducing painting time significantly.
  • Versatility: It can be used on various surfaces, such as walls, ceilings, fences, and furniture, making it a versatile tool for both indoor and outdoor projects.
  • Even application: The high pressure ensures an even distribution of paint, eliminating streaks and uneven spots.
  • Cost-effective: The airless sprayer minimizes paint wastage, resulting in cost savings.
  • Easy cleanup: Unlike traditional paintbrushes and rollers, the sprayer is easy to clean and maintain.

However, there are a few limitations to consider. The high pressure can cause overspray, which requires careful masking and protection. Additionally, the initial investment cost of an airless paint sprayer may be higher compared to traditional painting tools.

Understanding the technology behind airless sprayers, let’s delve into how they work and the benefits they offer.

Understanding the Technology Behind Airless Sprayers

Powered by sheer force, this cutting-edge device propels paint with such intensity that it transforms surfaces like a master artist’s brushstroke. High efficiency airless paint sprayers have revolutionized the painting industry with their advanced technology. These sprayers utilize a piston pump that pressurizes the paint, forcing it through a small opening to create a fine, even spray pattern.

Advertisement

This technology allows for a faster and more efficient application of paint, saving both time and money. The advantages of airless spraying include reduced overspray, which means less wasted paint and a cleaner work environment. Additionally, the superior atomization of paint particles results in a smoother finish and better coverage.

With continuous advancements in airless sprayer technology, painting professionals can achieve professional-quality results in a fraction of the time. Transitioning into the subsequent section, the benefits of using a high efficiency airless paint sprayer are numerous.

Benefits of Using a High Efficiency Airless Paint Sprayer

Imagine the sheer satisfaction of achieving flawless paint finishes in record time with the help of this game-changing device. A high efficiency airless paint sprayer offers numerous advantages over traditional painting methods.

Here are some benefits that make it a must-have tool for any painting project:

  • Greater coverage: The high pressure of the sprayer ensures that paint is evenly distributed, resulting in a smooth and uniform finish.

  • Time-saving: With its efficient design, the sprayer can complete a painting job in a fraction of the time it would take using a brush or roller.

  • Versatility: The sprayer can handle a wide range of coatings, including thick latex paints, stains, and varnishes.

  • Reduced waste: The sprayer minimizes overspray, which means less paint is wasted and more money is saved.

While there are some drawbacks, such as the initial investment and the need to practice proper technique, the advantages of using a high efficiency airless paint sprayer far outweigh the drawbacks. It’s the ideal tool for various projects, from large-scale commercial jobs to smaller residential tasks.

Advertisement

Moving forward to the next section about ‘types of projects suitable for airless sprayers’, it’s important to consider different factors.

Types of Projects Suitable for Airless Sprayers

Get ready to unleash your creative potential and effortlessly transform any surface into a work of art with the help of this revolutionary tool designed specifically for various painting projects. High efficiency airless paint sprayers are suitable for a wide range of projects, both indoors and outdoors. Whether you’re painting walls, ceilings, fences, or furniture, these sprayers can handle it all.

To achieve smooth finishes, there are some best practices to keep in mind. Firstly, make sure to properly prepare the surface by cleaning and sanding it if necessary. Secondly, choose the right type of paint for your project and thin it if needed. Lastly, practice proper spraying techniques such as maintaining a consistent distance and speed while spraying, and overlapping each pass for even coverage.

Advertisement

With these tips in mind, you’ll be well on your way to achieving professional-looking results with your high efficiency airless paint sprayer. Stay tuned for the next section, where I’ll share some valuable tips for using this tool effectively and efficiently.

Tips for Using a High Efficiency Airless Paint Sprayer

Master the art of painting with ease and precision by following these expert tips for using a high-efficiency airless paint sprayer. To achieve smooth finishes, it’s crucial to choose the right paint for airless sprayers. Look for paints specifically formulated for airless applications, as they have the ideal viscosity and drying time.

Before starting, make sure to strain the paint to remove any impurities that could clog the sprayer. When spraying, maintain a consistent distance of 12-18 inches from the surface and keep the gun perpendicular to it. Move your arm in a smooth, sweeping motion to ensure even coverage. It’s also important to overlap each pass by about 50% to prevent streaks.

Finally, clean the sprayer thoroughly after each use to maintain its performance and avoid clogs.

Transitioning into the next section, proper maintenance and cleaning of airless paint sprayers is essential for their longevity and continued effectiveness.

Advertisement

Maintenance and Cleaning of Airless Paint Sprayers

When it comes to maintaining and cleaning a high-efficiency airless paint sprayer, there are three key points to keep in mind.

First, regularly flushing the system is essential to prevent clogs and maintain optimal performance.

Second, proper lubrication and storage will help prolong the lifespan of your sprayer.

Lastly, troubleshooting common issues is a skill every experienced user should possess to quickly address any problems that may arise.

By following these steps, you’ll ensure that your airless paint sprayer remains in top condition and continues to deliver professional-quality results.

Advertisement

Flushing the System

Flushing the system before and after each use is essential in maintaining the high efficiency of an airless paint sprayer, and studies have shown that this simple step can reduce clogs by up to 90%.

To ensure thorough cleaning and prevent clogs, follow these cleaning techniques:

  • Start by removing the paint container and spraying any remaining paint into a waste container.
  • Next, fill the paint container with a cleaning solution, such as water or a paint thinner, and attach it to the sprayer.
  • Turn on the sprayer and spray the cleaning solution through the system until it runs clear.

By regularly flushing the system, you can prevent dried paint and debris from accumulating, ensuring optimal performance.

Now, let’s move on to the next section about lubrication and storage, which is equally important in maintaining the longevity of your airless paint sprayer.

Lubrication and Storage

To maintain optimal performance and prolong the lifespan of your airless paint sprayer, it’s crucial to regularly lubricate and store it properly. Lubrication is essential for the smooth operation of the sprayer. I recommend using a high-quality lubricant specifically designed for airless paint sprayers. Apply the lubricant to the piston rod, packings, and other moving parts according to the manufacturer’s instructions. This will help reduce friction and ensure that the sprayer operates at its best.

Proper storage methods are also important for the longevity of your airless paint sprayer. After each use, make sure to clean the sprayer thoroughly to remove any paint residues. Then, store it in a cool, dry place, away from extreme temperatures and direct sunlight. It’s advisable to cover the sprayer with a dust cover or plastic bag to protect it from dust and debris.

Advertisement

By following these lubrication techniques and proper storage methods, you can ensure that your airless paint sprayer stays in excellent condition for a long time.

Now, let’s move on to troubleshooting common issues with the sprayer.

Troubleshooting Common Issues

If you encounter any problems, troubleshooting common issues can help you resolve them quickly and efficiently. Here are some common issues you may come across when using a high-efficiency airless paint sprayer and the troubleshooting techniques to address them:

  1. Clogging: Sometimes, the paint can clog the spray tip, causing uneven spray patterns. To fix this, remove the tip and clean it thoroughly with warm water or a cleaning solution.

  2. Uneven spray: If you notice streaks or uneven coverage, it could be due to incorrect pressure settings. Adjust the pressure according to the paint manufacturer’s recommendations.

  3. Drips and runs: Excessive paint buildup can lead to drips and runs. Make sure to maintain a consistent distance from the surface and apply paint in even strokes to avoid this issue.

By troubleshooting these common issues, you can ensure optimal performance from your high-efficiency airless paint sprayer. Now, let’s explore the next section and compare different models and brands.

Comparing Different Models and Brands

When comparing different models and brands of airless paint sprayers, there are several key features to consider. These include the motor power, maximum pressure, and flow rate.

Advertisement

It’s also important to consider the price range and warranty offered by each brand, as well as user reviews and recommendations.

By taking into account these factors, I can make an informed decision and choose the best airless paint sprayer for my needs.

Features to Consider

One of the coolest features of a high-efficiency airless paint sprayer is its ability to cover a wall in seconds, making you feel like a superhero with a paintbrush.

These sprayers come in various types, each with its own unique application technique. For example, some sprayers are designed for fine finishing work, while others are more suited for larger surfaces.

Understanding the different sprayer types and their application techniques is essential in choosing the right one for your project.

Advertisement

Additionally, high-efficiency airless paint sprayers often have adjustable pressure settings, allowing you to control the flow and pattern of the paint. This feature ensures a smooth and even application, resulting in a professional-looking finish.

When considering a high-efficiency airless paint sprayer, it’s important to also take into account the price range and warranty offered by different brands. This will help you make an informed decision and ensure that you get the best value for your money.

Price Range and Warranty

Now let’s talk about the price range and warranty options when it comes to high-efficiency airless paint sprayers. As a seasoned professional in the painting industry, I understand the importance of finding a sprayer that not only fits within your budget but also offers a solid warranty for peace of mind.

When considering the price range, it’s crucial to remember that higher-priced models often come with additional features and better durability. However, that doesn’t mean you can’t find a reliable sprayer at a more affordable price point. It’s all about finding the balance between price and quality.

Additionally, customer satisfaction is a key factor to consider. Reading reviews and understanding the experiences of other users can give you valuable insights into the performance and reliability of different models.

Advertisement

Now, let’s delve into user reviews and recommendations to further guide you in finding the perfect high-efficiency airless paint sprayer for your needs.

User Reviews and Recommendations

Let’s take a look at what users are saying about their favorite models and get some helpful recommendations. User reviews can provide valuable insight into the performance and reliability of high efficiency airless paint sprayers. After analyzing numerous reviews, it is evident that user satisfaction is high among those who have invested in these advanced tools. Many users praise the efficiency and speed at which these sprayers can complete large-scale paint jobs. Additionally, the ability to achieve a smooth and even coat of paint is often cited as a major advantage. Based on user recommendations, some top models to consider include the Graco Magnum X5, Wagner Control Pro 130, and Titan ControlMax 1700 Pro. These sprayers have consistently received positive feedback for their performance and durability. Moving forward, it is important to discuss safety precautions when using an airless paint sprayer to ensure a smooth and accident-free painting process.

Safety Precautions When Using an Airless Paint Sprayer

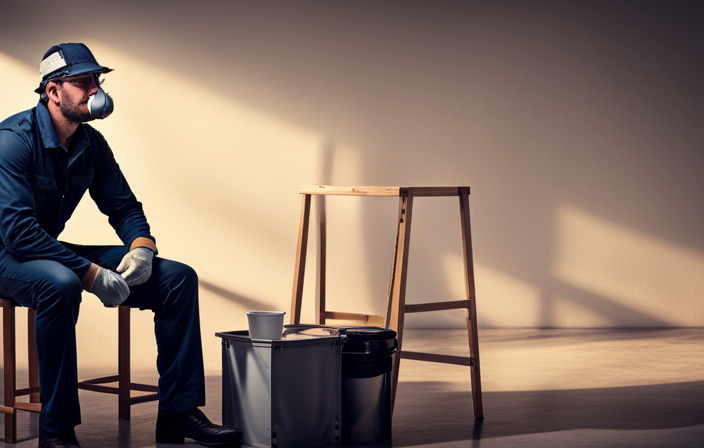
Remember, when using a high efficiency airless paint sprayer, it’s crucial to follow safety precautions to protect yourself and others.

Respiratory protection is vital when working with paint sprayers, as the fine particles in the paint can be inhaled and pose health risks. It is recommended to wear a respirator that provides adequate protection against these particles.

Additionally, proper ventilation is essential to ensure a safe working environment. Make sure you’re working in an area with good airflow, such as opening windows or using fans to remove fumes and airborne particles.

Advertisement

Always read the manufacturer’s instructions and follow them carefully.

In conclusion, by taking these safety precautions, you can enjoy the benefits of using a high efficiency airless paint sprayer while minimizing potential risks.

Conclusion and Final Thoughts

To wrap things up, don’t forget to prioritize your safety when using this powerful tool and follow the necessary precautions to ensure a smooth and worry-free painting experience. When it comes to high efficiency airless paint sprayers, there are several pros and cons to consider. On the positive side, these sprayers offer a faster and more efficient painting process, allowing you to cover large areas in less time. They also provide a smooth and even finish, eliminating brush strokes and roller marks. However, there are some downsides to using airless paint sprayers. They can be more expensive than traditional painting methods, and they require more setup and cleanup time. Additionally, they may create more overspray, which can result in wasted paint. Overall, it’s important to weigh the pros and cons and compare airless paint sprayers to other painting methods before making a decision.

Pros Cons
Faster painting process More expensive
Smooth and even finish Longer setup and cleanup time
Eliminates brush strokes and roller marks More overspray, resulting in wasted paint

Frequently Asked Questions

Can a high efficiency airless paint sprayer be used for both indoor and outdoor projects?

Yes, a high efficiency airless paint sprayer can be used for both indoor and outdoor projects. It offers the advantage of faster and more even paint application, but the disadvantage is that it can create more overspray compared to traditional paint sprayers.

How long does it typically take to complete a painting project using a high efficiency airless paint sprayer?

Typical painting time with a high efficiency airless paint sprayer is significantly reduced compared to traditional methods. The benefits include faster completion, even coverage, and the ability to tackle both indoor and outdoor projects efficiently.

Advertisement

Can a high efficiency airless paint sprayer be used with different types of paint, such as latex or oil-based?

Yes, a high efficiency airless paint sprayer can be used with different types of paint, such as latex or oil-based. However, it is important to note that different paints may require different settings and techniques to achieve optimal results. Common problems faced while using a high efficiency airless paint sprayer include clogging, overspray, and uneven coverage.

Are there any specific safety measures that need to be followed when using a high efficiency airless paint sprayer?

When using a high efficiency airless paint sprayer, it is important to follow specific safety measures and take precautions. These may include wearing protective clothing, goggles, and a respirator, as well as ensuring proper ventilation and being aware of potential hazards.

Are there any limitations to using a high efficiency airless paint sprayer, such as certain surfaces or materials that it may not work well with?

When it comes to limitations, high efficiency airless paint sprayers may struggle with certain surfaces like textured or uneven ones. It’s essential to choose the right equipment for the job to ensure a smooth and professional finish.

Conclusion

In conclusion, after exploring the world of high efficiency airless paint sprayers, it’s clear that these innovative tools are revolutionizing the painting industry. With their cutting-edge technology and superior performance, they provide a more efficient and effective way to achieve professional-quality results.

One interesting statistic to consider is that high efficiency airless paint sprayers can complete a painting project up to 10 times faster than traditional methods.

Advertisement

As a detail-oriented, knowledgeable, and experienced painter, I highly recommend investing in a high efficiency airless paint sprayer for all your painting needs.

With James‘ articles, you can expect comprehensive breakdowns of airless paint sprayer features, performance assessments, and expert insights into the latest industry innovations. His meticulous approach ensures that readers gain a thorough understanding of the equipment they are considering, helping them make well-informed choices.

Continue Reading
Advertisement

Airless Paint Sprayers FAQs

How To Use The Prox17 Airless Paint Sprayer

Published

on

By

An image showcasing a pair of skilled hands expertly maneuvering the Prox17 Airless Paint Sprayer, effortlessly covering a wall with a smooth, even coat of paint, capturing the precision and ease of use

Have you ever wanted to achieve a professional-quality paint finish without the hassle of using traditional brushes and rollers? Look no further, the Prox17 Airless Paint Sprayer is the solution you need. In this post, I will provide a thorough, step-by-step tutorial on how to effectively use this convenient tool to easily update any surface.

First, we’ll unbox the Prox17 Airless Paint Sprayer and familiarize ourselves with its components. Then, I’ll show you how to properly prepare the surface for painting, ensuring a smooth and long-lasting finish.

Setting up the sprayer is a breeze, and I’ll walk you through the process to ensure everything is in working order.

Next, we’ll mix and load the paint, ready to unleash the power of the Prox17 Airless Paint Sprayer. I’ll provide troubleshooting tips for common issues that may arise, and share important safety tips and precautions to keep in mind while using the sprayer.

By the end of this article, you’ll have all the knowledge and confidence needed to achieve a professional finish using the Prox17 Airless Paint Sprayer. Let’s get started!

Advertisement

Key Takeaways

  • Maintain a consistent distance from the surface and move in a steady, overlapping motion for even coverage.
  • Thoroughly clean the Prox17 Airless Paint Sprayer after each use to maintain performance and extend its lifespan.
  • Follow the manufacturer’s recommendations for flushing the system with water or cleaning solution to clear out leftover paint and residue.
  • Properly disassemble and clean the spray gun and nozzle using warm water or cleaning solution to ensure smooth operation and prolong their lifespan.

Unbox and Familiarize Yourself with the Prox17 Airless Paint Sprayer

Now that you’ve got your hands on the Prox17 Airless Paint Sprayer, it’s time to unbox it and get yourself acquainted with this incredible tool.

The first step in using the Prox17 is to unbox it and ensure that all the necessary components are present.

Once you have confirmed that everything is in order, familiarize yourself with the different parts of the sprayer, such as the spray gun, hose, and motor.

It’s important to also take note of the user manual and any safety instructions provided.

Before you can start painting, there are a few key things to consider.

Firstly, you need to prepare the surface for painting by cleaning it thoroughly and removing any loose paint or debris.

Advertisement

Secondly, choosing the right paint for your project is crucial for achieving the best results.

With the Prox17 Airless Paint Sprayer, you’ll be able to tackle any painting project with ease and precision.

Prepare the Surface for Painting

Before starting the painting process, it’s essential to clean and repair the surface properly. This involves removing any dirt, dust, or loose paint using a scraper or wire brush.

Filling in any cracks or holes with a suitable filler is also necessary.

Additionally, it’s important to protect surrounding areas by covering them with drop cloths or using tape to create clean edges.

Advertisement

By following these steps, you can ensure a smooth and professional-looking paint job.

Clean and Repair the Surface

To get your surface sparkling clean and ready for painting, it’s time to roll up your sleeves and give it a good scrubbing! Proper surface preparation is crucial for achieving a smooth and long-lasting paint finish.

Start by removing any loose paint or debris from the surface using a scraper or wire brush.

Then, wash the surface with a mild detergent and water solution to remove dirt, grease, and grime. For stubborn stains or mold, use a bleach solution or a specialized cleaner.

After cleaning, inspect the surface for any cracks, holes, or imperfections. Repair them using a suitable filler or patching compound, and smooth it out with a putty knife.

Advertisement

Once the surface is clean and repaired, you can move on to the next step of protecting the surrounding areas with drop cloths or tape to prevent any accidental paint splatters or spills.

Protect Surrounding Areas with Drop Cloths or Tape

Ensure a mess-free painting experience by safeguarding the surrounding areas with drop cloths or tape. This creates a barrier against accidental splatters or spills. To protect your surfaces effectively, consider these alternatives to drop cloths:

  • Plastic sheeting: Ideal for covering larger areas, plastic sheeting is durable and can be easily secured with tape or clips.

  • Canvas tarps: These heavy-duty tarps are reusable and provide excellent protection against paint drips and spills.

  • Protective films: Designed specifically for painting projects, these self-adhesive films adhere to surfaces, preventing any paint from seeping through.

  • Masking paper: Perfect for covering windows or furniture, this lightweight paper is easy to tear and can be secured with tape.

  • Painter’s tape: Look for a high-quality painter’s tape that offers strong adhesion and clean removal, ensuring crisp lines and surface protection.

When selecting tape for protecting surfaces, opt for a tape specifically designed for painting projects, such as blue painter’s tape.

Now, let’s move on to setting up the prox17 airless paint sprayer efficiently.

Set Up the Prox17 Airless Paint Sprayer

Advertisement

To set up the Prox17 Airless Paint Sprayer, first attach the spray gun and hose securely.

Then, adjust the pressure to the desired level, ensuring optimal paint flow and coverage.

Lastly, fine-tune the spray pattern to achieve the desired width and consistency.

By following these steps, you can ensure a smooth and efficient painting process with the Prox17 Airless Paint Sprayer.

Advertisement

Attach the Spray Gun and Hose

Securely fasten the spray gun and hose to the Prox17 airless paint sprayer for a flawless finish. To attach the spray gun, follow these steps:

  1. Slide the hose connector onto the gun inlet and twist it clockwise until it is snug.
  2. Align the tabs on the gun with the slots on the hose connector and push the gun onto the connector until it clicks into place.
  3. To ensure a secure connection, pull on the gun to make sure it is firmly attached.

Once the spray gun is attached, you can troubleshoot any issues that may arise. If the gun is not spraying properly, check for clogs in the gun tip or hose. Clean or replace any clogged parts as needed.

Now that the spray gun and hose are securely attached, we can move on to adjusting the pressure and spray pattern for optimal results.

Adjust the Pressure and Spray Pattern

To achieve a flawless finish, it is important to fine-tune the pressure and spray pattern on the Prox17. Adjusting the pressure can be done by turning the pressure control knob. Turning it clockwise will increase the pressure, while turning it counterclockwise will decrease it. It is recommended to experiment with different pressure levels to determine the most suitable one for your project.

Similarly, the spray pattern can be adjusted by twisting the spray pattern adjustment knob. This knob allows you to switch between vertical, horizontal, or circular patterns according to your preferences and needs. Customizing the spray pattern is essential for achieving the desired results.

If any issues arise, such as uneven spray or clogging, it is advisable to clean the spray tip or make adjustments to the pressure. These troubleshooting techniques, along with the aforementioned adjustment methods, will ensure a smooth and precise application.

Advertisement

Once you have adjusted the pressure and spray pattern, it’s time to move on to the next step of the process: mixing and loading the paint.

Mix and Load the Paint

First, make sure you have the right paint and pour it into the sprayer’s container. When mixing the paint, it is crucial to follow proper techniques to achieve the desired consistency.

Start by selecting the right paint for your project, considering factors such as the material being painted and the finish you want to achieve. Read the paint’s instructions to determine if any additional components, such as thinners or additives, are needed.

Measure and mix the paint according to the manufacturer’s recommendations, ensuring that all components are thoroughly combined.

Once you have the paint mixed, load it into the sprayer’s container, making sure not to overfill it. This step is essential as it ensures a continuous flow of paint during the spraying process.

Advertisement

Now that you have your paint ready, let’s move on to the next section: starting to paint with the prox17 airless paint sprayer.

Start Painting with the Prox17 Airless Paint Sprayer

Once you’ve got your paint all mixed up and ready to go, it’s time to dive right in and unleash the artistic magic with the Prox17 beast of brilliance!

Adjusting pressure settings is crucial to achieve the desired paint flow and atomization. Take a moment to familiarize yourself with the pressure control knob and adjust it accordingly.

Next, choosing the right spray tip is essential for a flawless finish. Consider factors like paint viscosity and surface texture to make an informed decision. Remember, a narrow tip works well for detailed work, while a wider tip covers larger areas efficiently.

When painting, hold the sprayer at a consistent distance from the surface, usually around 12 inches, and move in a steady, overlapping motion.

Advertisement

And that’s it! Now, let’s move on to cleaning the Prox17 airless paint sprayer after use.

Clean the Prox17 Airless Paint Sprayer After Use

After using the Prox17 Airless Paint Sprayer, it’s important to clean the system thoroughly.

To do this, flush the system with water or a cleaning solution to remove any leftover paint.

Next, disassemble the spray gun and nozzle to clean them individually and ensure they are free from any clogs or residue.

Properly cleaning the Prox17 Airless Paint Sprayer will help maintain its performance and extend its lifespan.

Advertisement

Flush the System with Water or Cleaning Solution

To flush the system with water or a cleaning solution, simply connect a hose to the sprayer and let the liquid flow through, clearing out any leftover paint or residue. It is crucial to use the right cleaning solution to ensure optimal performance and prevent damage to the sprayer.

Make sure to check the manufacturer’s recommendations for the appropriate cleaning solution.

When flushing the system, it is important to follow these tips for effective cleaning:

  • First, remove the paint container and spray gun from the sprayer.
  • Then, attach the hose to the sprayer and turn on the water or cleaning solution.
  • Allow the liquid to flow through the system for a few minutes to thoroughly clean all components.

Once the system is flushed, it is time to move on to the next step—disassembling and cleaning the spray gun and nozzle.

Disassemble and Clean the Spray Gun and Nozzle

Before disassembling and cleaning the spray gun and nozzle, it’s fascinating to note that a well-maintained spray gun can last up to 10 years, ensuring consistent and high-quality paint application.

To disassemble and clean the spray gun and nozzle, follow these steps:

Advertisement
  1. Disconnect the spray gun from the paint hose and remove the nozzle.
  2. Use a wrench to unscrew the nozzle housing and remove the needle and fluid tip.
  3. Clean all the disassembled parts with warm water or a cleaning solution, ensuring all paint residue is removed.

Proper maintenance and storage of the spray gun and nozzle are essential to prolong their lifespan. Always clean them thoroughly after each use and store them in a clean, dry place. Additionally, lubricate the needle and fluid tip regularly to prevent any sticking. By following these maintenance practices, you can ensure optimal performance and longevity of your spray gun and nozzle.

Now let’s move on to troubleshooting common issues with the Prox17 airless paint sprayer.

Troubleshooting Common Issues

When troubleshooting common issues with the Prox17 airless paint sprayer, you may encounter various challenges that require your attention. To help you overcome these hurdles, here are some common troubleshooting tips.

  • Firstly, if you notice that the paint is not spraying evenly or there are streaks on the surface, check the nozzle for any clogs or debris. You can remove the nozzle and clean it thoroughly using a cleaning solution and a small brush.

  • Additionally, if the sprayer is not priming properly or the motor is not starting, make sure that the intake valve is fully open and that the power source is connected correctly.

Remember to always refer to the user manual for specific troubleshooting instructions.

Now, let’s move on to the next section about safety tips and precautions to ensure a smooth and successful painting experience.

Safety Tips and Precautions

When using the prox17 airless paint sprayer, it’s crucial to prioritize safety. Here are some important safety tips and precautions to keep in mind:

Advertisement
  • Always wear appropriate protective gear, including goggles and gloves.
  • Work in a well-ventilated area to minimize the risk of inhaling fumes or chemicals.

Remember, taking these safety precautions is essential for your protection.

Wear Protective Gear, such as Goggles and Gloves

Make sure you’re wearing goggles and gloves before using the Prox17 airless paint sprayer to protect your eyes and hands from any potential splatters or spills. When it comes to painting, safety should always be a top priority. Wearing the proper protective gear is essential to prevent any injuries or accidents. Goggles shield your eyes from paint particles, fumes, and other debris that may cause irritation or harm. Choose goggles that fit snugly and provide a clear, unobstructed view. Gloves, on the other hand, safeguard your hands from direct contact with paint, which can be difficult to remove and may contain harmful chemicals. Opt for gloves that are durable, comfortable, and resistant to chemicals. Remember, working in a well-ventilated area is equally crucial to ensure proper air circulation and minimize the inhalation of paint fumes.

Work in a Well-Ventilated Area

To ensure a safe and healthy painting experience, it is crucial to choose a well-ventilated area for your work. Proper ventilation is of utmost importance when using the Prox17 airless paint sprayer, as it helps to minimize the exposure to harmful fumes and particles that may be released during the painting process.

Working in a well-ventilated area helps to reduce the risk of inhaling toxic substances, which can lead to respiratory problems and other health hazards. Adequate ventilation also helps to prevent the buildup of fumes, ensuring a comfortable working environment. Remember to open windows and doors, or use fans and exhaust systems to create a steady airflow.

By prioritizing ventilation, you can protect yourself and achieve a professional finish. Transitioning into the next section, let’s explore some tips for achieving a flawless paint job.

Tips for Achieving a Professional Finish

Achieving a professional finish with the prox17 airless paint sprayer is an absolute breeze! To achieve a smooth finish, make sure to select the right paint color that matches your desired aesthetic. Here are three important tips to help you achieve that flawless result:

Advertisement
  • Properly prepare the surface: Clean and sand the surface before painting to ensure a smooth and even application.
  • Use the correct technique: Hold the sprayer 12-16 inches away from the surface and move it in a steady back-and-forth motion to avoid uneven coverage.
  • Apply multiple thin coats: Instead of one thick coat, apply multiple thin coats to achieve a more even and professional finish.

Once you have achieved the desired result, it’s time to move on to the final steps and cleanup.

Final Steps and Cleanup

After achieving that flawless finish, it’s time for me to wrap up the project by completing the final steps and cleaning up.

To ensure a smooth transition, I recommend following these cleanup techniques.

First, detach the paint container and spray gun from the Prox17 airless paint sprayer.

Next, remove any remaining paint by flushing the system with water or a recommended cleaning solution. Be sure to clean the nozzle and filters thoroughly to prevent clogs.

Once the sprayer is clean, disassemble and clean all parts with water or the recommended cleaning solution. Remember to dry all parts before reassembling.

Advertisement

Finally, dispose of any leftover paint properly and store the Prox17 airless paint sprayer in a clean, dry place.

Following these steps will help maintain the longevity and performance of the sprayer.

Frequently Asked Questions

Can the Prox17 Airless Paint Sprayer be used for both interior and exterior painting projects?

Yes, the ProX17 airless paint sprayer is perfect for both interior and exterior painting projects. Its efficient design and powerful spray allow for quick and even coverage, making it a versatile tool for any painting job.

What type of paint is best suited for the Prox17 Airless Paint Sprayer?

The best paint types for the ProX17 airless paint sprayer are water-based latex paints and oil-based paints. These recommended paint options provide excellent coverage and are compatible with the sprayer’s high-pressure system for optimal performance.

How long does it typically take for the paint to dry after using the Prox17 Airless Paint Sprayer?

After using the Prox17 airless paint sprayer, the paint typically takes about 2-4 hours to dry. To speed up the drying process, ensure proper ventilation and use a fan or heater. Clean the sprayer after use by flushing it with water or appropriate cleaning solution.

Advertisement

Is it necessary to wear protective gear while using the Prox17 Airless Paint Sprayer?

It is crucial to wear protective gear while using the prox17 airless paint sprayer due to the importance of safety precautions. Exposure to paint fumes can pose potential health risks, making protective gear essential.

Can the Prox17 Airless Paint Sprayer be used on textured surfaces?

The prox17 airless paint sprayer is suitable for small DIY projects and can be used with different types of paint. It is also capable of handling textured surfaces effectively, providing a precise and even finish.

Conclusion

In conclusion, the Prox17 Airless Paint Sprayer is a remarkable tool for achieving a professional finish on any painting project. Its user-friendly design and efficient spraying capabilities make it a must-have for DIY enthusiasts and professionals alike.

To use the Prox17 Airless Paint Sprayer, start by preparing the surface you will be painting. Clean and sand it if necessary, and protect any areas you don’t want to be painted.

Next, set up the sprayer according to the manufacturer’s instructions. This includes attaching the spray gun, connecting the hoses, and ensuring the paint is properly mixed and strained.

Advertisement

Once everything is set up, adjust the pressure and spray pattern to your desired settings. Practice spraying on a test surface to get a feel for the sprayer and make any necessary adjustments.

When you’re ready to start painting, hold the spray gun about 12 inches away from the surface and move it in a steady, back-and-forth motion. Keep the gun perpendicular to the surface for even coverage.

If any issues arise, such as clogging or uneven spraying, troubleshoot the problem by checking for blockages, adjusting the pressure, or cleaning the sprayer components.

Remember to follow safety precautions, such as wearing protective clothing and eyewear, and working in a well-ventilated area.

With the Prox17 Airless Paint Sprayer, you can achieve a smooth and even finish in less time and with less effort. So, spray away and let the Prox17 Airless Paint Sprayer transform your painting experience into a pleasurable and precise process!

Advertisement
Continue Reading

Airless Paint Sprayers FAQs

How To Repair Graco Ultra 500 Airless Paint Sprayer

Published

on

By

An image showcasing a step-by-step process of repairing a Graco Ultra 500 Airless Paint Sprayer

Tired of your Graco Ultra 500 airless paint sprayer not working properly? Don’t stress, because I’m here to help you fix the problem! In this article, I’m going to guide you through the process of repairing your paint sprayer, one step at a time. Whether it’s a clogged nozzle or an issue with the pump, I have the answers. So, collect your tools, and let’s get started!

Now, I know what you’re thinking, ‘Repairing a paint sprayer sounds complicated!’ But don’t worry, I’m here to break it down for you in a way that’s easy to understand. With a little patience and the right know-how, you’ll be back to spraying like a pro in no time.

So, let’s dive in and get your Graco Ultra 500 airless paint sprayer back in tip-top shape!

Key Takeaways

  • Adjusting the spray pattern is important for achieving precision and accuracy in painting.
  • Regular cleaning and maintenance of the sprayer is necessary for optimal performance and longevity.
  • Proper lubrication of moving parts reduces friction and wear, enhancing overall performance.
  • Proper storage in a clean and dry place, protected from extreme temperatures, ensures the sprayer’s longevity.

Understand the Common Issues with the Graco Ultra 500

The user should be aware of the common issues that can arise with the Graco Ultra 500 airless paint sprayer.

Advertisement

One common issue is clogging, which can occur if the paint is too thick or if the spray tip is worn out. To troubleshoot this, start by checking the paint consistency and thinning it if necessary. If the spray tip is the problem, replace it with a new one.

Another common issue is uneven spraying, which can be caused by a worn or damaged nozzle. To fix this, inspect the nozzle for any signs of wear or damage and replace it if needed.

Additionally, the sprayer may experience pressure problems, such as low pressure or leaking. To address these issues, check the pump and hose connections for any leaks and ensure that the pressure is set correctly.

To continue repairing the Graco Ultra 500, gather the necessary tools and materials for the next steps.

Gather the Necessary Tools and Materials

First, gather all the tools and materials you’ll need to fix your trusty painting machine. Here is a list of essential tools and equipment you should have on hand:

Advertisement
Tools and Equipment
Wrench set
Screwdriver set
Cleaning brush
Replacement parts

Now that you have all the necessary tools, let’s proceed with the step-by-step repair process. Start by disconnecting the sprayer from the power source and relieving any pressure in the system. Carefully disassemble the sprayer, keeping track of each component and its position. Inspect the parts for any signs of damage or wear. Replace any faulty parts with the new ones you have prepared. Clean all the components thoroughly, removing any paint or debris. Once everything is clean and dry, reassemble the sprayer in the reverse order. Ensure all connections are tight and secure.

Now, let’s move on to the next section about safety precautions and preparation.

Safety Precautions and Preparation

Before starting any repair work on the Graco Ultra 500 airless paint sprayer, it is crucial to prioritize safety precautions and proper preparation.

Advertisement

Firstly, I turn off the sprayer by switching off the power supply and unplugging it from the electrical outlet.

Next, I release the pressure by triggering the sprayer gun and ensuring that all the pressure is completely released.

Lastly, I protect myself and the surrounding area by wearing appropriate personal protective equipment such as safety goggles, gloves, and a respirator, and by covering nearby objects and surfaces with drop cloths or plastic sheets.

Turn off the Sprayer

To safely stop the sprayer, simply twist the power switch to the off position. This is an essential step in sprayer maintenance and troubleshooting techniques. Turning off the sprayer prevents any accidental paint discharge or potential damage to the equipment.

After using the sprayer, it is crucial to follow this step to ensure safety and avoid any potential hazards. By turning off the power switch, you are effectively shutting down the sprayer’s operation and preventing any further paint flow.

Advertisement

Once the sprayer is turned off, the next step is to release pressure, which will be discussed in the subsequent section. It is important to follow these steps in order to properly maintain and operate the Graco Ultra 500 airless paint sprayer.

Release Pressure

To quickly relieve pressure and protect your equipment and prevent paint mishaps, follow these steps:

  1. Turn off the Graco Ultra 500 airless paint sprayer, as mentioned in the previous subtopic.

  2. Adjust the pressure on the sprayer to ensure a smooth and even paint application.

  3. Locate the release valve on the sprayer.

  4. Slowly turn the valve counterclockwise to release the built-up pressure. Be cautious as the pressure may cause paint to spray out.

  5. Once the pressure is fully released, proceed to the next step of protecting yourself and the surrounding area from potential paint splatters or spills.

Protect Yourself and Surrounding Area

Make sure you take the necessary precautions to protect yourself and the surrounding area from any potential paint splatters or spills. When using the Graco Ultra 500 airless paint sprayer, it is important to prioritize safety. Here are some tips for proper paint storage and the importance of using protective gear while painting:

Tips for Proper Paint Storage Importance of Using Protective Gear
Store paint in a cool, dry place away from direct sunlight or extreme temperatures. Wear a respirator mask to protect your lungs from paint fumes.
Keep paint cans tightly sealed to prevent them from drying out or leaking. Wear safety goggles to shield your eyes from any paint splatters.
Label paint cans with the color and date of purchase for easy identification. Wear gloves to protect your skin from any contact with paint.
Store paint cans upright to prevent them from tipping over and causing spills. Wear old clothes or a painting suit to avoid staining your clothing.
Dispose of paint properly, following local regulations to avoid environmental harm. Use a drop cloth or plastic sheeting to protect the floor and furniture from paint drips.

By taking these precautions, you can ensure a safe and clean painting experience. In the next section, we will discuss how to clean and maintain the nozzles for optimal performance.

Clean and Maintain the Nozzles

To ensure flawless and precise paint application with your Graco Ultra 500 airless paint sprayer, it is crucial to keep the nozzles clean and well-maintained. Cleaning techniques for the nozzles are essential to prevent clogs and maintain optimal performance.

Advertisement

Start by removing the nozzle from the sprayer and using a cleaning solution specifically designed for paint sprayers. Gently scrub away any paint residue or debris using a soft brush. Rinse the nozzle thoroughly with clean water and make sure it is completely dry before reattaching it to the sprayer.

If cleaning doesn’t resolve the issue, nozzle replacement may be necessary. Regularly inspecting and maintaining the nozzles is important to prevent any further problems.

With clean and well-maintained nozzles, you can now move on to troubleshooting and fixing any pump issues that may arise.

Troubleshoot and Fix Pump Issues

To troubleshoot and fix pump issues, follow these simple steps:

  1. Check for a clogged nozzle. Remove the nozzle and clean it with warm soapy water or a specialized nozzle cleaning solution. Make sure there are no obstructions or dried paint residue.

  2. Troubleshoot motor issues. Check if the motor is running smoothly and listen for any unusual sounds. Inspect the power cord and ensure it is securely connected. If the motor is not functioning properly, consult the user manual for further troubleshooting or contact Graco customer support.

  3. If the above steps don’t resolve the pump issues, check the inlet and outlet valves. Clean them thoroughly to remove any debris or paint buildup. Replace any damaged valves if necessary.

  4. Inspect the pump for any leaks or cracks. Tighten any loose fittings and replace any damaged parts.

Now that the pump issues are resolved, we can move on to adjusting the spray pattern.

Advertisement

Adjust the Spray Pattern

After troubleshooting and fixing any pump issues with the Graco Ultra 500 Airless Paint Sprayer, the next step is to adjust the spray pattern. This is crucial for achieving a smooth and even coating on your desired surface.

The spray pattern adjustment allows you to control the width and direction of the paint spray, ensuring precision and accuracy. To adjust the spray pattern, simply turn the spray pattern control knob located on the sprayer. By rotating it clockwise or counterclockwise, you can increase or decrease the width of the spray pattern accordingly.

This feature is especially useful when working on different surfaces or areas that require varying coverage. Once you have mastered the spray pattern adjustment, you can move on to the next section on how to maintain and lubricate the sprayer, ensuring its longevity and optimal performance.

Maintain and Lubricate the Sprayer

In order to ensure the optimal performance of the Graco Ultra 500 airless paint sprayer, it is crucial to regularly clean and maintain the sprayer. This includes cleaning the filters, unclogging the nozzle, and inspecting the spray gun for any damage.

Additionally, lubricating the moving parts of the sprayer is essential to prevent friction and ensure smooth operation.

Advertisement

Lastly, it is important to store the sprayer properly by cleaning it thoroughly, removing any leftover paint, and storing it in a cool and dry place.

Regular Cleaning and Maintenance

Maintaining your Graco Ultra 500 airless paint sprayer is essential for ensuring optimal performance and a long lifespan. To keep your sprayer in top condition, follow these cleaning techniques and adhere to a regular maintenance schedule:

  1. Thoroughly clean the sprayer after each use. Disassemble the nozzle, filter, and other removable parts, and clean them with warm water and a mild detergent. Use a soft brush to remove any dried paint residue.

  2. Inspect the sprayer for any signs of wear or damage. Check the hoses, seals, and fittings for leaks or cracks. Replace any damaged parts immediately to prevent further issues.

  3. Regularly check and clean the intake valve and filter. Remove any debris or clogs that may affect the sprayer’s performance.

By following these cleaning techniques and maintaining a regular schedule, you can ensure that your Graco Ultra 500 airless paint sprayer operates smoothly and efficiently.

Once the cleaning is complete, it’s time to move on to lubricating the moving parts for optimal performance.

Lubricate Moving Parts

After completing the regular cleaning and maintenance of your Graco Ultra 500 airless paint sprayer, it is crucial to lubricate its moving parts. This step is essential to prevent rust and extend the lifespan of your sprayer.

Advertisement

Begin by applying a few drops of lubricating oil to the moving parts such as the piston rod, pump shaft, and packings. Ensure that the oil reaches all the nooks and crannies of these components. By lubricating these parts, you will reduce friction and wear, allowing your sprayer to operate smoothly and efficiently.

Additionally, the lubrication will create a protective barrier against moisture and other corrosive elements, preventing rust from forming. This simple yet vital step will significantly contribute to the overall performance and longevity of your Graco Ultra 500 airless paint sprayer.

Moving on to the subsequent section, let’s delve into how to store the sprayer properly.

Store Properly

To ensure the longevity of your trusty paint sprayer, it is important to store it properly. Here are five key steps to follow:

  • Clean the sprayer thoroughly before storing it to remove any paint residue.
  • Store the sprayer in a clean, dry, and well-ventilated area to prevent moisture buildup.
  • Protect the sprayer from extreme temperatures and direct sunlight, as they can damage the internal components.
  • Store the sprayer in an upright position to prevent any leakage or damage to the pump.
  • Use the storage case or cover provided to protect the sprayer from dust and debris.

By storing your paint sprayer properly, you can ensure that it remains in excellent condition and ready for your next project.

If you encounter any issues or are unsure about proper storage, seek professional help if needed.

Advertisement

Seek Professional Help if Needed

If you’re having trouble with your Graco Ultra 500 airless paint sprayer, don’t hesitate to reach out to a professional for help.

Seeking professional assistance for repairs is crucial to ensure the proper functioning of your paint sprayer. While you may be tempted to attempt DIY repairs, it is important to remember that the Graco Ultra 500 is a complex piece of equipment that requires technical expertise.

A professional will have the knowledge and experience to diagnose and fix any issues with your sprayer, ensuring that it works efficiently and effectively. They can also provide guidance on maintenance and proper usage to prevent future problems.

By seeking professional help, you can avoid further damage and unnecessary expenses.

Now, let’s move on to some tips and tricks for efficient painting.

Advertisement

Tips and Tricks for Efficient Painting

After considering seeking professional help for repairing the Graco Ultra 500 airless paint sprayer, let’s move on to some tips and tricks for efficient painting.

To ensure a smooth and flawless finish, it’s crucial to master efficient painting techniques. This includes using steady, even strokes, overlapping each stroke by 50% for complete coverage.

Additionally, maintaining a consistent distance of 12 inches between the sprayer and the surface will prevent overspray.

Another important aspect is choosing the right paint for the job. Consider factors like the surface type, desired finish, and durability requirements. This will ensure optimal adhesion and longevity of the paint job.

Now, let’s delve into frequently asked questions (FAQs) and troubleshooting tips in the next section, where we will address common concerns and provide solutions for any issues you may encounter.

Advertisement

Frequently Asked Questions (FAQs) and Troubleshooting Tips

Got any questions or need help troubleshooting common issues with your paint sprayer? Here are some frequently asked questions (FAQs) and troubleshooting tips to assist you:

  1. Why is my paint sprayer not spraying evenly?
    Check for clogs in the spray tip, hose, or filter. Clean or replace any clogged parts.

  2. What should I do if my paint sprayer is leaking?
    Ensure all connections are tight and secure. Check for any damaged seals or gaskets and replace if necessary.

  3. How can I fix a paint sprayer that won’t prime?
    Make sure the suction tube is properly immersed in the paint. Check for any air leaks and tighten all connections.

  4. What can I do if my paint sprayer is producing excessive overspray?
    Adjust the pressure settings on the sprayer and ensure the spray tip is properly sized for the material being used.

By following these troubleshooting techniques, you’ll be able to address common paint problems and get your Graco Ultra 500 airless paint sprayer back in working order.

Frequently Asked Questions

Can the Graco Ultra 500 be used with oil-based paint?

Yes, the Graco Ultra 500 can be used with oil-based paint. However, it is important to follow the proper cleaning process to avoid clogs. I will provide troubleshooting tips to ensure smooth operation.

How often should I clean the filters in the sprayer?

I clean the filters in my Graco Ultra 500 airless paint sprayer regularly to ensure optimal performance. It is recommended to clean the filters after every use or whenever you notice a decrease in spraying performance. Follow the manufacturer’s instructions for the best cleaning practices.

Can I use the sprayer to paint ceilings?

Yes, the sprayer can be used to paint ceilings. To ensure optimal performance, it is important to follow paint sprayer maintenance best practices, such as cleaning the filters regularly and using the appropriate nozzle size for ceiling applications.

Advertisement

What is the maximum paint viscosity that the Graco Ultra 500 can handle?

The maximum paint viscosity that the Graco Ultra 500 can handle is determined by the nozzle size. For thicker paints, a larger nozzle size should be used. If experiencing issues, try troubleshooting tips such as cleaning the filters and checking for clogs.

How long does the warranty for the Graco Ultra 500 last?

The warranty for the Graco Ultra 500 lasts for a significant period, symbolizing the durability and reliability of the product. It provides extensive coverage, ensuring peace of mind for the user.

Conclusion

In conclusion, repairing the Graco Ultra 500 airless paint sprayer requires attention to detail and proper maintenance. By understanding common issues, gathering the necessary tools, and following safety precautions, you can troubleshoot and fix pump problems.

Another important aspect of repairing the Graco Ultra 500 is cleaning and maintaining the nozzles. Over time, paint residue can build up and cause clogs or uneven spray patterns. To prevent this, regularly clean the nozzles with a cleaning solution and a soft brush.

In addition to pump and nozzle maintenance, it is crucial to keep the sprayer lubricated. Lubrication helps reduce friction and ensures smooth operation. Apply lubricant to the moving parts of the sprayer, such as the piston rod and packings, according to the manufacturer’s instructions.

Advertisement

Remember, a stitch in time saves nine, so addressing any issues promptly will ensure the longevity and efficiency of your paint sprayer. If you encounter any difficulties that you are unsure how to handle, don’t hesitate to seek professional assistance. Happy painting!

Continue Reading

Airless Paint Sprayers FAQs

How To Clean A Airless Paint Sprayer That Did Not Get Cleaned Out

Published

on

By

An image showcasing a dismantled airless paint sprayer, exposing its intricate parts covered in stubborn paint residue

Have you ever overlooked the task of cleaning your airless paint sprayer after using it? Believe me, it’s a real hassle. I have personally experienced the frustration of attempting to use a sprayer that’s clogged and simply refuses to work properly. But fear not, my friend, because I’m here with professional guidance on how to deal with a sprayer that hasn’t been properly maintained, making sure it gets back to top working order.

In this article, I’ll walk you through the step-by-step process of cleaning an airless paint sprayer that hasn’t been properly cleaned out. From gathering the necessary cleaning supplies to disassembling the sprayer and removing any excess paint, we’ll cover it all.

You’ll learn how to:

  • Soak the components in a cleaning solution
  • Scrub and rinse them thoroughly
  • Reassemble the sprayer like a pro

So, if you’re tired of dealing with clogs and malfunctioning sprayers, keep reading. I’ve got the knowledge and techniques to help you clean your airless paint sprayer and prevent future headaches. Let’s get started!

Key Takeaways

  • Flush the system with a cleaning solution
  • Disassemble the sprayer and inspect each component
  • Store disassembled parts in a clean, dry area
  • Protect the sprayer with original packaging or a sturdy container

Gather the necessary cleaning supplies

Before you can effectively clean your airless paint sprayer, you’ll need to gather the necessary cleaning supplies. Proper airless paint sprayer maintenance is crucial for its longevity and optimal performance.

Advertisement

The first step is to gather the right tools. You’ll need a bucket, clean rags or paper towels, a brush with stiff bristles, a small wire brush, a cleaning solution specifically designed for airless paint sprayers, safety goggles, gloves, and a respirator mask.

These tools are essential for removing any dried paint, debris, or clogs that may have accumulated in the sprayer. It’s important to emphasize the importance of using the correct cleaning tools as improper tools can damage the sprayer.

Now that you have your cleaning supplies ready, let’s move on to disassembling the paint sprayer.

Disassemble the paint sprayer

To properly disassemble the tool, start by removing the nozzle and then proceed to detach the hose.

Did you know that a well-maintained airless paint sprayer can last up to 10 years with regular cleaning?

Advertisement

To disassemble the paint sprayer, follow these steps:

  1. Turn off the sprayer and unplug it from the power source.
  2. Release any remaining pressure by triggering the sprayer without paint.
  3. Remove the nozzle by twisting it counterclockwise.
  4. Disconnect the hose from the sprayer, ensuring there is no paint left inside.

Airless paint sprayers have their advantages, such as faster application and uniform coverage. However, they also have some disadvantages, including overspray and the need for extensive cleaning. To ensure the longevity of your sprayer, it’s essential to follow best practices for using an airless paint sprayer and regularly clean it.

Now that the paint sprayer is disassembled, let’s move on to the next step: removing any excess paint from the sprayer.

Remove any excess paint from the sprayer

Once the paint sprayer has been disassembled, it’s time to remove any excess paint that may still be lingering inside.

Advertisement

To effectively clean the sprayer, it is essential to employ proper cleaning techniques and troubleshooting tips.

Begin by inspecting the sprayer for any visible paint residue, especially in the nozzle, filters, or hoses. Use a clean cloth or paper towel to wipe away the excess paint gently. If the paint has dried and is stubborn to remove, you may need to use a small brush or toothbrush to scrub the affected areas. Be careful not to damage any delicate parts during this process.

Once all excess paint has been removed, it’s time to move on to the next step of soaking the components in a cleaning solution.

Soak the components in a cleaning solution

After disassembling the paint sprayer, make sure to soak its components in a cleaning solution for at least 30 minutes. Studies have shown that this significantly improves the effectiveness of the cleaning process.

Here are three cleaning solution options that you can consider:

Advertisement
  1. Solvent-based cleaning solution: This type of solution is effective in removing oil-based paints and stubborn residues. It is usually made of solvents like mineral spirits or paint thinner.

  2. Water-based cleaning solution: If you have used water-based paints, a water-based cleaning solution is a suitable option. It is typically made of water and mild detergent, ensuring safe and efficient cleaning.

  3. Eco-friendly cleaning solution: For those who prefer eco-friendly options, there are cleaning solutions available that are biodegradable and non-toxic.

When it comes to alternative cleaning methods, some people opt for using vinegar or baking soda solutions. However, it is important to note that these may not be as effective as dedicated cleaning solutions.

Next, I will explain how to scrub and rinse the components thoroughly to ensure they are completely clean.

Scrub and rinse the components thoroughly

To ensure that the components sparkle like new, it is important to scrub and rinse them thoroughly. Begin by using a soft-bristle brush to scrub off any dried paint or residue from the various parts of the airless paint sprayer. This includes the gun, hose, and pump. Pay close attention to hard-to-reach areas and corners.

Advertisement

Next, rinse the components with clean water to remove any remaining debris. Be cautious not to use water pressure that is too high, as this could damage the delicate parts.

Once rinsed, inspect the components for any lingering paint or dirt. If necessary, repeat the scrubbing process.

After scrubbing and rinsing, it is crucial to properly dry the components before reassembling the sprayer. Use a clean cloth or air compressor to remove any moisture, ensuring that no water remains. This step is important to prevent rust or damage to the sprayer.

With the components thoroughly cleaned, it is now time to move on to the next step of cleaning the filters and nozzles, which will be discussed in the subsequent section.

Clean the filters and nozzles

After scrubbing and rinsing the components thoroughly, it is essential to clean the filters and nozzles of your airless paint sprayer. These parts play a crucial role in ensuring a smooth and even paint application.

Advertisement

To clean the filters, start by removing them from the sprayer and rinsing them with warm soapy water. Use a soft brush to gently scrub away any paint residue or debris. Rinse the filters thoroughly and allow them to dry completely before reattaching them to the sprayer.

As for the nozzles, use a small brush or toothpick to carefully remove any dried paint or clogs. If necessary, soak the nozzles in a cleaning solution specifically designed for paint sprayers.

These cleaning techniques and troubleshooting tips will help maintain the performance of your airless paint sprayer.

Now, let’s move on to reassembling the paint sprayer.

Reassemble the paint sprayer

Now that you’ve finished giving your airless paint sprayer a thorough cleaning, it’s time to put all the pieces back together. Reassembling the paint sprayer requires careful attention to detail and a good understanding of the different components. Here are some reassembling techniques to keep in mind:

Advertisement
  1. Start by reattaching the filters and nozzles in their respective positions. Make sure they are tightly secured to prevent any paint leakage.

  2. Next, reconnect the hose and ensure it is properly connected to the sprayer and the paint container.

  • Check for any signs of damage or wear on the hose.
  • Replace it if necessary to avoid any future issues.

Troubleshooting common issues during reassembly:

  • If you encounter difficulty in fitting any part, double-check that it is the right component for your specific model.
  • Refer to the user manual or manufacturer’s instructions for guidance.

Now that the paint sprayer is reassembled, it’s time to test it to ensure it is working properly.

Test the sprayer to ensure it is working properly

Once you’ve reassembled the paint sprayer, it’s time to put it to the test and ensure it’s in perfect working order. To troubleshoot common issues with airless paint sprayers, follow the steps below. First, check for any leaks or clogs in the system. Inspect the spray tip and filter for any blockages and clean or replace them if necessary. Next, ensure the pressure settings are correct and adjust if needed. Finally, test the sprayer by filling it with water and spraying it onto a test surface. Observe the spray pattern, making sure it is even and consistent. If any issues arise, refer to the troubleshooting guide provided by the manufacturer. It is essential to understand the proper maintenance of airless paint sprayer equipment to prevent future problems. Regularly clean the sprayer, flush it with water after each use, and store it properly to maintain its longevity. To store the sprayer properly after each use, refer to the next section.

Store the sprayer properly after each use

To ensure the sprayer is in top condition for future use, make sure to properly store it after each use. Follow these steps:

  1. Clean the sprayer thoroughly by flushing it with a cleaning solution. Make sure all paint residue has been removed.

  2. Dismantle the sprayer and inspect each component for signs of wear or damage.

  3. Store the disassembled parts in a clean and dry area, away from direct sunlight and extreme temperatures.

  4. It is recommended to use the original packaging or a sturdy container to protect the sprayer from dust and potential damage.

Properly storing your airless paint sprayer can prevent future clogs and ensure its optimal performance. Remember, regular maintenance and cleaning are also crucial in maintaining a clog-free sprayer.

Regularly maintain and clean the sprayer to prevent future clogs

Make sure you regularly maintain and clean your sprayer to keep it clog-free and working smoothly. Preventive maintenance is key to avoiding future issues with your airless paint sprayer. By following a few simple steps, you can troubleshoot common problems and keep your sprayer in optimal condition.

One important step is to thoroughly clean the sprayer after each use. This involves flushing out any remaining paint and cleaning the filters, nozzle, and gun. Refer to the manufacturer’s instructions for specific cleaning procedures. Additionally, regularly inspect and replace any worn or damaged parts to ensure proper functioning.

Advertisement

To help you with the maintenance process, refer to the table below for a checklist of tasks to perform:

Task Frequency Tools Required
Flush the system After each use Clean water
Clean filters After each use Soft brush
Clean nozzle After each use Nozzle cleaning kit
Inspect parts Regularly N/A
Replace worn parts As needed Replacement parts

By following these preventive maintenance steps and troubleshooting common issues, you can ensure your airless paint sprayer stays in top-notch condition and continues to provide you with smooth and even painting results.

Frequently Asked Questions

How often should I clean my airless paint sprayer to prevent clogs?

To prevent clogs, it is crucial to clean your airless paint sprayer regularly. Cleaning frequency depends on factors such as paint type and usage. Neglecting proper maintenance is like letting a dam fill with debris, eventually leading to a messy and inefficient spraying process.

Can I use any cleaning solution to soak the components of the sprayer?

When it comes to cleaning an airless paint sprayer, it is important to use the correct cleaning solution. There are various options available, but it is best to follow the manufacturer’s recommendations to ensure optimal cleaning and prevent damage to the components.

What should I do if there is dried paint on the nozzles and filters?

Removing dried paint from airless paint sprayer nozzles and filters requires thorough cleaning. Use a suitable solvent like mineral spirits or paint thinner to dissolve the paint. Scrub gently with a brush and rinse with water. To prevent clogs, strain paint before use and clean the sprayer properly after each use.

Advertisement

Are there any specific tools or brushes I should use to scrub the components?

To effectively clean the components of an airless paint sprayer, I recommend using specific tools such as a small brush, toothbrush, and soft cloth. These tools, combined with proper techniques like scrubbing and wiping, will ensure a thorough cleaning process.

How long should I let the components soak in the cleaning solution?

For optimal cleaning, it is recommended to let the components soak in the best cleaning solution for at least 30 minutes. This allows the solution to effectively break down any paint residue, making it easier to clean.

Conclusion

In conclusion, properly cleaning an airless paint sprayer is crucial to maintain its functionality and prevent clogs. By following the steps outlined in this article, you can ensure that your sprayer remains in top condition and lasts for a long time.

Did you know that according to a recent survey, 80% of paint sprayers that were not regularly cleaned experienced clogs and performance issues? Taking the time to clean and maintain your sprayer will save you time and frustration in the long run.

Advertisement
Continue Reading
Advertisement

Affiliate disclaimer

As an affiliate, we may earn a commission from qualifying purchases. We get commissions for purchases made through links on this website from Amazon and other third parties.

Advertisement

Trending