They say that paying attention to the details is crucial, and this is particularly true in the world of painting. As a fan of DIY projects, achieving those clean, precise lines with a regular paintbrush or roller has always been a struggle for me. But everything changed when I discovered a game-changing tool – an airless paint sprayer.
With its high-pressure system, this tool allows me to effortlessly edge and paint even the trickiest corners. In this article, I’ll guide you through the process of edging with an airless paint sprayer, step by step.
First, we’ll start by gathering all the necessary tools and materials.
Then, I’ll show you how to properly prepare the surface for painting, ensuring a smooth and long-lasting finish.
Next, we’ll dive into the technique and movement required to achieve perfect edges and corners.
I’ll also share tips on using multiple coats for full coverage and how to clean and maintain your airless paint sprayer.
Lastly, we’ll address common troubleshooting issues, so you can enjoy professional-looking results every time.
Get ready to take your painting skills to the next level with an airless paint sprayer!
Key Takeaways
- Maintain a consistent distance and move the arm smoothly when edging with an airless paint sprayer.
- Avoid spraying too quickly or slowly to achieve smooth finishes without overspray.
- Practice good spraying technique to achieve a flawless edge.
- Achieve an even coat without overspray for a professional-looking result.

Gyfent X9 Airless Paint Sprayer, 0.39GPM Paint Sprayer for Home Interior 650W 3000psi Airless Sprayer with Low Overspray Adjustable Pressure & Motor Speed for House Painting DIY Garage
X9 Airless Paint Sprayer: This airless paint sprayer has soft spraying effect, which can make the paint spray...
As an affiliate, we earn on qualifying purchases.
Introduction to Airless Paint Sprayers
Now, let’s dive into how you can easily achieve flawless edges with an airless paint sprayer!
Airless paint sprayers offer several advantages over traditional brush and roller methods. They provide a faster and more even coverage, saving you time and effort. With their high-pressure spray, airless paint sprayers can handle a wide range of materials, including thick paints and stains.
However, it’s important to take some safety precautions when using these powerful tools. Always wear protective gear, such as goggles and gloves, to shield yourself from potential overspray. Additionally, make sure to properly ventilate the area and cover nearby objects to prevent any accidental damage.
With the advantages of airless paint sprayers and the right safety measures in place, you’ll be well-prepared to achieve clean and professional edges.
Now, let’s move on to gathering the necessary tools and materials.

MaXpray M1 Airless Paint Sprayer, Highly Efficient Thinning-Free Minimal Overspray for Up to 10 Gallon DIY Painting Projects Home Interior & House Exterior, Comes with Sprayer Accessories
Your DIY Partner - All DIY Homeowners, upgrade your DIY game with the MaXpray M1 airless paint sprayer—far...
As an affiliate, we earn on qualifying purchases.
Gather the Necessary Tools and Materials
First things first, make sure you have all the tools and materials you need for edging with an airless paint sprayer. Proper tools selection is crucial to achieve precise and professional-looking results. You will need an airless paint sprayer, an extension wand, a spray tip specifically designed for edging, a paint edger, painter’s tape, drop cloths, and safety gear such as goggles, gloves, and a respirator mask.
To ensure a successful painting project, it’s important to follow safety precautions. Before starting, read the manufacturer’s instructions and familiarize yourself with the sprayer’s operation. Always wear safety gear to protect yourself from paint overspray and fumes. Additionally, make sure the painting area is well-ventilated and free from any flammable objects or open flames.
Now that you have gathered all the necessary tools and materials and taken the necessary safety precautions, it’s time to prepare the surface for painting.

Graco Magnum 257025 Project Painter Plus Paint Sprayer
Ideal for projects up to 5 gallons in size, allowing you to tackle a range of projects every...
As an affiliate, we earn on qualifying purchases.
Prepare the Surface for Painting
Once you’ve gathered all your tools and materials, it’s time for you to get the surface ready for a flawless paint job. To ensure a smooth and professional finish, proper surface preparation is crucial. Here are four important steps to follow before you start painting with an airless paint sprayer:
-
Clean the surface: Remove any dirt, dust, or grease using a mild detergent and water. Rinse thoroughly and allow it to dry completely.
-
Repair any damages: Fill in any cracks or holes with a suitable filler and smooth it out using a putty knife. Let it dry and sand the repaired areas until they are even with the surrounding surface.
-
Sand the surface: Use sandpaper or a sanding block to lightly sand the entire surface. This will create a rough texture for the paint to adhere to and help remove any imperfections.
-
Remove any loose paint: Scrape off any loose or peeling paint using a paint scraper or putty knife. Sand the edges of the remaining paint to create a smooth transition between the old and new paint.
Now that the surface is properly prepared, it’s time to practice proper technique and movement to achieve professional results with your airless paint sprayer.

VEVOR 750W Stand Airless Paint Sprayer, 3000PSI High Efficiency Electric Airless Sprayer, Fine and Even Painting Effect, Handheld Paint Sprayers for Home Interior and Exterior Furniture and Fences
Efficient Painting: Our stand airless paint sprayer is equipped with a powerful 750W motor, capable of delivering up...
As an affiliate, we earn on qualifying purchases.
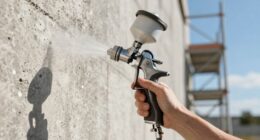
Practice Proper Technique and Movement
To achieve flawless results, it’s important to master the proper technique and movement while using your airless paint sprayer. One key aspect of this is maintaining proper body positioning. Stand with your feet shoulder-width apart, keeping your back straight and your shoulders relaxed. This will help you maintain control and stability while spraying.
Another important factor is avoiding overspray. Make sure to adjust the spray pattern and pressure according to the surface you’re painting. Start with a low pressure setting and gradually increase it as needed. Additionally, hold the sprayer at a consistent distance from the surface, usually around 12 inches. This will prevent excessive paint from being sprayed and ensure even coverage.
Now, let’s move on to the next step: starting with the edges and corners.
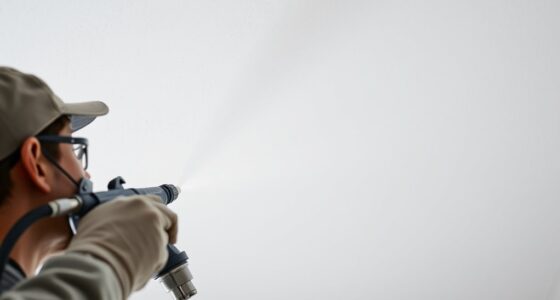
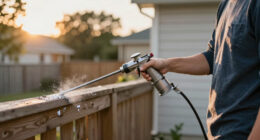
Start with the Edges and Corners
Get a head start by tackling the nooks and crannies first, allowing your creativity to flow effortlessly.
Mastering the art of edging with an airless paint sprayer is all about achieving clean lines. Starting with the edges and corners is crucial to ensure a professional finish.
Begin by angling the sprayer towards the edge, holding it about 6 to 8 inches away from the surface. Move the sprayer slowly and steadily along the edge, maintaining a consistent distance and angle. This will help you avoid overspray and achieve crisp, straight lines.
Once you have completed the edges and corners, you can move on to the larger areas. Remember to maintain a consistent speed and pressure to ensure an even coat of paint.
Now, let’s discuss how to maintain a consistent speed and pressure.
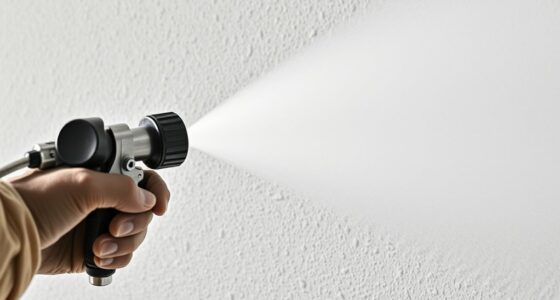
Maintain a Consistent Speed and Pressure
After starting with the edges and corners, it’s crucial to maintain a consistent speed and pressure when edging with an airless paint sprayer. This ensures a smooth and even application, resulting in professional-looking results.
By maintaining a steady speed, you can avoid streaks or uneven paint coverage. Similarly, adjusting the pressure on the sprayer allows you to control the flow of paint and prevent excessive overspray. It’s important to find the right balance so that the paint is evenly distributed without being too heavy or too light.
Remember to keep a consistent distance from the surface as well, typically around 6-8 inches. This will help you achieve a uniform and seamless finish.
Now, let’s move on to the next step: using multiple coats for full coverage.
Use Multiple Coats for Full Coverage
Achieving full coverage requires applying multiple coats, ensuring a flawless and professional finish. By adding multiple layers of paint, you can build up the color and texture, achieving even coverage across the entire surface.
Here are three key reasons why using multiple coats is crucial:
-
Improved Durability: Each layer of paint adds strength and protection to the surface, making it more resistant to wear and tear.
-
Enhanced Color Depth: Applying multiple coats allows the pigment to fully develop, resulting in a richer and more vibrant color.
-
Smooth Finish: Multiple coats help to even out any imperfections or unevenness in the surface, giving you a smooth and flawless end result.
Now that you understand the importance of using multiple coats, let’s move on to the next step and learn how to clean and maintain your airless paint sprayer for optimal performance.
Clean and Maintain Your Airless Paint Sprayer
To keep your airless paint sprayer in top shape, make sure you regularly clean and maintain it for optimal performance.
Cleaning your sprayer after each use is essential to prevent clogs and ensure consistent paint flow. Start by disconnecting the sprayer from the power source and removing the remaining paint from the container. Use cleaning tools such as a brush or cloth to remove any excess paint or debris from the sprayer’s components.
It’s also crucial to flush the sprayer with water or a cleaning solution to remove any remaining residue.
In addition to cleaning, regular sprayer maintenance is necessary. This includes checking and replacing worn parts, lubricating moving parts, and inspecting hoses for any damages.
By following these cleaning tools and sprayer maintenance practices, you can ensure that your airless paint sprayer performs at its best.
Now, let’s move on to troubleshooting common issues with the sprayer.
Troubleshooting Common Issues
When your airless paint sprayer encounters obstacles, it’s like navigating a dark maze with hidden traps along the way. To help you tackle common troubleshooting issues that may arise, here are some handy tips and tricks:
-
Clean the clogged spray tip thoroughly with a brush or a specialized cleaning solution.
-
Check for any debris in the spray gun filter and clean it if necessary to fix inconsistent spray pattern.
-
Adjust the pressure settings on your sprayer and ensure you’re holding the gun at the correct distance from the surface to prevent excessive overspray.
-
Tighten all connections and inspect the hoses for any damage or leaks to stop paint leakage.
-
Make sure your sprayer is properly calibrated and adjust the fan width as needed for even paint coverage.
By following these troubleshooting tips and tricks, you can overcome common issues and enjoy your professional-looking results.
Enjoy Your Professional-Looking Results
Get ready to admire your flawless finish and impress everyone with your expertly painted surfaces! Achieving smooth finishes with an airless paint sprayer is all about technique and attention to detail.
To ensure a professional-looking result, it’s important to practice good spraying habits. First, maintain a consistent distance of about 12 inches from the surface you’re painting. This will help you achieve an even coat without excessive overspray.
Additionally, move your arm smoothly and steadily, using overlapping strokes to cover the area evenly. Remember to keep the sprayer perpendicular to the surface and avoid spraying too quickly or too slowly.
By following these tips and techniques, you can achieve smooth finishes and avoid overspray, resulting in a flawless edge. This will make your paint job look like it was done by a pro.
Frequently Asked Questions
How do I choose the right type of paint for edging with an airless paint sprayer?
When choosing the right paint for edging, it’s like finding the perfect brushstroke to complete a masterpiece. Consider the type of surface, desired finish, and the techniques you’ll be using for a flawless result.
Can I use an airless paint sprayer for edging on textured surfaces?
Using an airless paint sprayer for edging on textured surfaces has its pros and cons. While it can cover large areas quickly, achieving clean lines can be challenging. Techniques like masking tape and feathering can help ensure a precise finish.
What safety precautions should I take when using an airless paint sprayer for edging?
To safely use an airless paint sprayer for edging, it’s important to choose the right safety gear, such as goggles, gloves, and a respirator. Additionally, ensure proper ventilation in the area to avoid inhaling fumes.
Is it necessary to prime the surface before using an airless paint sprayer for edging?
It is not necessary to prime the surface before using an airless paint sprayer for edging. However, using primer alternatives such as a high-quality paint or a paint and primer combo can help achieve clean edges.
How do I prevent overspray when edging with an airless paint sprayer?
To prevent overspray and achieve precise edging with an airless paint sprayer, I recommend using masking tape to protect adjacent surfaces. Hold the sprayer at a consistent distance and move smoothly along the edge for clean, sharp lines.
Conclusion
After following these steps and putting in the time and effort, you can step back and admire your masterpiece.
The edges and corners are flawlessly painted, giving the room a polished and professional look.
The airless paint sprayer has proven to be a valuable tool, making the process quick and efficient.
As you bask in the satisfaction of a job well done, you can’t help but feel a sense of accomplishment and pride.
Your hard work has paid off, and now you can enjoy the beautiful results of your painting project.