Imagine revitalizing the exterior of your home with a fresh, efficient coat of paint. Using an airless sprayer turns this task into a breeze.
In this article, I will guide you through the process of painting the exterior of your house using an airless sprayer. From preparing the surface to achieving a smooth finish, I will provide you with all the necessary steps and tips to ensure a professional-looking result.
We will explore topics such as selecting the right paint and equipment, setting up the sprayer, applying the primer and paint coats, as well as dealing with common challenges that may arise.
By the end of this article, you will have the knowledge and confidence to tackle this project and give your house a stunning new look. So, let’s dive in and discover the wonders of painting with an airless sprayer.
Key Takeaways
- Maintain a distance of 12-18 inches from the surface when painting
- Use the right nozzle for a flawless finish
- Apply paint in thin, even layers to avoid drips and runs
- Properly prep and prime the surface before painting
Preparing the Exterior Surface
Get ready to transform your house into a stunning work of art by prepping the exterior surface like a pro! Surface preparation is a crucial step before painting with an airless sprayer.
Start by thoroughly cleaning the surface using a power washer or a scrub brush and detergent to remove dirt, mildew, and loose paint.
Next, inspect the exterior for any damaged areas such as cracks or holes. Repair these areas using a suitable filler or putty and allow it to dry completely.
Sand the repaired areas smooth to ensure a seamless finish.
Finally, make sure to prime any bare wood or metal surfaces before applying paint.
Now that the surface is prepped and ready, let’s move on to selecting the right paint and equipment for the job.
Selecting the Right Paint and Equipment
Investing in high-quality materials and the proper tools is crucial for achieving a flawless and professional finish when transforming the outside of your home. When selecting the right paint, consider the type of surface you’ll be painting. For example, if your house has a lot of wood siding, you may want to choose an exterior paint that’s specifically formulated for wood.
Additionally, consider the climate in your area and choose a paint that can withstand the elements. Another important factor to consider is selecting the proper spray nozzle for your airless sprayer. The size of the nozzle will determine the spray pattern and coverage. It’s important to choose a nozzle size that’s appropriate for the size of your project.
By choosing the right paint type and selecting the proper spray nozzle, you can ensure a smooth and even application. Once you’ve selected the right paint and equipment, it’s time to set up the airless sprayer and get started on your project.
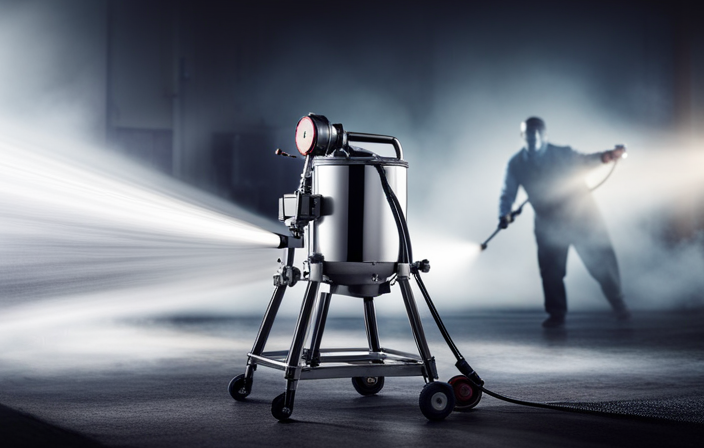
Setting Up the Airless Sprayer
Once you’ve gathered your top-quality materials and chosen the perfect paint, it’s time to dive into the exhilarating process of setting up your powerful airless sprayer.
Before getting started, it’s important to familiarize yourself with airless sprayer troubleshooting and how to adjust the spray pressure. Troubleshooting tips include checking for clogs or blockages in the sprayer nozzle and ensuring that all connections are secure.
To adjust the spray pressure, refer to the manufacturer’s instructions and make small adjustments until you achieve the desired spray pattern and coverage.
Once your airless sprayer is set up and ready to go, you can move on to applying the primer, which will provide a smooth and even base for your paint.
Applying the Primer
Before diving into the exciting process of applying primer to your surface, it’s fascinating to note that using primer can increase the lifespan of your paint job by up to 50%, ensuring a long-lasting and durable finish.
Primer application techniques are crucial for achieving a smooth and even surface. When using an airless sprayer, it’s important to maintain a consistent distance from the surface and apply the primer in overlapping strokes. This ensures that the primer is evenly distributed and avoids any streaks or uneven coverage.
Additionally, choosing the right primer for your exterior surface is essential. Consider factors such as the type of surface, weather conditions, and desired finish.
Now that the primer application is complete, it’s time to move on to the next step of mixing and diluting the paint, which will be discussed in the following section.
Mixing and Diluting the Paint
Now that you’ve completed the primer application, it’s time to mix and dilute the paint, creating a smooth and flowing consistency that will effortlessly glide onto your surface.
Proper paint mixing is crucial for achieving optimal results with an airless sprayer. Start by pouring the paint into a clean and empty bucket. Use a stir stick or a paint paddle attachment for a power drill to thoroughly mix the paint. This will ensure that the pigments and binders are evenly distributed throughout the mixture.
Once the paint is well-mixed, it may need to be diluted depending on the manufacturer’s instructions or the desired viscosity. Add small amounts of water or paint thinner at a time, stirring continuously until you achieve the desired consistency. Remember to follow the manufacturer’s guidelines for proper paint dilution.
With the paint mixed and diluted to perfection, you’re now ready to start the painting process seamlessly.
Starting the Painting Process
When starting the painting process, I always begin with a systematic approach. This means starting from the top and working my way down, ensuring that every surface is covered evenly.
Additionally, it’s crucial to maintain a consistent spray pattern throughout the project. This ensures a uniform and professional finish, avoiding any streaks or uneven coverage.
Begin with a Systematic Approach
To kick things off, it’s best to start with a well-thought-out plan when tackling the task of painting the exterior of a house with an airless sprayer. Taking a systematic approach offers several benefits, including efficient use of time and materials, and a higher quality finish. Here is a step-by-step guide to help you through the process:
- Prep the surfaces: Clean and repair any damaged areas before painting.
- Mask off areas: Protect windows, doors, and other areas that shouldn’t be painted.
- Prime the surfaces: Apply a primer to ensure proper adhesion and coverage.
| Step | Description |
|---|---|
| 1 | Prep surfaces |
| 2 | Mask off areas |
| 3 | Prime surfaces |
By following this systematic approach, you can ensure a smooth and successful painting project. Now, let’s move on to the next section about maintaining a consistent spray pattern.
Maintain a Consistent Spray Pattern
Maintaining a consistent spray pattern is key for achieving a professional finish when using an airless sprayer. To ensure even coverage, it’s important to keep the sprayer at a consistent distance from the surface being painted and move it at a steady pace.
Troubleshooting spray pattern issues is also crucial in achieving optimal results. If you notice uneven coverage or streaks, check the spray tip for clogs or wear and tear. Adjust the pressure settings as needed and make sure the paint viscosity is appropriate for the sprayer.
Additionally, practicing proper technique, such as overlapping each stroke by 50%, can help maintain a consistent spray pattern. By following these guidelines, you can achieve a flawless finish that prepares your house for the subsequent section about applying the paint coats.
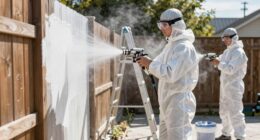
Applying the Paint Coats
Now is the perfect time to grab an airless sprayer and transform the exterior of your house with a smooth and efficient coat of paint. To achieve professional results, it’s important to understand proper painting techniques and choose the right nozzle for your sprayer.
Here are some tips to help you apply the paint coats effectively:
-
Start by applying a thin and even first coat to create a solid foundation.
-
Allow the first coat to dry completely before applying the second coat.
-
Use long, overlapping strokes to maintain a consistent coverage.
-
Adjust the sprayer’s pressure to control the thickness of the paint.
-
Keep a steady pace and maintain a distance of 12-18 inches from the surface.
By following these techniques and using the right nozzle, you can achieve a flawless finish.
Now, let’s move on to the next section and discuss how to deal with common challenges that may arise during the painting process.
Dealing with Common Challenges
Facing common challenges during the painting process can be a frustrating experience, but with the right techniques, you can overcome them and achieve a flawless finish.
When dealing with weather conditions, it’s important to choose the right time to paint. Avoid painting in extreme heat or cold, as it can affect the paint’s performance. Additionally, rain or high humidity can also cause issues, so ensure that the weather is dry and suitable for painting.
Troubleshooting common equipment issues is also crucial. If the spray pattern is uneven or splattering, check the nozzle for clogs or wear and replace if necessary. Inconsistent pressure or paint flow may indicate a problem with the pump or hose, so inspect and repair or replace any damaged parts.
By addressing these challenges and taking the necessary precautions, you can ensure a smooth finish that will enhance the appearance of your house.
Achieving a Smooth Finish
To achieve a smooth finish, you’ll need to ensure that your surface is properly prepped and primed before applying the paint. For example, if you’re painting a wooden fence, make sure to sand it down and apply a coat of primer to seal the wood and create a smooth base for the paint.
To further enhance the smoothness and achieve a glossy finish, here are some additional tips:
- Use a high-quality paint that’s designed for exterior surfaces.
- Apply the paint in thin, even layers to avoid drips and runs.
- Maintain a consistent distance between the sprayer and the surface to avoid overspray.
- Practice proper technique, such as using smooth, overlapping strokes.
By following these steps, you can achieve a smooth and glossy finish on your exterior surfaces while minimizing overspray.
Now, let’s move on to cleaning and maintaining the sprayer.
Cleaning and Maintaining the Sprayer
Proper maintenance of your sprayer is essential to ensure its longevity and optimal performance. After each use, it’s important to thoroughly clean the sprayer to remove any leftover paint and prevent clogs.
Start by disconnecting the sprayer from the power source and relieving any built-up pressure. Next, disassemble the sprayer and soak the parts in a cleaning solution specifically designed for sprayers. Use a brush or cloth to remove any stubborn paint residue.
Once all the parts are clean, rinse them with water and allow them to dry completely before reassembling. Regularly check and replace any worn or damaged parts to maintain the sprayer’s efficiency.
By following these cleaning and maintenance practices, you can ensure that your sprayer continues to deliver smooth and even paint application.
Frequently Asked Questions
How long does it take for the primer to dry before applying the paint coats?
Primer needs proper preparation to prevent peeling. Prioritize the process by cleaning the surface and maintaining the airless sprayer. Use a dry time of 24 hours before applying paint coats for optimal results.
Can I use an airless sprayer to paint the interior walls of my house?
Using an airless sprayer for interior walls has pros and cons. It can save time and provide a smooth finish, but it requires proper preparation and masking. Tips for achieving a smooth finish include using a high-quality paint and maintaining a consistent spray pattern.
How many coats of paint should I apply for optimal coverage and durability?
To achieve optimal coverage and durability, it is recommended to apply two coats of paint on the exterior of a house. Properly prepping the surface and using the right techniques with an airless sprayer can help achieve a smooth finish.
What safety precautions should I take when using an airless sprayer?
When using an airless sprayer, it is important to prioritize safety. Wearing appropriate safety equipment, such as goggles, gloves, and a respirator, is crucial. Additionally, ensure proper ventilation to minimize the risk of inhaling harmful fumes.
Is it necessary to use a specific type of paint for exterior surfaces when using an airless sprayer?
When using an airless sprayer for exterior surfaces, it is important to choose the right paint. Opt for a paint specifically designed for exteriors to ensure a smooth and even finish. Here are some tips.
Conclusion
In conclusion, painting the exterior of a house with an airless sprayer is a convenient and efficient way to achieve a professional-looking finish. By properly preparing the surface, selecting the right paint and equipment, and following the steps for application, you can transform your home’s appearance.
Remember to address any challenges that may arise and strive for a smooth finish. With regular cleaning and maintenance of the sprayer, you’ll be able to enjoy the lasting beauty of your freshly painted house for years to come.