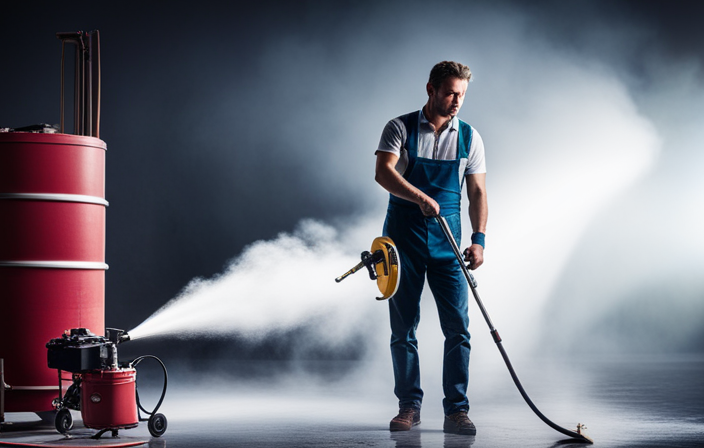
Tired of spending endless hours manually brushing paint onto your wooden deck? Worry no more, because the Krause and Becker Airless Paint Sprayer has arrived to revolutionize your painting projects! This incredible tool is engineered to speed up your painting tasks, ensuring a simpler and faster experience than previously thought possible. With the use of the Krause and Becker sprayer, achieving a professional-quality finish quickly is now within reach.
In this article, I will guide you through the step-by-step process of using the Krause and Becker Airless Paint Sprayer on your wooden deck. From preparing your deck for painting to cleaning and maintaining your sprayer, I will cover all the essential tips and tricks you need to know.
So, grab your Krause and Becker Airless Paint Sprayer, put on your painting clothes, and get ready to transform your wooden deck into a masterpiece. Trust me, you won’t believe the difference this sprayer will make in your painting experience!
Key Takeaways
- Hold the Krause and Becker airless paint sprayer at a slight angle for better coverage on the wooden deck.
- Use a brush to carefully paint corners and blend for a seamless finish.
- Allow sufficient drying time before moving to the next step to ensure a professional and long-lasting result.
- Regularly clean and maintain the sprayer to ensure smooth application and prevent clogs.

TICONN Anti-Fog Safety Glasses for Men and Women, ANSI Z87.1 Scratch Proof Eye Goggles with Adjustable Arms and UV Protection (Clear, 1PK)
- Durable Polycarbonate Construction: Impact-resistant and lightweight design
- Anti-Fog and UV Protection: Scratch-resistant, clear vision, blocks 99.9% UV
- Adjustable and Comfortable Fit: Rubber frame, nose pads, adjustable temples
As an affiliate, we earn on qualifying purchases.
Prepare Your Deck for Painting
Get your deck ready for a fresh coat of paint with these easy prep steps:
-
Thoroughly clean the deck to remove dirt, debris, and any existing paint. Use a deck cleaner and a power washer for a deep clean.
-
Inspect the deck for any damaged or loose boards. Repair or replace any boards that need attention.
-
Sand the entire deck surface to create a smooth and even base for the paint. Use a medium-grit sandpaper and sand in the direction of the wood grain.
-
Sweep away any dust or debris from the sanding process.
Now that the deck is cleaned, repaired, and sanded, you are ready to set up the Krause and Becker airless paint sprayer for the next step.
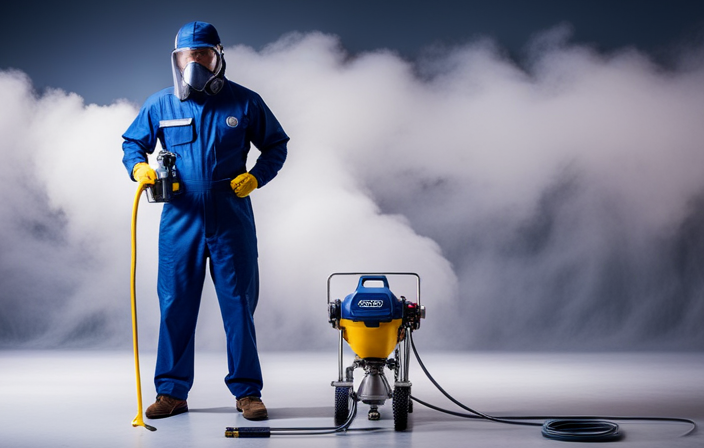
Set Up the Krause and Becker Airless Paint Sprayer
To set up the Krause and Becker airless paint sprayer, start by familiarizing yourself with its components. This includes understanding the main unit, the spray gun, the hose, and the different nozzles.
Next, check the paint or stain you will be using and determine if it needs to be diluted. If it does, follow the manufacturer’s instructions for dilution ratios.
Finally, adjust the pressure and spray pattern on the sprayer to ensure an even and smooth application.
Remember to take your time and follow all safety precautions when setting up the Krause and Becker airless paint sprayer.
Familiarize Yourself with the Sprayer Components
Take a moment to acquaint yourself with the different components of the Krause and Becker airless paint sprayer, as each part plays a vital role in achieving a flawless finish on your wooden deck.
The main components of the sprayer include:
- The motor
- The pump
- The hose
- The gun
- The nozzle
To ensure proper functioning, it is important to regularly clean and maintain these parts. Sprayer maintenance involves cleaning the filters, lubricating the pump, and checking for any leaks or damage.
If you encounter any issues, such as uneven spray patterns or clogs, refer to the troubleshooting tips provided in the sprayer’s manual.
Now that you are familiar with the sprayer components and maintenance, you can proceed to the next step of diluting the paint or stain if necessary.
Dilute the Paint or Stain if Necessary
Before using the sprayer, it’s important to check if your paint or stain needs to be diluted. Diluting the paint or stain can help ensure smooth and even coverage on your wooden deck. Here are three dilution techniques to consider:
-
Follow the manufacturer’s instructions: Some paint or stain brands provide specific guidelines on how much water or solvent to add for optimal results. Be sure to read and follow these instructions carefully.
-
Test a small area: Before diluting the entire batch, it’s wise to test the paint or stain on a small, inconspicuous area of the deck. This will help you determine if dilution is necessary and if so, the right ratio to use.
-
Recommended paint types: Certain paint types, such as latex or water-based paints, may require less or no dilution compared to oil-based counterparts. Check the label or consult with a paint professional to determine the recommended dilution ratio for your chosen paint.
Once you’ve determined the appropriate dilution technique, you can proceed to adjust the pressure and spray pattern for optimal application.
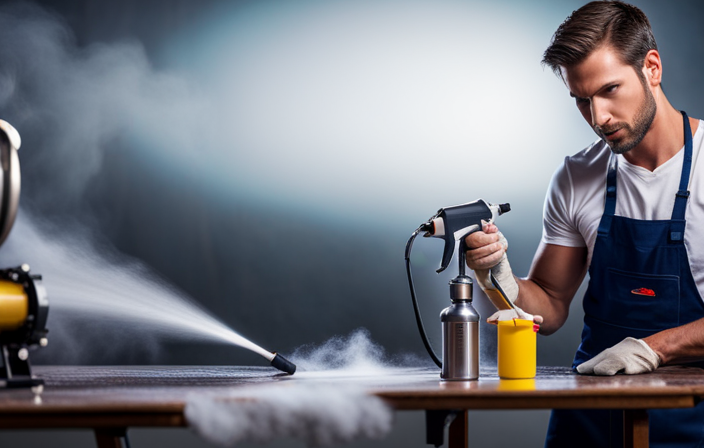
Adjust the Pressure and Spray Pattern
To achieve a flawless finish, you’ll want to make sure you find the perfect balance between pressure and spray pattern, like a graceful dancer effortlessly gliding across the stage. Adjusting the pressure and selecting the right spray pattern are crucial steps in using the Krause and Becker airless paint sprayer on a wooden deck. The table below provides a visual representation of the different pressure settings and spray patterns you can choose from:
| Pressure Setting | Spray Pattern |
|---|---|
| Low | Vertical |
| Medium | Horizontal |
| High | Round |
By adjusting the pressure, you can control the amount of paint or stain being sprayed onto the deck. Selecting the appropriate spray pattern allows you to achieve an even and uniform application. Once you have mastered these techniques, you can move on to practicing proper safety measures when using the paint sprayer. This ensures a smooth transition into the subsequent section.
Practice Proper Safety Measures
Ensure your safety while using the Krause and Becker airless paint sprayer on your wooden deck by following these essential tips.
-
Wear the necessary safety precautions such as safety goggles, a respirator mask, and gloves to protect yourself from paint particles and fumes.
-
Clear the work area of any obstacles or debris that may pose a tripping hazard.
-
Keep bystanders and pets away from the spraying area to avoid any accidents or injuries.
-
Familiarize yourself with the sprayer’s safety features and operation manual before starting.
By adhering to these safety measures, you can minimize the risks associated with using the paint sprayer and ensure a safe working environment.
Now that you are aware of the importance of safety, let’s move on to the next section and start painting your wooden deck.
Start Painting
Get ready to transform your deck into a work of art with a few simple steps.
When using the Krause and Becker airless paint sprayer on a wooden deck, it’s important to employ proper technique and choose the right paint. To achieve a smooth and even finish, hold the sprayer nozzle about 12 to 18 inches away from the surface and move in a steady, back-and-forth motion.
Start painting from one end of the deck and work your way towards the other, overlapping each pass slightly. Use long, continuous strokes to avoid streaks or lines.
Additionally, make sure to choose a paint specifically designed for outdoor use, as it will provide better durability and protection against harsh weather conditions.
With these tips in mind, you’ll be on your way to a beautifully painted deck.
Now, let’s dive into the next section and pay attention to detail.
Pay Attention to Detail
When painting a wooden deck, it’s important to pay attention to detail in order to achieve a professional-looking finish.
One key point is to use a brush for hard-to-reach areas, such as between the deck boards or around posts. This ensures that every part of the deck is properly painted and protected.
Taking care in painting edges and corners is crucial to ensure that the entire surface is evenly covered and no spots are missed.
Use a Brush for Hard-to-Reach Areas
To tackle those hard-to-reach spots on your wooden deck, grab a brush and give them a flawless finish with the Krause and Becker airless paint sprayer. Here are three alternative methods to consider when dealing with these challenging areas:
-
Use a smaller brush: When you encounter tight corners or narrow gaps, a small brush can provide better control and precision compared to the sprayer or roller.
-
Try a paint pad: Paint pads are great for applying paint to areas that are difficult to reach with a brush or roller. They have a flat surface and can be easily maneuvered into tight spaces.
-
Utilize an extension pole: Attach an extension pole to your brush or roller to extend your reach. This is especially useful when dealing with high or low areas of your deck.
By employing these techniques, you can ensure that every inch of your deck receives a professional-looking finish.
Moving on to the next section, let’s discuss how to take care in painting edges and corners.
Take Care in Painting Edges and Corners
When painting the edges and corners of your deck, it’s important to take care and be meticulous for a flawless finish. There are specific painting techniques to consider for achieving smooth finishes.
Start by using the Krause and Becker airless paint sprayer to apply an even coat along the edges. Hold the sprayer at a slight angle for better coverage.
Next, use a brush to carefully paint the corners. Take care not to leave any gaps or streaks. Work in small sections and blend the paint with the surrounding areas for a seamless look.
Remember to maintain a steady hand and apply consistent pressure to avoid uneven application.
After completing the edges and corners, allow sufficient drying time before moving on to the next step of the painting process. This will ensure a professional and long-lasting result.
Allow Sufficient Drying Time
When using a Krause and Becker airless paint sprayer on a wooden deck, it’s crucial to follow the paint or stain manufacturer’s instructions for drying time. This ensures that the paint or stain properly sets and adheres to the surface, providing a long-lasting finish.
Allow sufficient drying time for the paint or stain to fully dry before using the deck. This may vary depending on the product used, so it’s important to refer to the manufacturer’s guidelines. Walking on the deck before it’s fully dry can cause damage or smudging of the freshly applied coating.
To avoid any potential issues, it’s best to wait until the recommended drying time has passed before using the deck. This will help ensure that the paint or stain has fully cured and is ready for regular use. Taking the time to allow sufficient drying time will result in a beautiful and durable finish on your wooden deck.
Follow the Paint or Stain Manufacturer’s Instructions for Drying Time
Once the wooden deck has been painted or stained using the Krause and Becker airless paint sprayer, it’s important to follow the paint or stain manufacturer’s instructions for drying time. Proper drying time is crucial for achieving a durable and long-lasting finish on your deck.
Allowing the paint or stain to fully cure and adhere to the wood is essential for optimal protection against the elements. To achieve this, it’s important to consider factors such as temperature, humidity, and air circulation.
Make sure the deck is in a well-ventilated area and avoid painting or staining during rainy or excessively humid conditions. Maintaining the recommended temperature range will also aid in the drying process.
By allowing sufficient drying time and creating optimal drying conditions, you can ensure a beautifully finished and protected wooden deck.
Now, let’s discuss the next step: avoiding walking on the deck until it is fully dry.
Avoid Walking on the Deck Until Fully Dry
To ensure a flawless finish, it is crucial to wait until the deck is fully dry before walking on it. This will help avoid damage and prevent footprints on the freshly painted or stained surface. It is important to follow the instructions provided by the paint or stain manufacturer for drying time, as different products may have varying requirements.
Walking on the deck before it is fully dry can cause smudges and ruin all your hard work. Give the deck ample time to dry, typically at least 24 hours, before allowing any foot traffic.
Once the deck is completely dry, you can proceed to the next step of cleaning and maintaining your sprayer.
Clean and Maintain Your Sprayer
Make sure you regularly give your sprayer a little TLC to keep it running smoothly, just like how you would oil the gears of a well-loved bicycle. Here are a few tips for proper cleaning of the sprayer and how to prevent clogs in the sprayer nozzle:
-
After each use, flush the sprayer with a cleaning solution recommended by the manufacturer. This will remove any leftover paint or debris that could clog the nozzle.
-
Pay special attention to the nozzle, as it is the most susceptible to clogs. Use a small brush or toothpick to remove any dried paint or residue that may have accumulated.
-
Regularly inspect the hoses and filters for any signs of damage or wear. Replace them if necessary to ensure optimal performance.
By taking the time to clean and maintain your sprayer, you’ll be able to achieve a smooth and even application of paint on your wooden deck. Once you’ve evaluated the finished result, you can move on to the next step.
Evaluate the Finished Result
Now that you’ve put in the effort to clean and maintain your sprayer, take a moment to admire the beautifully finished result of your hard work.
Evaluating the durability of the paint finish is essential to ensure its longevity on a wooden deck. One way to assess this is by comparing different paint finishes. Look for signs of cracking, peeling, or fading, as these indicate a less durable finish.
Additionally, consider the level of protection the paint provides against moisture and UV rays. A high-quality finish will resist these elements and maintain its appearance over time.
Once you’re satisfied with the durability of the paint, you can move on to the next section and enjoy your newly painted deck.
Enjoy Your Newly Painted Deck
Sit back and relax on your newly transformed deck, enjoying the fresh and vibrant colors that bring life to your outdoor space.
To maximize durability, it’s crucial to choose the right paint or stain for your wooden deck. Consider factors such as weather resistance, UV protection, and moisture resistance when selecting the appropriate product. A high-quality paint or stain will not only enhance the aesthetic appeal of your deck but also provide long-lasting protection against the elements.
Proper application techniques using the Krause and Becker airless paint sprayer will ensure an even and professional finish. However, if you encounter any issues during the painting process, don’t worry.
In the next section, we will discuss some troubleshooting tips to help you overcome any challenges that may arise.
Troubleshooting Tips
Don’t let any obstacles deter you from achieving a flawless finish on your deck – we’re here to help you troubleshoot any issues that may arise! When using the Krause and Becker airless paint sprayer on a wooden deck, some common troubleshooting issues you may encounter include uneven spray patterns. Here are some troubleshooting tips to help you achieve an even spray:
-
Check the paint viscosity: Ensure that the paint is properly thinned according to the manufacturer’s instructions. Thick paint can cause uneven spray patterns.
-
Adjust the pressure: Increase or decrease the pressure on the sprayer until you achieve a consistent spray pattern. Start with a lower pressure and gradually increase if needed.
-
Clean or replace the spray tip: A clogged or worn-out spray tip can lead to uneven spray. Clean the tip thoroughly or replace it if necessary.
-
Maintain a consistent distance: Keep a consistent distance of about 12 inches between the sprayer and the deck surface to ensure an even coat.
-
Practice proper technique: Move the sprayer in a smooth, overlapping motion to avoid buildup and achieve an even distribution of paint.
By following these troubleshooting tips, you can ensure a smooth and even coat of paint on your wooden deck using the Krause and Becker airless paint sprayer.
Frequently Asked Questions
Can I use the Krause and Becker airless paint sprayer on surfaces other than wood?
Yes, the Krause and Becker airless paint sprayer can be used on surfaces other than wood. It is suitable for applying paint on concrete and metal surfaces as well.
How long should I wait before walking on the deck after painting?
To prevent paint drips on a wooden deck, I recommend using a slow and steady motion while spraying. To protect nearby plants and furniture, cover them with plastic sheets or tarps. After painting, wait at least 24 hours before walking on the deck.
Can I use multiple paint colors with the Krause and Becker airless paint sprayer?
Oh, the wonders of the Krause and Becker airless paint sprayer! It not only allows you to paint your wooden deck effortlessly, but also gives you the freedom to experiment with multiple paint colors. Explore different painting techniques and choose the best paint colors for your deck.
What should I do if the paint is not adhering properly to the deck?
If the paint is not adhering properly to the deck, there are a few troubleshooting tips you can try. Ensure the surface is clean and dry, use a primer, sand the deck, or consider alternative paint application methods like brush or roller.
How often should I clean and maintain the Krause and Becker airless paint sprayer?
Keeping the Krause and Becker airless paint sprayer clean and maintained is crucial for its performance. Regularly clean the filters, flush the sprayer with water after each use, and inspect for any wear and tear.
Conclusion
In conclusion, using the Krause and Becker Airless Paint Sprayer on my wooden deck was a breeze. I followed a few simple steps to ensure success. First, I prepared the deck by cleaning it thoroughly and removing any loose or peeling paint. Next, I protected surrounding areas by covering them with plastic or drop cloths. I also made sure to wear appropriate safety gear, including goggles and a respirator, to protect myself from fumes and overspray.
Once everything was ready, I loaded the sprayer with the appropriate paint for my deck. I adjusted the spray pattern and pressure according to the manufacturer’s instructions. Then, I started spraying the paint onto the deck, moving in smooth, even strokes. I made sure to overlap each pass to ensure complete coverage.
After finishing the painting process, I carefully cleaned the sprayer to prevent any clogs or damage. I followed the manufacturer’s instructions for cleaning and maintenance, which included flushing out the sprayer with water and removing any remaining paint.
Finally, I evaluated the finished result. I inspected the deck for any missed spots or uneven coverage. If needed, I touched up these areas with a brush or roller. I also made sure to allow the paint to dry completely before using the deck.
Now, as I sit on my newly painted deck, I am filled with joy and satisfaction. The sprayer truly brought my deck to life, like a symphony of colors harmonizing in perfect rhythm. I am confident that with proper preparation and attention to detail, anyone can achieve stunning results with the Krause and Becker Airless Paint Sprayer.