Connect with us

Airless Paint Sprayers

How to Properly Mask and Protect Surfaces When Using an Airless Paint Sprayer

Transform your painting experience by learning essential masking techniques for airless sprayers; discover critical tips that can elevate your project to perfection.

Published

on

masking and protecting surfaces

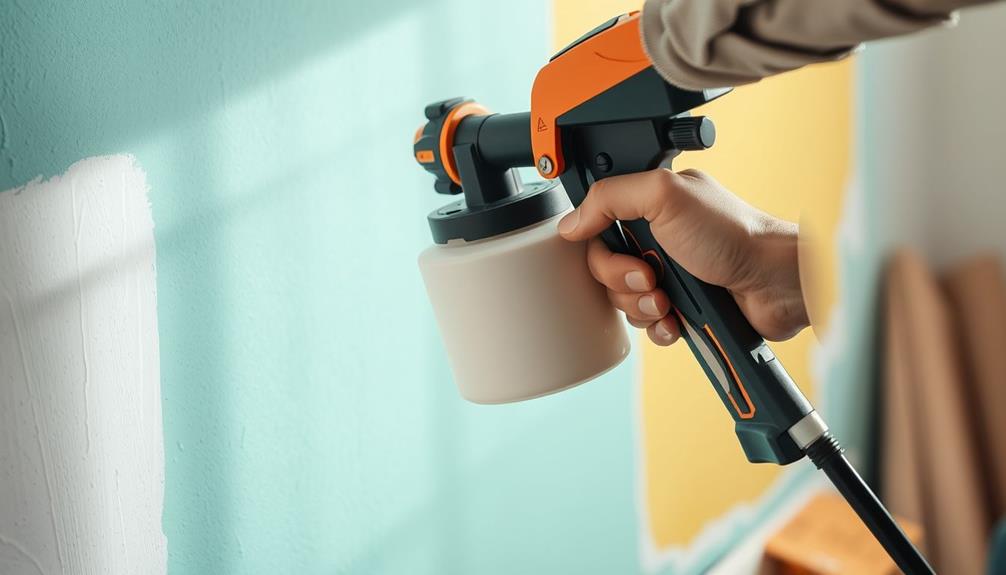
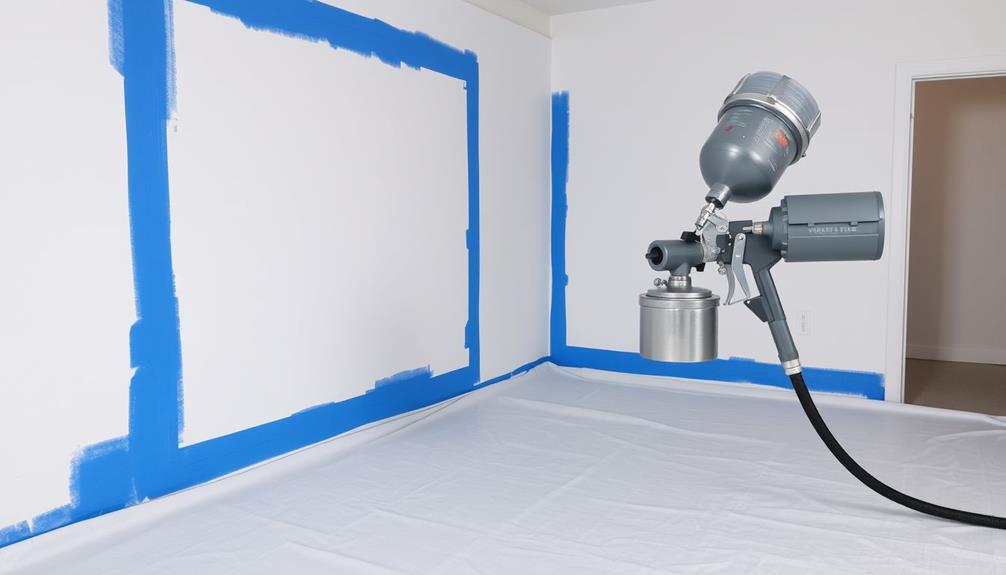
To properly mask and protect surfaces when using an airless paint sprayer, start by cleaning the areas with TSP or a pressure washer. Use high-quality masking tape like Tesa 7 Day and protective films that cling tightly to surfaces. Cover furniture and nearby plants with drop cloths or plastic sheeting. Confirm you maintain proper ventilation while spraying, and keep a distance of 10-12 inches from your surfaces to minimize overspray. Invest in overspray shields for tricky spots and take your time preparing. These steps set you up for a professional finish, and more tips await that can further enhance your project.

Key Takeaways

  • Thoroughly clean and prepare surfaces by removing dirt and repairing imperfections to enhance paint adhesion and finish quality.
  • Use high-quality masking tape and protective films to ensure sharp edges and effective overspray prevention.
  • Maintain a consistent spraying distance of 10-12 inches and adjust pressure settings to minimize overspray risk.
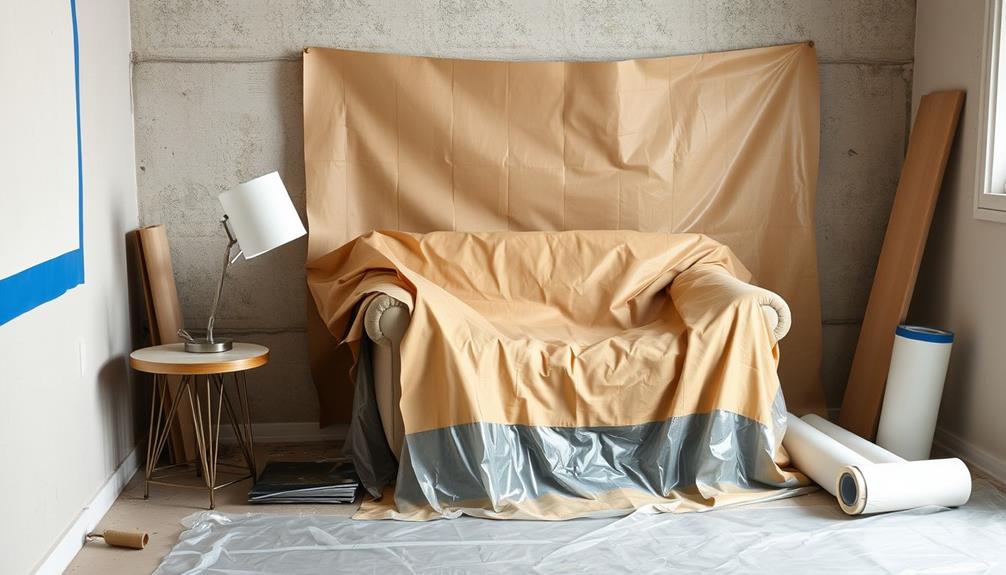
  • Implement effective barriers, such as drop cloths or plastic sheeting, to protect surrounding surfaces from paint damage.
  • Wear protective gear and ensure proper ventilation to create a safe and clean workspace during spraying.

Importance of Proper Masking

Proper masking is essential when using an airless paint sprayer, as it directly influences the quality of your paint job. The potential for overspray with these systems is significant, making proper masking fundamental to achieving clean lines and protecting surrounding surfaces.

A well-prepared workspace not only enhances the overall appearance but also allows you to focus on the painting process without distractions. While it might seem tedious, investing extra time in proper masking pays off by preventing costly mistakes and guaranteeing a professional finish.

Different spray systems require different masking techniques, and airless paint sprayers generally need more extensive masking due to their overspray capabilities. You'll find that the time you spend masking might double compared to traditional methods, but this thorough preparation leads to a more efficient workflow.

Effective Masking Techniques

masking strategies for effectiveness

To maximize your efficiency when using an airless paint sprayer, start with pre-masking your surfaces thoroughly.

Choosing the right masking materials can make a big difference, especially when aiming for sharp edges.

Additionally, utilizing appropriate cleaning solutions for different paint types can help guarantee your masking remains effective throughout the project.

Advertisement

Let's explore effective techniques that will help you achieve clean and professional results.

Pre-Masking for Efficiency

Often overlooked, effective pre-masking is essential for achieving a smooth and efficient spraying process. Before you start spraying, make certain to complete all masking to guarantee an uninterrupted workflow. This approach enhances efficiency by allowing you to spray continuously until the project is done, minimizing the time spent on adjustments.

Additionally, maintaining proper ventilation during spraying, similar to safety precautions for gas appliances, can help uphold a safer and healthier work environment.

Investing time in proper masking techniques can greatly reduce overspray and cleanup time, leading to a cleaner work environment. When you're using airless systems, the potential for overspray increases, making effective masking even more critical.

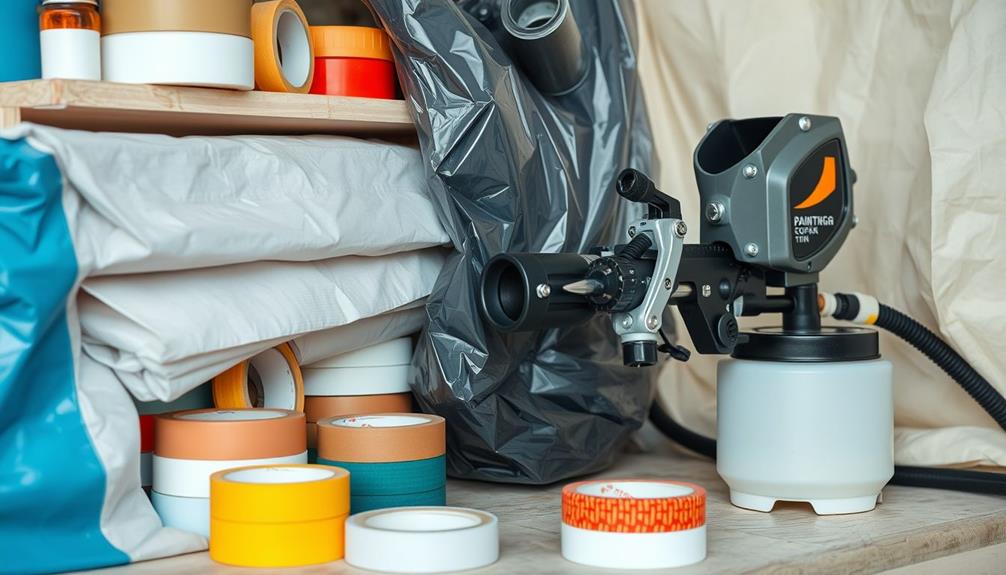
Consider using high-quality masking films and tapes, like Tesa Easy Cover, which combines tape and protective film for added convenience and effectiveness.

Advertisement

Types of Masking Materials

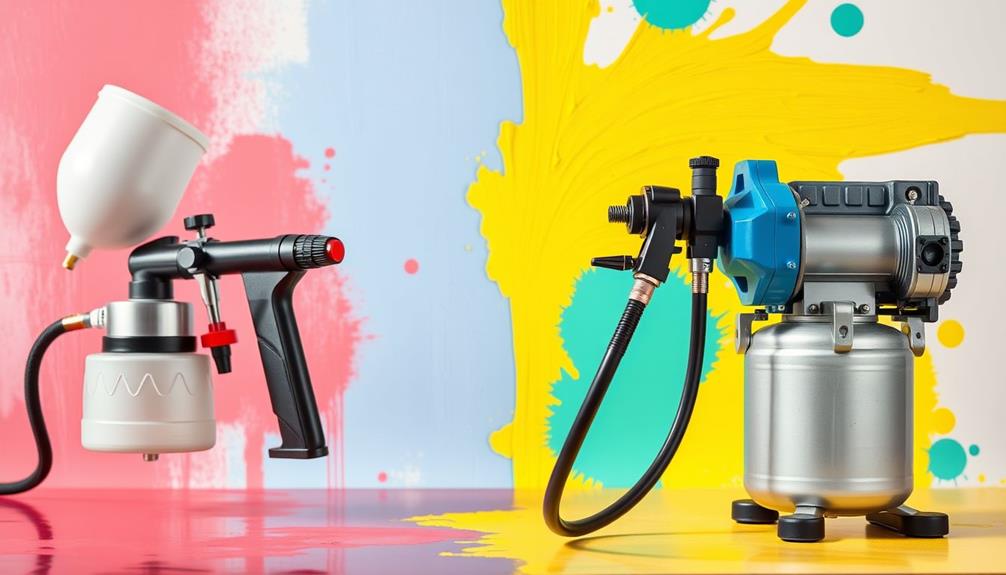
Selecting the right masking materials is essential to achieving a flawless finish when using an airless paint sprayer. Start with good-quality masking tape, like Tesa 7 Day Masking Tape, which guarantees clean lines and removes easily without leaving residue. This will help you maintain sharp edges while protecting adjacent surfaces from overspray.

For added protection and ease of use, consider incorporating safety glasses to shield your eyes from paint mist during the spraying process.

For larger areas, consider using protective film. Statistically charged masking films cling tightly to surfaces, so you get a secure seal and minimal movement during spraying. This is especially useful for protecting floors and furniture, as seen with 3M Masking Film.

Combining masking tape with protective film, such as Tesa Easy Cover, can streamline your process, giving you both coverage and convenience in one product.

Investing time in proper masking techniques is vital; it enhances your efficiency and leads to a more professional finish.

Advertisement

Tips for Sharp Edges

Achieving sharp edges is essential for a professional-looking paint job, and effective masking techniques can make all the difference. To start, complete all your masking before you begin spraying. This guarantees a clean workflow and minimizes the risk of overspray on unintended surfaces.

Use masking films that cling well to surfaces; they provide sharp edges and reduce movement during the spraying process. Additionally, consider the importance of having a clean environment, similar to how budget-friendly vacuum cleaners can help maintain a tidy workspace, making sure that dust and debris don't interfere with your painting efforts.

Consider Tesa Easy Cover tape, which combines tape and protective film. This is a convenient solution that offers both adhesion and coverage, making it easier to create those clean lines you desire.

Invest time in proper masking techniques, as thorough pre-masking leads to more efficient spraying and better results. You won't have to worry as much about touch-ups later.

Types of Masking Products

masking product varieties available

When it comes to masking for an airless paint sprayer, you'll find a variety of products to choose from.

Options like masking tape and protective films each offer unique benefits that can enhance your painting experience.

Advertisement

For instance, using a quality masking tape can help achieve crisp edges and prevent overspray, ensuring a perfect finish with techniques like the Graco FFLP Fine Finish Low Pressure Reversible Tip.

Understanding these types can help you select the right tools for achieving clean lines and effective surface protection.

Masking Tape Options

A variety of masking tape options are available to suit different painting needs, guaranteeing you can achieve clean lines and protect surfaces effectively. High-quality masking tape adheres well to surfaces without leaving residue, and it comes in various widths to accommodate your specific projects.

For instance, using high-quality tapes can enhance the overall efficiency of your painting process, much like how robotic pool cleaners streamline pool maintenance.

For added convenience, consider using Tesa Easy Cover, which combines tape and protective film. This product guarantees sharp lines and minimizes overspray, making it perfect for intricate work.

Advertisement

If you're tackling larger areas, the 3M Masking Film is a strong choice. Its statically charged design clings to surfaces, reducing movement while safeguarding floors and furniture during your painting process.

If your project extends over several days, Tesa 7 Day Masking Tape is engineered for that purpose. It allows for clean removal up to seven days after application, guaranteeing you maintain sharp edges throughout your work.

Additionally, don't overlook specialty masking tapes, which cater to delicate surfaces or high-temperature applications. With the right masking tape, you'll protect your surfaces effectively and achieve professional-looking results on every project.

Protective Films Benefits

Using protective films can greatly enhance your painting projects by efficiently covering large areas and safeguarding surfaces from overspray. These films come in various sizes, allowing you to quickly mask off significant spaces, which is essential when working with airless paint sprayers.

Statistically charged films cling to surfaces, minimizing movement and ensuring that your protection stays in place throughout the process. For those interested in maintaining a spotless environment during cleaning projects, key factors in choosing a home cleaning service can provide insights into how to keep your workspace tidy.

Advertisement

For excellent coverage, consider using products like 3M Masking Film, designed specifically to shield floors and furniture from paint overspray effectively.

If you're looking for convenience, Tesa Easy Cover combines tape and protective film, saving you time on your masking projects. It streamlines the masking process, allowing you to focus more on painting.

Additionally, Tesa 7 Day Masking Tape is a fantastic option for achieving sharp edges and ensuring residue-free removal. This feature is crucial for maintaining clean finishes after your painting is complete.

Specialty Masking Techniques

Masking your surfaces effectively is key to achieving a professional finish, and specialty masking products offer innovative solutions tailored for various painting projects. One excellent option is statically charged films, which cling to surfaces without adhesive, making them perfect for protecting larger areas from overspray while allowing for easy removal.

Additionally, understanding how certain environmental factors can influence your work area is essential. For instance, keeping your workspace free from strong scents like citrus scents that cats hate can help maintain focus and reduce distractions.

Advertisement

Another great choice is Tesa Easy Cover, which combines masking tape with protective film. This product simplifies your prep work by covering edges and surfaces in one step, ensuring you get sharp lines during spray painting.

For broader protection, consider 3M Masking Film, designed to safeguard floors and furniture. It comes in various sizes to match different project scales.

If you're working on a multi-day project, Tesa 7 Day Masking Tape is engineered for prolonged use, allowing for clean, residue-free removal even after extended periods.

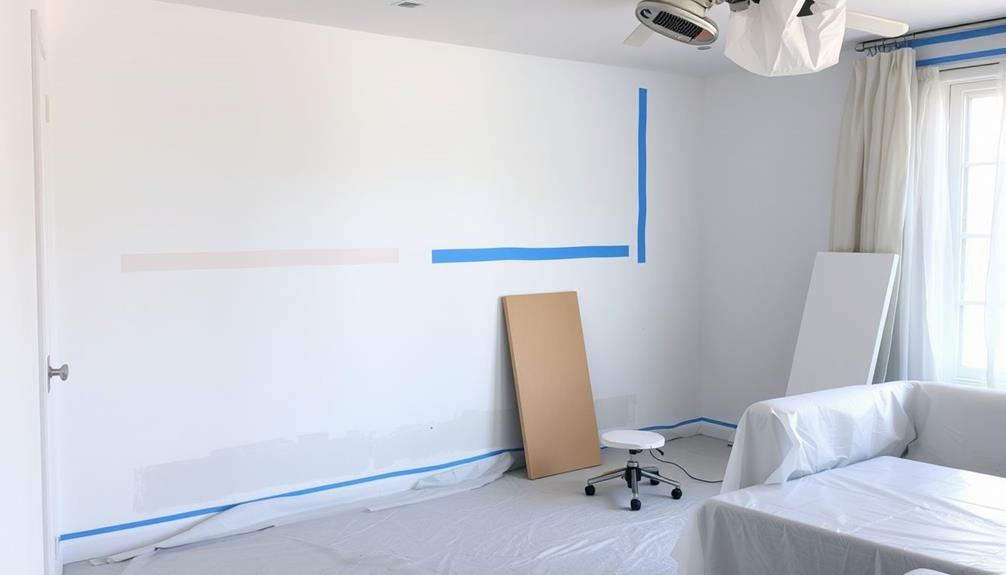
Surface Preparation Steps

surface preparation process steps

Before you start painting, proper surface preparation is vital for achieving a professional finish. Neglecting this step can lead to a less than stellar result, so let's guarantee you're ready to go. Here are the key steps to follow:

Clean all surfaces thoroughly using TSP for interior walls or a pressure washer with a cleaning solution for exteriors. This removes dirt and grease, creating a pristine canvas.

Additionally, maintaining a clean environment can greatly enhance air quality, which is important when working indoors, especially in spaces with air purifiers for improved overall health.

Advertisement
  • Repair cracks, chips, or holes in the surface after cleaning to secure a smooth finish. This will also help improve paint adhesion.
  • Sand rough areas to create a uniform surface. Smoother surfaces allow for the best paint application, enhancing the final appearance of your project.
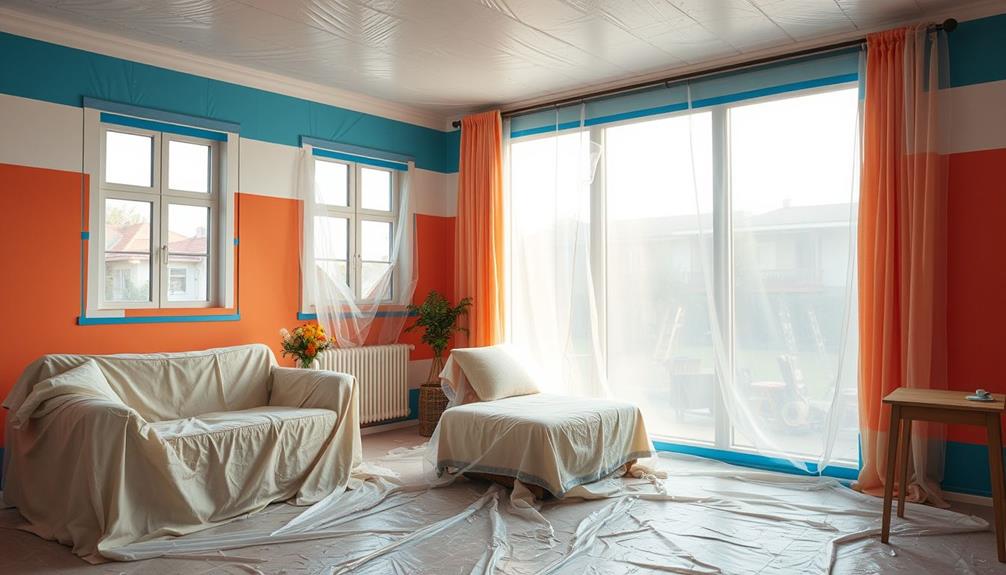
  • Protect surrounding areas from overspray. Cover furniture and plants with drop cloths or plastic sheeting to maintain a clean workspace.

Safety Precautions for Spraying

proper spraying safety measures

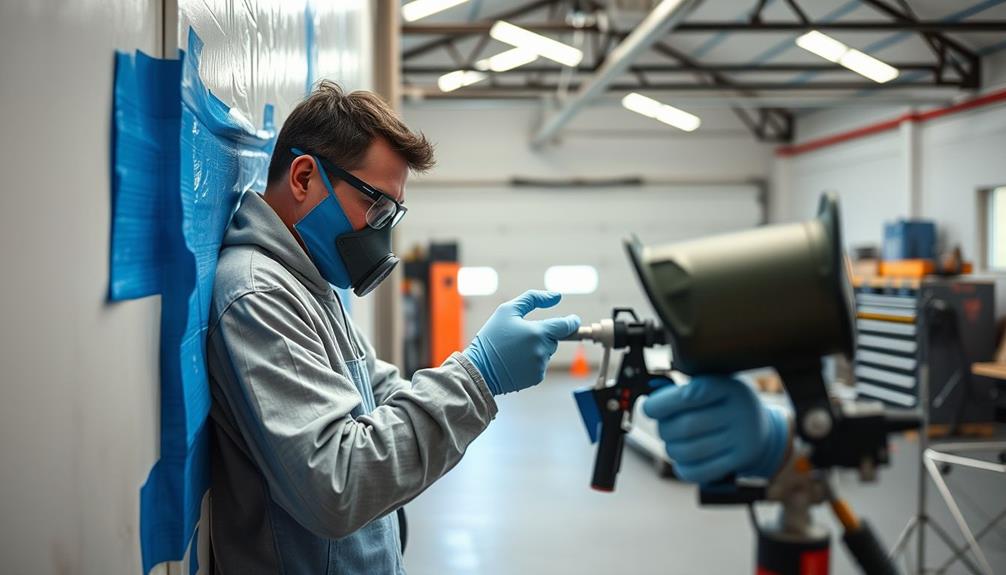
When you're ready to start spraying, it's crucial to prioritize safety to protect yourself and those around you. Always wear protective clothing and eyewear to shield against harmful paint particles and overspray. This gear is your first line of defense against potential hazards.

Additionally, consider implementing a home security system, as it can provide peace of mind and enhance overall well-being while you focus on your project, guaranteeing that your family and belongings remain protected from intrusions home security benefits.

Next, make certain proper ventilation in your work area. Good airflow minimizes inhalation risks from paint fumes, keeping air quality safe. If you're working indoors, open windows and use fans to enhance ventilation.

Before you start, familiarize yourself with the specific safety procedures outlined in the spray equipment's instruction manual. Understanding these guidelines can prevent accidents and injuries, making your spraying process smoother.

Stay aware of potential hazards in your surroundings. Check for flammable materials nearby, as they can pose significant fire risks during spraying.

Overspray Management Strategies

effective overspray control techniques

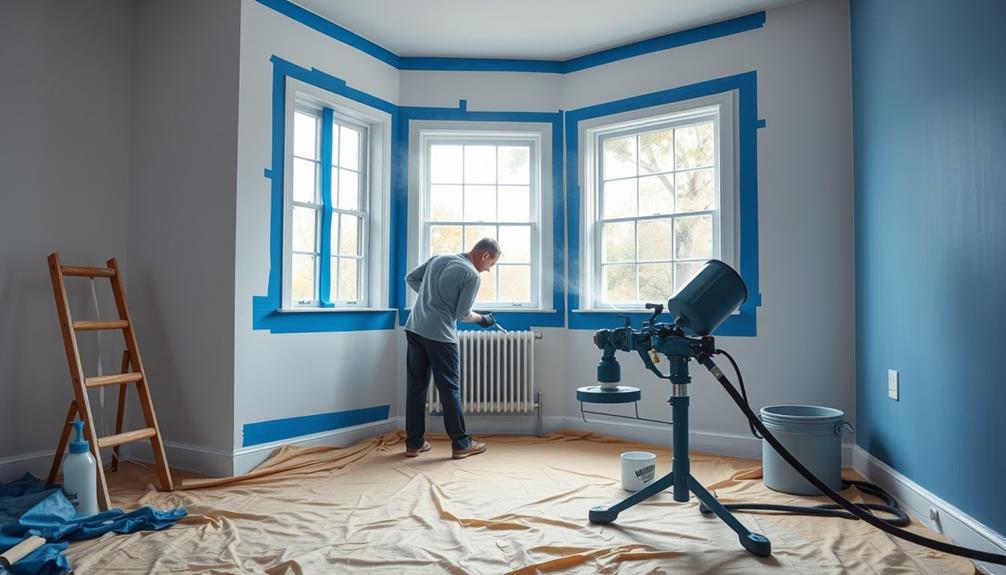
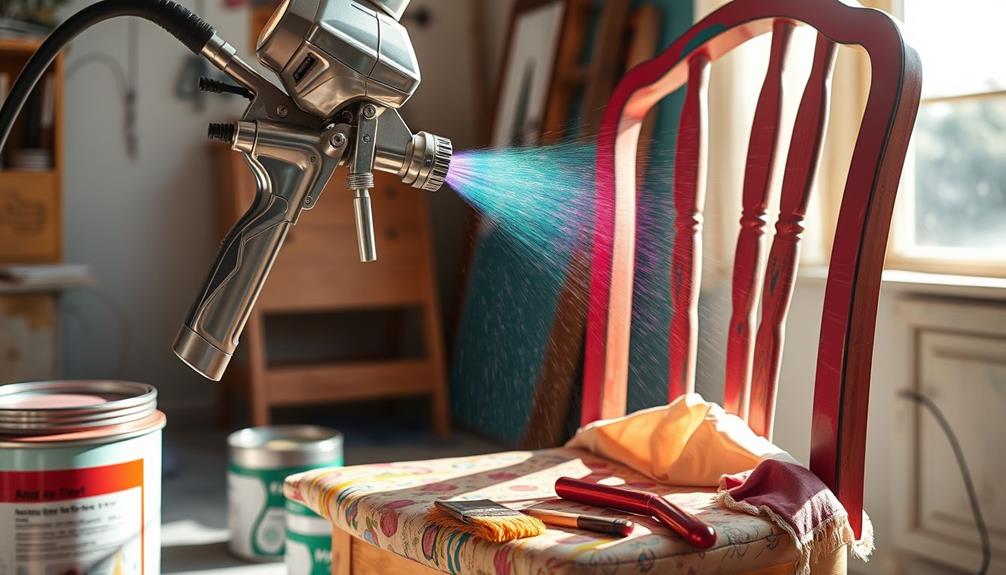
Effective overspray management is key to achieving a professional finish while using an airless paint sprayer. Overspray can travel up to 3-4 meters, so it's essential to protect surrounding surfaces and objects.

Here are some strategies you can use:

Advertisement
  • Maintain a consistent spraying distance of 10-12 inches from the surface to reduce overspray.
  • Utilize spray shields, like cardboard or specialized protections, especially in tricky areas.
  • Adjust the pressure on your airless sprayer; operating within 2000 to 3300 psi helps minimize overspray.
  • Regularly check your equipment to guarantee you're using the right tip size and pressure settings.

Equipment Maintenance Tips

essential equipment care guidelines

To keep your airless paint sprayer running smoothly, regular maintenance is vital. One of the best equipment maintenance tips is to apply Throat Seal Liquid (TSL) every four hours of operation. This enhances the longevity of your sprayer's packing and prevents wear.

Always clean the sprayer thoroughly after each use; dried paint can cause clogging and compromise peak performance.

Additionally, make it a habit to inspect hoses and connections for leaks or damage. These issues can greatly affect spray pressure and application efficiency, leading to disappointing results.

Check and replace worn or damaged components, such as filters and tips, to maintain consistent spray quality and avoid overspray problems.

Lastly, don't forget to follow the manufacturer's maintenance schedule outlined in your instruction manual. Adhering to this schedule will help keep your equipment in top condition and extend its lifespan.

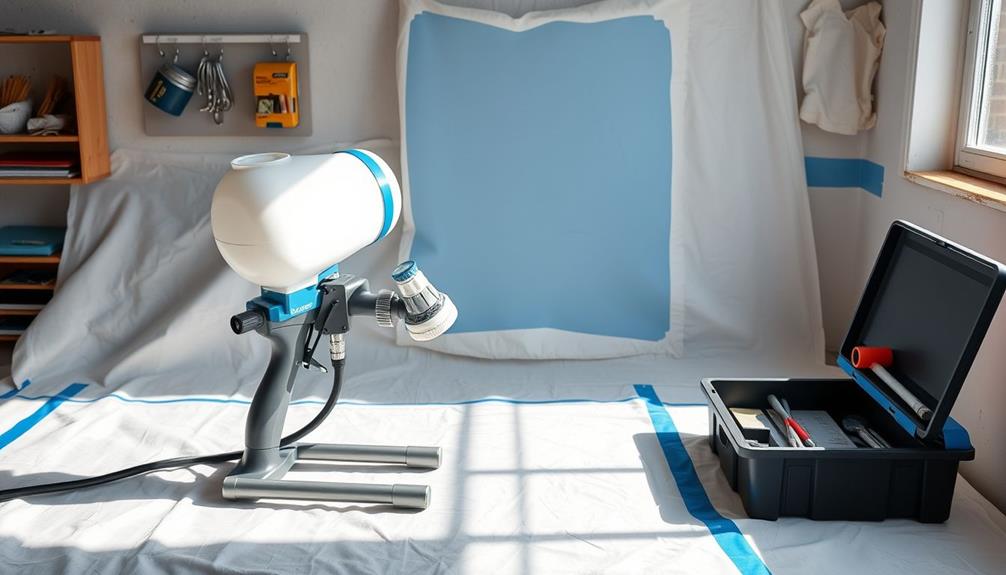
Recommended Accessories and Tools

essential gear and equipment

Having the right accessories and tools can make all the difference in achieving a professional finish with your airless paint sprayer.

To guarantee you effectively protect your surfaces and maintain clean lines, consider the following essential items:

Advertisement
  • High-quality masking tape: Use products like Tesa 7 Day Masking Tape for sharp edges and easy residue-free removal.
  • Statically charged masking film: This clings well to surfaces, minimizing movement and guaranteeing cleaner results during spraying.
  • Masking film combined with tape: Tesa Easy Cover offers a quick and efficient way to protect larger areas while guaranteeing proper masking techniques.
  • Overspray shields: Investing in cardboard or specialized spray shields can greatly reduce cleanup time and protect adjacent surfaces from overspray.

Frequently Asked Questions

Do You Need a Respirator for Airless Paint Sprayer?

Yes, you need a respirator when using an airless paint sprayer, especially indoors. It filters harmful fumes and protects your lungs from inhaling paint particles, ensuring your safety during the painting process. Don't skip it!

What to Wear When Using a Paint Sprayer?

"Better safe than sorry." When you use a paint sprayer, wear a particulate mask, respirator, goggles, long sleeves, and gloves. This gear protects you from harmful fumes and potential skin irritation during your project.

How to Mask When Spray Painting?

When you're spray painting, start by covering floors and furniture with high-quality masking tape and film. Pre-mask all areas thoroughly, and consider using spray shields to control overspray for a cleaner, more precise finish.

Do You Have to Cover Everything When Using a Paint Sprayer?

Yes, you should cover everything. Overspray can travel up to 3-4 meters, affecting nearby surfaces. Proper masking not only protects your surroundings but also saves you from time-consuming touch-ups later on.

Conclusion

In summary, proper masking and surface protection are essential when using an airless paint sprayer to achieve professional results. Did you know that nearly 30% of paint waste comes from overspray? By following effective masking techniques and managing overspray, you not only save paint but also guarantee a cleaner workspace. Remember to prioritize safety and maintain your equipment for the best performance. With the right approach, you can transform your project while minimizing mess and maximizing efficiency.

Advertisement

Whether it’s a step-by-step tutorial on achieving flawless finishes or an in-depth analysis of the latest airless paint sprayer models, Joe’s ability to articulate complex ideas in a simple and engaging manner resonates with our diverse audience. His practical tips and techniques empower readers to tackle their projects with confidence.

Continue Reading
Advertisement

Airless Paint Sprayers

Airless Paint Sprayer Maintenance: Dealing With Clogs and Blockages

Just follow these essential tips for airless paint sprayer maintenance to prevent clogs and blockages, and discover how to keep your equipment in top shape.

Published

on

By

maintaining airless paint sprayer

To keep your airless paint sprayer running smoothly, you need to prevent clogs and blockages. Start by ensuring your paint's viscosity matches the manufacturer's guidelines and always use the correct spray tip size. Regularly check and clean your gun and inline filters, and strain your paint before use to catch debris. After each use, clean your sprayer thoroughly to avoid material hardening. If a clog occurs, flush the system with solvent to clear it out. Stick to these practices for peak performance, and you'll be ready to tackle any paint job efficiently. There's plenty more to explore to enhance your maintenance routine.

Key Takeaways

  • Regularly check and replace gun filters to prevent debris buildup and ensure smooth paint flow.
  • Strain paint before use to eliminate contaminants and maintain proper viscosity for optimal performance.
  • Use the correct spray tip size based on paint thickness to reduce clogging and enhance coverage.
  • Flush the pump system with warm water and detergent immediately after use to prevent material hardening.
  • Schedule routine maintenance checks to identify wear and tear, extending the sprayer's lifespan and efficiency.

Common Clogs and Their Causes

When you're using an airless paint sprayer, you might find that clogs can occur surprisingly quickly, often within the first 10 minutes of operation. One common cause is the incorrect paint viscosity. If the paint's too thick for the spray tip, like the RAC 515, you'll likely face frequent blockages.

Additionally, using the wrong size or type of spray tip can exacerbate this issue, especially with thicker coatings that require larger orifice tips. Properly adjusting the sprayer pressure settings can also help in managing paint flow and reducing the likelihood of clogs.

Contaminants or debris in the paint mixture can also lead to clogs, making it essential to strain your paint before use. Poor maintenance of gun and inline filters considerably contributes to clogging. Regular cleaning of these filters can prevent many headaches.

Furthermore, if you've got old, dried paint residue in your pump system, it can solidify and create blockages. To avoid this, make it a habit to clean your sprayer immediately after use.

Effective Preventative Measures

proactive health safety strategies

To keep your airless paint sprayer running smoothly, you need to focus on a few key preventative measures.

Regularly check and clean your filters, strain your paint to catch any particles, and consider using a Graco FFLP Fine Finish Low Pressure Reversible Tip for improved control and reduced overspray.

Advertisement

Regular Filter Checks

Maintaining ideal performance in your airless paint sprayer hinges on the diligence of regular filter checks. To keep your equipment running smoothly, you should check and replace the gun filter every few weeks. This practice prevents debris accumulation and guarantees optimal performance. A clean inline filter can greatly improve paint flow, reducing the risk of clogs during operation.

The importance of regular maintenance checks can't be overstated, as it not only enhances performance but also extends the lifespan of your equipment. Before each use, take a moment to clean the inline filter. This simple step can make a big difference in how well your sprayer works.

Additionally, consider using a strainer bag around the intake tube to filter out smaller particles from the paint mixture. This can further minimize the chance of blockages while you're working.

Don't forget to consult your manufacturer's guidelines for recommended filter sizes that match your specific spray tip. This enhances efficiency and helps reduce clogs.

Scheduling routine maintenance checks on filters and sprayer components is essential. By identifying wear and tear early, you can extend the lifespan of your equipment and maintain its performance.

Advertisement

Regular filter checks are an effective preventative measure that will save you time and hassle in the long run.

Proper Paint Straining

Proper paint straining is essential for achieving a flawless finish with your airless paint sprayer. By filtering out debris, you prevent clogs in the spray tips and guarantee a smooth application. Using a paint strainer bag around the intake tube captures smaller particles, reducing the risk of blockages and enhancing the paint's consistency.

Here's a quick overview of the benefits of proper paint straining:

Benefit Description
Prevents Clogs Filters out debris before it enters the sprayer.
Smoother Finish Guarantees an even application, free from imperfections.
Better Mixing Promotes proper viscosity and consistency in your paint.
Clean Collection Use a clean bucket to collect strained paint efficiently.
Longevity of Equipment Regular straining extends the life of your sprayer.

Tip Size Selection

Choosing the right spray tip size is crucial for optimizing your airless paint sprayer's performance and preventing clogs. Larger tip sizes are ideal for thicker paints, while smaller tips work better for thinner liquids. This selection can greatly reduce the chances of blockages during your projects.

For instance, if you're using a Graco Magnum X5, stick to a maximum tip size of .515, but if you're working with high-viscosity coatings, you might need larger orifice tips like .017. It's vital to recognize that just as you'd choose unique dog names to suit your pet's personality, selecting the right tip size should align with the paint type and project requirements.

Advertisement

To make informed choices, consult tip sizing charts that match the paint's viscosity with the desired spray fan width. This simple step can considerably minimize clogging issues.

It's also wise to keep a variety of spray tips on hand, allowing you to quickly adjust based on any material changes you encounter.

Don't forget to regularly switch out worn or dried spray tips. This practice prevents buildup and maintains a consistent paint flow, which enhances the overall efficiency of your airless sprayer.

Maintenance Practices for Longevity

sustainable care for durability

Airless paint sprayer longevity hinges on consistent maintenance practices that keep your equipment in top shape. This is similar to how garage door openers require regular maintenance to guarantee peak performance.

By following these essential tips, you can guarantee your spray gun and sprayer remain efficient and reliable:

  1. Check and replace filters: Regularly inspect and replace filters in both the gun and sprayer to prevent debris buildup, guaranteeing peak paint flow.
  2. Clean after each use: Make it a habit to clean the sprayer immediately after use. This prevents material hardening and buildup, which can lead to clogs and reduced performance.
  3. Lubricate moving parts: Follow the maintenance schedule to lubricate moving parts. This enhances efficiency and greatly extends the lifespan of your equipment.
  4. Flush the pump system: After using your sprayer, flush the pump system with warm water mixed with dishwashing detergent to remove residual coatings and prevent blockages.

Lastly, keep a log of your maintenance activities, including filter replacements and cleaning schedules. This practice helps you track your sprayer's condition and identify potential issues early, guaranteeing your spray gun and equipment continue performing at their best.

Troubleshooting Common Blockages

resolving frequent obstructions issues

Clogs can be a frustrating issue when using an airless paint sprayer, but identifying and addressing common blockages can save you time and hassle. One major cause of tip clogs is using the wrong spray tip size. If you're working with thicker coatings, opt for a larger orifice tip to reduce the risk of blockages.

Additionally, consider the importance of maintaining a well-organized workspace to minimize debris exposure, ensuring a smoother painting experience akin to creating a modern farmhouse bedroom atmosphere.

Advertisement

Regularly inspecting and cleaning the gun and inline filters is also essential. Debris accumulation in these components leads to tip clogs, so make it a habit to check them frequently.

If you encounter stubborn blockages, flush the system with a solvent like lacquer thinner to dissolve dried paint and clear the pump and hoses.

Pay close attention to paint viscosity; keeping it within the manufacturer's specifications can help prevent clogs during operation.

If you still experience persistent tip plugs despite following these steps, it might be time to replace your spray tip with a larger size. This simple adjustment can greatly improve flow and reduce the frequency of clogs, allowing you to achieve a smoother finish without the frustration of constant interruptions.

Understanding Tip Sizing

optimal tip sizing strategies

Choosing the right tip size is essential for achieving the best results in your spray application. You need to take into account the viscosity of the paint you're using, as thicker materials require larger tips to prevent clogs.

Additionally, it's important to regularly maintain your airless paint sprayer to guarantee peak performance and avoid complications like energy consumption of appliances.

Advertisement

Tip Size Selection Guidelines

Selecting the right tip size is crucial for achieving a smooth and even finish when using an airless paint sprayer. The size of the tip greatly impacts the application process, so here are some guidelines to help you choose:

  1. Consider Paint Viscosity: Thicker paints require larger tips, while thinner liquids work better with smaller tips.
  2. Additionally, maintaining proper projector maintenance tips can enhance your overall spraying experience by minimizing equipment issues.
  3. Check the Gun's Limitations: Always consult your sprayer's specifications, like the Graco Magnum X5, which has a maximum tip size (e.g., .515).
  4. Aim for Ideal Coverage: Using the correct tip size prevents frequent clogs and guarantees you get even coverage across your surface.
  5. Keep Variety on Hand: Having different tip sizes ready allows you to adapt to various paint types and reduces clogging issues.

Impact of Viscosity Factors

Understanding how viscosity affects tip sizing can greatly improve your airless paint spraying experience. The orifice size of your spray tip plays an important role in achieving the desired flow rate and spray pattern.

Larger tips are necessary for high-viscosity paints, while smaller tips work best for low-viscosity liquids. If you're using a paint that's too thick, it may clog your sprayer, so you'll need to adjust your tip size accordingly.

To maintain peak sprayer performance, make sure that you're using a well-draining soil mix when considering the environment for your project, as this can impact the overall application.

To avoid blockages, always consult the manufacturer's guidelines on paint viscosity. If your paint is thicker than recommended, consider using a larger tip size, indicated by higher numbers (like .017 or .019). This guarantees a smooth application without frequent clogs.

Matching the orifice size to the paint's viscosity is essential for top performance.

Advertisement

Regularly consult tip sizing charts to select the appropriate size for different materials. Doing so not only minimizes the risk of clogs but also enhances your overall spraying efficiency.

Cleaning Techniques for Optimal Performance

effective cleaning strategies explained

Maintaining your airless paint sprayer's performance hinges on effective cleaning techniques. By following these tips, you can guarantee peak function and prevent clogs:

  1. Clean Gun Filters Regularly: Swap out filters every few weeks to avoid debris buildup, similar to how regular filter changes are essential for air purifiers to maintain efficiency.
  2. Use Warm, Soapy Water: Mix warm-hot water with dishwashing detergent to dissolve paint residues without harming the sprayer's internal mechanisms.
  3. Utilize a Cleaning Needle: This tool helps clear blocked ports and vent holes, guaranteeing a smooth paint flow during operation.
  4. Flush the Pump System Immediately: After each use, flush the pump with a suitable cleaner to prevent material hardening that can cause stubborn clogs.

Additionally, keeping a log of your maintenance activities, including these cleaning techniques, helps you track the sprayer's condition.

This approach allows you to identify potential issues before they escalate, guaranteeing that your airless paint sprayer continues to deliver excellent results.

Community Resources and Support

local assistance and services

Joining the Bunnings Workshop community can be a game-changer for anyone looking to improve their airless paint sprayer skills. This vibrant platform connects you with fellow DIY enthusiasts who share invaluable project advice, troubleshooting tips, and maintenance strategies specifically tailored to airless paint sprayers.

With experienced members ready to lend their support, you can gain insights based on their own experiences with similar equipment issues. You'll find that community resources, like visual aids showcasing nozzles and sprayer components, help you identify your cleaning and maintenance needs effectively.

Engaging with others encourages collaboration, allowing you to learn from each other's successes and challenges. It's an excellent way to expand your knowledge and skills in maintaining your sprayer.

Additionally, the wealth of articles and ongoing discussions available within the community empowers you to tackle any issues that arise confidently. Whether you're dealing with clogs, blockages, or routine maintenance, you'll find the support you need to keep your airless paint sprayer in top shape.

Advertisement

Don't hesitate to jump in—there's a wealth of knowledge just waiting for you!

Risks of Poor Maintenance Practices

neglected upkeep leads hazards

Neglecting proper maintenance practices for your airless paint sprayer can lead to a host of problems that compromise both performance and longevity.

If you don't keep up with maintenance, you risk facing issues that can severely impact your projects. Here are four key risks of poor maintenance:

  1. Difficult Clogs: Clogged paint can cause operational failures, leading to costly downtime during your painting job.
  2. Component Damage: Poor cleaning practices can damage internal parts, decreasing the efficiency of your paint sprayer and potentially requiring replacement.
  3. Uneven Application: Inconsistent maintenance can result in clogged mechanisms, leading to uneven paint application and a poor finish.
  4. Increased Wear: Failing to regularly inspect and replace filters exacerbates clogging issues, shortening the lifespan of your equipment.

To avoid these risks, make sure you're regularly cleaning your sprayer and straining your paint.

Remember, an airless spray system that's well-maintained will deliver smoother results and last longer.

If you notice any signs of wear, such as a larger orifice or decreased performance, it's a clear indication that your paint sprayer needs replacement or repair.

Frequently Asked Questions

Why Does My Airless Paint Sprayer Keep Getting Clogged?

Your airless paint sprayer keeps getting clogged due to incorrect tip sizes, inconsistent paint viscosity, and contaminants in the mixture. Regularly check filters, strain your paint, and guarantee proper tip maintenance to prevent these issues.

Advertisement

How to Clean a Clogged Airless Paint Sprayer?

To tackle a troublesome sprayer, start by shutting it off and relieving pressure. Soak the spray tip in warm, soapy water, then use a cleaning needle to clear clogs, ensuring smooth spraying success.

How to Unblock a Paint Sprayer?

To unblock a paint sprayer, engage the trigger lock, rotate the spray tip, and release pressure. If clogs persist, clean the filters and flush the system with solvent to dissolve any paint residue.

What Causes Spray Paint to Clog?

When your spray paint gets a bit stubborn, it's often due to mismatched tip sizes, thick paints, or dried remnants. Regularly cleaning and filtering your paint can keep things flowing smoothly during your projects.

Conclusion

To sum up, ignoring airless paint sprayer maintenance is like inviting chaos to your painting projects! You'll face clogs that seem to multiply like rabbits, and blockages that turn your masterpiece into a disaster zone. By staying proactive with cleaning and understanding your sprayer, you can keep it running smoother than a freshly waxed floor! Don't let poor maintenance haunt you—embrace these tips, and watch your sprayer transform into a reliable painting partner that never lets you down!

Advertisement
Continue Reading

Airless Paint Sprayers

How to Use an Airless Paint Sprayer for Painting Brick

Perfectly painting brick with an airless sprayer is easier than you think; discover the essential steps to achieve a flawless finish without the fuss.

Published

on

By

airless sprayer brick painting

Using an airless paint sprayer to paint brick can really streamline your project. First, clean and repair the brick surface thoroughly. Next, assemble and configure the sprayer with the appropriate tip size for masonry paint. Maintain 8-10 inches from the surface while spraying and use horizontal strokes for the first coat, followed by vertical strokes for the second to guarantee even coverage. Allow each coat to dry before adding the next. Finally, don't forget to clean the sprayer after use. There's plenty more to evaluate for a flawless finish if you want to enhance your painting skills even further.

Key Takeaways

  • Clean and dry the brick surface thoroughly, ensuring no moisture is trapped before painting for optimal adhesion.
  • Assemble the airless paint sprayer according to the manufacturer's instructions and select the appropriate spray tip size for masonry paints.
  • Maintain a distance of 8-10 inches from the brick while using a consistent side-to-side motion for even coverage.
  • Apply the first coat with horizontal strokes, then follow with vertical strokes for the second coat, overlapping by 50%.
  • Clean the sprayer components after use and store them in a dry environment to prevent residue buildup.

Tools and Supplies Needed

When you're ready to tackle painting brick with an airless sprayer, having the right tools and supplies makes all the difference. Start with a high-quality airless paint sprayer, like the Wagner Control Pro 130, specifically designed for masonry surfaces to achieve professional results.

Airless paint sprayers use high pressure to guarantee an even finish, making them ideal for your project. Next, you'll want to use Behr Masonry, Stucco & Brick Paint, as it covers a substantial area per bucket—consider getting 10 gallons for larger projects.

Gather essential tools and supplies: pre-taped plastic simplifies taping windows, while small paint brushes are perfect for touch-ups. Multiple paint shields will help you maintain clean lines during application.

Don't forget to opt for appropriate spray tips; sizes between 519-525 work well for dilution, while larger sizes like 535-543 are suitable for silicate paints on mineral substrates.

Before you begin painting, prepare the surface by power washing the brick and filling any holes. Masking areas not to be painted will guarantee a clean application, preventing any accidental overspray.

Advertisement

With the right tools and supplies in hand, you're set for a successful painting project!

Choosing the Right Paint

selecting appropriate paint options

Choosing the right paint is vital for achieving a durable and visually appealing finish on your brick surfaces. Start by selecting a masonry paint that contains organic binders, like silicone resin or silicate dispersion, to guarantee durability and water resistance.

It's important to choose paint specifically formulated for airless sprayers, as this assures ideal application and coverage on the porous brick surface. Additionally, consider the benefits of using air purification systems to maintain a clean working environment while painting, as this can enhance your overall painting experience.

For better adhesion and long-lasting results, consider using a combination of paint and primer. This approach helps the paint bond effectively to the brick, enhancing overall durability.

Additionally, check the compatibility of the paint with your sprayer's recommended tip sizes; you'll typically need larger tips (535-543) for silicate paints on mineral substrates.

Before committing to a color, always test paint samples in various lighting conditions on the brick surface. This step helps you see how the paint appears under different lights, making sure you achieve the desired look.

Advertisement

Preparing the Brick Surface

surface preparation for bricks

Before you start painting, you need to clean the brick surface to remove any dirt or debris. This step is essential, as a clean surface guarantees better adhesion of the paint.

Repair any damaged areas to guarantee a smooth foundation, and make sure the brick dries completely before applying paint. This preparation sets you up for a successful and even finish.

Additionally, consider using a vacuum cleaner with appropriate attachments to effectively remove dust from the crevices of the brick.

Clean the Brick Surface

Preparing the brick surface is vital for achieving a smooth and long-lasting paint finish. Start by power washing the brick to clean the brick surface thoroughly, removing dirt, mildew, and any loose paint. This step is essential for guaranteeing proper paint adhesion, as regular updates to content can enhance the overall quality and effectiveness of your project.

After washing, let the brick dry for at least 24-48 hours to avoid moisture-related issues during painting.

Once the surface is dry, inspect the brick for any cracks or damage. If you find any, fill them with a suitable caulk or masonry filler to create a smooth surface.

Advertisement

Next, you'll want to remove any peeling paint using a scraper or wire brush. This will guarantee a clean substrate for the new paint application.

Before applying paint, consider using a primer specifically formulated for masonry. This will enhance paint adhesion and improve the durability of your final finish.

With the surface properly prepped, you're now ready to use your airless paint sprayer for an even application. Taking these steps will help you achieve a professional-looking result that lasts.

Repair Damaged Areas

After confirming your brick surface is clean and dry, it's time to focus on repairing any damaged areas. Start by inspecting the surface for cracks, holes, or other imperfections. For small gaps, use a masonry filler or patching compound, following the manufacturer's instructions for application. For larger cracks, hydraulic cement works best, as it expands while drying to create a durable repair.

Once you've filled the damaged areas, let them dry completely. Then, sand down the repairs to create a smooth surface, which will improve paint adhesion and give your wall an even appearance.

Advertisement

Finally, grab your power washer to remove any dust or debris from the entire brick surface before painting. This step confirms that your new paint adheres properly and looks great.

Here's a quick overview of the repair process:

Step Description
Inspect Check for cracks, holes, and damaged areas.
Fill Apply masonry filler or hydraulic cement as needed.
Smooth Sand down repaired areas for a smooth finish.
Power Wash Clean the surface to remove dust and debris.
Prepare for Painting Confirm a clean, smooth surface for paint adhesion.

Allow Proper Drying Time

Allowing the brick surface to dry completely is vital for achieving a smooth and lasting paint finish. After power washing, you should allow proper drying time of at least 2-3 days. This period guarantees peak paint adhesion and prevents issues like peeling or bubbling that can arise from trapped moisture beneath the paint layer.

Additionally, confirming that the surface is free from any debris or residue, similar to maintaining a clog-free toilet, will further enhance the paint's longevity.

Keep in mind that drying time may vary based on weather conditions. High humidity or low temperatures can prolong the drying process, so it's important to monitor the moisture level in the brick. Using a moisture meter can help you confirm that the brick is adequately dry before you begin painting.

Advertisement

Setting Up the Sprayer

preparing the sprayer equipment

Setting up your airless paint sprayer is essential for achieving a smooth and even finish on your brick surfaces. Start by following the assembly instructions provided by the manufacturer, making certain every component is securely connected.

For peak performance, consider using a Graco FFLP Fine Finish Low Pressure Reversible Tip which is designed to reduce overspray and improve control. Next, select the appropriate spray tip size, usually between 519-525, which is ideal for dispersion paints and guarantees peak paint application on brick surfaces.

Once your sprayer is assembled, mix your paint and primer, if required, and fill the paint container. Perform a test spray on cardboard to fine-tune your pressure settings. Set the sprayer's pressure to a medium level; this prevents overspray while providing enough force to cover the porous brick effectively.

For better maneuverability, attach a long hose. This allows you to move around the brick surface easily, reducing the need for frequent repositioning of the sprayer.

With everything set up, you're ready to achieve a professional-looking finish on your brick surfaces. Make certain you have everything in place before you start spraying to make the process smoother and more efficient.

Spraying Techniques

effective application methods

When using your airless paint sprayer, keep a distance of 8-10 inches from the brick surface for even coverage.

It can be helpful to verify your equipment is in top shape, similar to how garage door openers enhance home security with modern technology.

Advertisement

Employ a cross-hatching technique by applying the first coat horizontally and the second vertically to fill in gaps effectively.

Experiment with different angles to ensure you coat all edges and corners of the brick.

Optimal Distance and Angles

How can you guarantee an even finish when using an airless paint sprayer? Start by maintaining an ideal distance of 8-10 inches from the brick surface. This distance helps you achieve even coverage without excessive overspray.

When applying the first coat, spray from the base up to prevent drips and run-off, assuring a smooth application on the porous surface. For those seeking inspiration in their home renovation projects, consider exploring island getaways for a revitalizing perspective on design aesthetics.

For the second coat, you'll want to adjust your spray technique. Apply horizontally first, then use vertical strokes to fill in gaps. This method assures thorough coverage while also allowing you to coat edges and crevices effectively for a complete finish.

Advertisement

Remember to overlap each spray pass by about 50%. This overlap is vital to avoid missed spots and maintain uniformity across the brick surface.

Adjusting the nozzle angle can also enhance your results. By spraying from different directions, you'll be able to reach all areas of the brick.

Following these guidelines won't only improve your spraying technique but also contribute to a flawless look for your project. So, take your time and be precise for the best results!

Cross Hatching Technique

To achieve a flawless finish on textured surfaces, mastering the cross hatching technique is essential. This method involves applying your initial coat horizontally, followed by a second coat vertically. This approach guarantees thorough coverage of uneven surfaces, especially on textured materials like brick.

For those dealing with pet hair, utilizing a vacuum with a self-cleaning brush roll can greatly enhance your cleaning efficiency.

Advertisement

Here's how to effectively implement the cross hatching technique:

  • Maintain a distance of 6 to 8 inches from the wall for an even application.
  • Adjust the nozzle on your airless sprayer to create a wide spray pattern for the initial coat.
  • Focus on edges and mortar to fill in gaps and nooks effectively.

Applying the First Coat

first coat application process

Applying the first coat with an airless paint sprayer requires careful attention to detail for best results. Start by maintaining an ideal distance of 8-10 inches from the brick surface. This helps guarantee even coverage while preventing overspray.

To enhance the aesthetic of your painted brick, consider using a neutral color palette that complements the natural surroundings, similar to popular modern farmhouse decor trends. Begin spraying from the base of the wall and work your way up, using a consistent side-to-side motion to effectively cover the porous texture of the brick.

Choose a spray tip size between 519-525 for optimal dispersion, as it's designed for rough surfaces like brick. Apply the first coat in a horizontal pattern, making sure to overlap each pass by approximately 50%. This technique promotes uniform coverage, allowing the paint to fill in any uneven areas effectively.

Once you've completed the first coat, allow adequate drying time, typically a few hours. This is essential to guarantee that the first coat is fully adhered before moving on to the second coat.

Applying the Second Coat

second coat application process

Once the first coat is completely dry to the touch, you can move on to applying the second coat. This typically takes about 1-2 hours, but keep an eye on environmental conditions that might affect drying time.

For the second coat, use a slightly larger spray tip size, like 525-543, to improve coverage on the porous brick surface.

Advertisement

To guarantee an even application, maintain a consistent distance of 8-10 inches from the wall as you spray. Use the cross-hatching technique by spraying horizontally first, then vertically, to fill in any gaps and achieve complete coverage.

Remember these key points:

  • Use a larger spray tip size for better coverage.
  • Keep a consistent distance for an even application.
  • Allow 4-6 hours of drying time before removing protective coverings.

Following these steps will help you achieve a smooth, professional finish.

Once you've finished applying the second coat, be sure to wait the appropriate drying time before touching up or removing any tape to keep those edges clean. Enjoy your newly painted brick!

Cleanup and Maintenance

routine upkeep and tidying

After you've finished your painting project, cleaning your airless paint sprayer promptly is vital to guarantee it continues to operate smoothly. Start by disassembling the sprayer components, including the nozzle and filter. Soak them in a cleaning solution to effectively remove any paint residue. This step is essential to prevent clogs that could hinder performance.

Here's a quick reference table for your cleanup and maintenance routine:

Task Frequency Notes
Disassemble sprayer After each project Prevent paint residue buildup
Clean components After each project Use manufacturer's guidelines
Check for worn parts Monthly Replace worn parts as necessary
Store sprayer After cleaning Keep in a dry environment

Regularly check your airless sprayer to replace worn parts, like seals and filters, to maintain peak performance. Following the specific maintenance schedule outlined in your sprayer's manual will extend its lifespan and reliability for future projects. Finally, verify any leftover paint is properly sealed and stored according to the manufacturer's guidelines.

Advertisement

Tips for Future Projects

future project planning tips

Proper cleanup and maintenance set the stage for your next painting project, guaranteeing your airless sprayer is ready when you are.

As you plan future endeavors, keep these essential tips in mind for the best results on brick surfaces:

  • Test paint colors: Always test your chosen paint colors on a small area to see how they look in different lighting. This helps you avoid any surprises.
  • Calibrate your sprayer: Confirm your airless sprayer is calibrated with the right tip size and pressure settings according to the type of paint you're using.
  • Allow sufficient drying time: Especially on porous brick, letting each coat dry properly enhances adhesion and improves finish quality.

Additionally, consider using a cross-hatch technique for better coverage—apply the first coat horizontally and the second coat vertically to catch any missed spots.

Don't forget to wear protective gear like masks and goggles to guard against hazardous overspray.

Frequently Asked Questions

Is It Better to Roll or Spray Paint Brick?

When deciding whether to roll or spray paint brick, you'll find that spraying offers faster application, better coverage, and improved adhesion. It also reduces your physical strain, making it a more efficient choice for large projects.

Can You Use a Sprayer to Paint Brick?

Yes, you can use a sprayer to paint brick. It efficiently covers porous surfaces, but make certain you choose the right tip size, clean the surface, and maintain proper distance for even application and better adhesion.

Can You Spray Masonry Paint With an Airless Sprayer?

Yes, you can spray masonry paint with an airless sprayer. Make sure to choose the right tip size, dilute the paint if needed, and always test your settings beforehand for the best results.

Advertisement

Do You Dilute Paint When Using an Airless Sprayer?

You wouldn't want your paint to resemble thick molasses, would you? Diluting it can enhance flow and coverage when using an airless sprayer. Always check the manufacturer's guidelines for the best dilution practices.

Conclusion

Using an airless paint sprayer to paint brick is like giving your home a fresh coat of armor. With the right tools, prep, and techniques, you can achieve a smooth, professional finish that'll last for years. Remember to take your time, follow each step, and clean your equipment afterward to keep it in top shape for future projects. Now you're ready to transform your brick surfaces and make a bold statement in your space!

Continue Reading

Airless Paint Sprayers

Airless Paint Sprayer Vs. Paint Pods: Which Is More Convenient?

Both airless paint sprayers and paint pods have unique advantages—discover which one truly offers the convenience you need for your next project.

Published

on

By

airless sprayer vs pods

When deciding between airless paint sprayers and paint pods, convenience really depends on your project. Airless sprayers excel for large jobs, offering fast application and easier cleanup. However, they can be bulky and require more setup. On the other hand, paint pods are compact and user-friendly, perfect for small to medium projects where precision is key. They reduce cleanup time but may need frequent refills. Choose based on the scale of your task; if you're keen on finding out which option fits your needs best, there's more to explore regarding their features and applications.

Key Takeaways

  • Airless paint sprayers offer faster application times for large areas, reducing overall project duration significantly.
  • Paint pods provide an easy setup with pre-filled units, minimizing preparation and cleanup efforts.
  • Airless sprayers require extensive masking and cleanup, making them less convenient for small spaces.
  • Paint pods are lightweight and portable, ideal for DIY projects and quick color changes.
  • Airless sprayers excel in efficiency for large jobs but can be cumbersome due to their bulkiness and setup complexity.

Overview of Airless Paint Sprayers

Airless paint sprayers are powerful tools that use high-pressure pistons to push paint directly through the nozzle, eliminating the need for compressed air. With the ability to achieve pressures up to 2200 PSI, these sprayers efficiently apply thicker materials like latex paints and primers straight from the container, without any thinning required.

This feature makes airless sprayers perfect for larger projects, as they deliver faster production rates while maintaining high film builds. Additionally, garage door openers are examples of modern technology enhancing home efficiency, which is a similar benefit to using airless sprayers in painting tasks.

The spray tip of airless sprayers atomizes the paint, ensuring a consistent spray pattern that covers surfaces evenly. However, it's crucial to recognize that this method can result in higher overspray compared to HVLP systems, so you'll want to be cautious around areas you don't want painted.

Portability is another advantage of airless paint sprayers. Many models are designed for easy transport, allowing you to move the sprayer around job sites without needing a compressor.

This flexibility can save you time and effort, making your painting projects more efficient overall. Whether you're tackling a large wall or an extensive exterior, airless paint sprayers can be a game-changer for your painting tasks.

Advertisement

Overview of Paint Pods

summary of paint pods

Paint pods provide a convenient and compact solution for small to medium-sized painting projects. These self-contained units integrate a paint reservoir and a spray mechanism, allowing you to tackle tasks without needing bulky equipment.

With built-in motors that atomize paint, paint pods enable easy application without the hassle of an external air compressor or pressure pot. Additionally, using paint pods can be likened to the benefits of headphone extension cables in that they enhance the overall experience by making the process simpler and more enjoyable.

One of the major benefits is their portability. You can easily move them from one location to another, making them ideal for DIY enthusiasts who work on various projects around the house.

The use of disposable paint cartridges minimizes cleanup and maintenance time, letting you focus more on your work and less on the mess.

Paint pods are designed to be user-friendly, featuring quick setup and operation that cater to novice painters. However, keep in mind that they generally work best with thinner paints.

If you're planning to use thicker materials, you might find that paint pods don't perform as effectively as airless sprayers or pressure pots. Overall, paint pods offer a practical solution for those looking to simplify their painting experience.

Advertisement

Pros of Airless Paint Sprayers

efficient uniform paint application

For larger painting projects, airless sprayers stand out due to their high-pressure operation, reaching up to 2200 PSI. This high pressure translates into faster application rates, allowing you to cover large areas efficiently. You'll appreciate how airless sprayers can handle unthinned paints directly from the can, making them perfect for thicker materials like latex paints and primers.

Here's a quick overview of the pros:

Pros Details
High Pressure Reaches up to 2200 PSI for efficient coverage.
Application Rates Faster application reduces overall project time.
Consistent Spray Pattern Delivers an even finish across surfaces.
Heavy Coats Capable of applying thick layers quickly.
Reduced Setup Time Draws paint directly from containers, minimizing prep.

With their ability to apply heavy coats quickly, airless sprayers greatly cut down on labor time, making them a top choice for professional contractors. You'll find that they save you time and effort on extensive outdoor applications, allowing you to tackle those big jobs with ease.

Pros of Paint Pods

convenient portable mess free application

When you use paint pods, you'll enjoy an easy setup process that gets you started quickly.

These pods are designed for convenience, making them ideal for small projects or touch-ups, and they require minimal cleanup, letting you wrap up your project without a hassle.

With these benefits, paint pods can make your painting experience smoother and more efficient.

Additionally, they're a great option for those who prefer a quick and user-friendly alternative to airless paint sprayers.

Advertisement

Easy Setup Process

Typically, paint pods offer an incredibly easy setup process that saves you time and hassle. Unlike airless paint sprayers, which require you to fill a paint container manually, paint pods come pre-filled and ready to use. You can simply attach the pod to the sprayer and start painting without dealing with complex assembly or adjustments. This user-friendly design enhances your convenience, allowing for quick changes between different colors or finishes during your projects.

Additionally, unlike airless sprayers that can benefit from proper dilution guidelines, paint pods eliminate the need for measuring and mixing, streamlining your workflow even more.

Moreover, the lightweight and compact nature of paint pod systems makes them easy to transport and set up in various locations. You won't need extra equipment, like an air compressor, which can complicate things and slow you down. With paint pods, you can focus on your painting tasks rather than the setup process.

In addition, paint pods typically require minimal cleaning after use. Since they can be disposed of or reused without the extensive cleaning process necessary for airless sprayers, you'll find that you spend much less time maintaining your tools.

Minimal Cleanup Requirements

Cleaning up after painting can often be a tedious chore, but with paint pods, that hassle is greatly reduced. Unlike traditional sprayers, paint pods come with built-in containers designed to minimize paint spillage and overspray. This means less mess and a more efficient cleanup process.

Advertisement
Feature Paint Pods Traditional Sprayers
Cleanup Effort Minimal cleanup required Extensive cleaning needed
Disposal Disposable liners available Requires washing and storing
Solvent Usage Drastically reduced Higher solvent requirements
Color Changes Quick-switch design Time-consuming cleanup required

With paint pods, you can simply discard the disposable liners after use, eliminating the need for extensive cleaning of paint containers. This design reduces the number of components you need to clean, making your post-application process faster and more convenient. Plus, the minimal use of solvents contributes to a more environmentally friendly application process. Switching between colors is a breeze, too, as the quick-change design minimizes cleanup associated with color changes. If you're looking for a hassle-free painting experience, paint pods are the way to go.

Cons of Airless Paint Sprayers

limitations of airless sprayers

Airless paint sprayers have their drawbacks that can make them less appealing for certain projects. One major issue is overspray, which can lead to wasted material and necessitate extensive masking and cleanup. This can be particularly frustrating when working in small spaces or around delicate features.

Additionally, these sprayers require a minimum of a pint of paint to prime the hose, making them inefficient for smaller jobs. Many budget-friendly options, like those found in budget-friendly vacuum cleaners, highlight the need for cost-effective solutions in any project.

The high pressure of airless sprayers often results in a rougher finish, meaning you might need to spend extra time sanding or applying touch-ups for a smoother appearance. This can slow down your project turnaround, especially if you're aiming for a polished look.

Portability is another concern; airless sprayers can be bulkier and require a power source, making them less convenient to transport compared to paint pods. Plus, the setup and cleanup can be time-consuming.

You'll need to thoroughly clean high-pressure components and hoses, which can deter you from starting projects that require quick execution. For these reasons, airless paint sprayers may not be the best choice for every situation.

Advertisement

Cons of Paint Pods

limited color options available

While convenience is often a key selling point for paint pods, there are notable downsides that can hinder their effectiveness for various projects. One significant drawback is their limited capacity, which restricts the size of your painting tasks. You might find yourself refilling frequently, disrupting your workflow.

Additionally, the initial cost of paint pods can be higher than traditional paint containers, making them less economical for larger applications. Moreover, the need for specialized equipment to use paint pods can create additional obstacles, reminiscent of the personal attributes linked to signs that enhance overall allure in astrology, as both require specific considerations for ideal results.

Another issue is compatibility; paint pods may not work with all types of paint, forcing you to stick with specific brands or formulations. This can limit your choices and affect the final results of your project.

The supposed convenience can also be overshadowed by the need for specialized equipment for application, which often requires a further investment.

In addition, there are environmental concerns regarding the disposal of paint pods. Many aren't recyclable, leading to increased waste compared to reusable containers. This can leave you feeling guilty about your choice, especially if you're environmentally conscious.

When weighing your options, it's crucial to take these cons into account to guarantee you choose the best solution for your painting needs.

Advertisement

Ideal Applications for Airless Sprayers

versatile efficient painting solutions

When you're tackling large painting projects, airless sprayers shine as an excellent choice due to their ability to cover extensive areas quickly and efficiently. These tools are perfect for painting large surface areas like walls and ceilings, where speed is vital. They handle thicker materials, allowing you to use latex paints and primers without the hassle of thinning.

Additionally, having a well-organized home cleaning kit can enhance your overall project efficiency by ensuring that your workspace remains tidy and free from paint spills.

Airless sprayers excel in outdoor applications, such as fencing and siding, where portability and fast application are essential. You'll appreciate the high-pressure operation that delivers consistent coverage, even on textured surfaces, ensuring a uniform finish despite challenging substrates.

If your project demands rapid completion, airless sprayers can greatly reduce labor time compared to traditional methods. Their efficiency means you can get the job done faster, making them ideal for those tight deadlines.

Whether you're painting a vast room or tackling an exterior project, airless sprayers provide the performance you need. So, for your next big paint job, consider the advantages of airless sprayers to achieve a professional finish with minimal effort.

Ideal Applications for Paint Pods

versatile uses for paint pods

When you're looking for efficient coating applications, paint pods shine with their ability to deliver precise finishes.

Their ease of use and portability make them a go-to choice for DIY enthusiasts and professionals alike, especially when tackling projects like Island Getaways that require a touch of finesse.

Advertisement

They're perfect for projects that demand versatility, whether you're working on intricate cabinetry or detailed trim.

Plus, their controlled application helps you minimize waste and achieve high-quality results every time.

Efficient Coating Applications

Paint pods excel in efficient coating applications, making them a top choice for projects that demand high-quality finishes and precision. With their advanced HVLP technology, you can achieve better control over fluid volume and atomization, greatly reducing paint consumption by up to 50%. This efficiency is vital for minimizing waste and guaranteeing that your materials go further.

In today's digital landscape, the integration of AI technology in cybersecurity is fundamental for protecting sensitive information, much like how precision in application protects the integrity of your projects.

When tackling detailed work like furniture painting, cabinetry, or trim, paint pods shine. They provide a fine mist that allows you to apply coatings with exceptional accuracy. Additionally, the ability to operate multiple spray guns from a single pressure pot enhances overall efficiency, especially on larger projects that require consistent coating across various surfaces.

Advertisement

If you're working with specialized coatings, paint pods can even facilitate the heating of your materials, helping to achieve the specific viscosity and flow characteristics needed for peak application. This versatility guarantees that you can tackle a wide range of coating applications with confidence.

To conclude, if efficiency and high-quality results are what you seek, paint pods are an excellent investment for your next project.

Precision in Finishing

Achieving precision in finishing is what sets paint pods apart, especially for intricate applications where quality is paramount.

With paint pots, you gain precise control over fluid volume and atomization pressure, making them ideal for high-quality finishes on surfaces like furniture and cabinetry. The HVLP (High Volume Low Pressure) technology used in paint pots produces a fine mist, which minimizes overspray and waste, ensuring efficient use of coatings while reducing VOC emissions.

Additionally, for those seeking to enhance their home environment, the use of essential oils for relaxation can create a calming atmosphere that complements beautifully finished spaces.

Advertisement

When you're tackling detailed work, such as trim painting or refinishing projects, the consistency and finesse provided by paint pots are unmatched.

You can even use multiple spray guns simultaneously, allowing for efficient application across various tasks without sacrificing quality. Plus, paint pots are particularly suited for scenarios that require heating coatings, enhancing their application properties and finish quality for specialized materials.

Versatile Usage Scenarios

For small to medium-sized projects, paint pods shine as a versatile tool that offers precision and control. They're perfect for tasks like furniture refinishing or intricate detailing, where every stroke matters. Their user-friendly design makes them an ideal choice for DIY enthusiasts and homeowners, allowing for quick touch-ups and small room renovations without the hassle of larger equipment like airless sprayers.

Moreover, paint pods excel in minimizing VOCs and overspray, making them suitable for indoor projects and confined spaces. You can easily switch between different coatings, including water-based paints, primers, and stains, giving you the flexibility needed for various applications.

Feature Paint Pods
Ideal for Small to medium projects
VOCs & Overspray Minimizes both
User-Friendliness Easy setup and operation

With their compact design, paint pods are also easy to store and transport, making them a convenient option for those with limited space. Whether it's a small project or a detailed indoor job, paint pods provide the precision and versatility you need to achieve excellent results.

Advertisement

Comparing Convenience Factors

evaluating ease of use

When it comes to convenience, airless paint sprayers and paint pots each have their unique strengths.

If you're tackling large projects, airless paint sprayers excel due to their quick coverage and ability to handle unthinned latex paints straight from containers. This considerably reduces setup time and enhances production rates with consistent high-pressure sprays.

However, if you're focusing on detailed work, paint pots offer better control over fluid application and minimize overspray, though they may require a bit more setup and cleanup.

Here's a quick comparison of key convenience factors:

  • Setup Time: Airless sprayers are faster to set up than paint pots.
  • Production Rates: Airless sprayers allow for quicker application across larger areas.
  • Cleanup: Airless sprayers are easier to clean post-use, while paint pots may involve more steps.
  • Quality Finishes: Paint pots, especially when used with HVLP spray guns, achieve high-quality finishes.

Ultimately, your choice depends on the project's scale and your specific needs.

Whether you prioritize speed or precision will guide you in selecting the right tool for your painting tasks.

Frequently Asked Questions

What Is the Main Advantage to Using an Airless Sprayer Over a Compressed Air Sprayer for a Painting Project?

The main advantage of using an airless sprayer is its ability to handle thicker materials without thinning. You'll cover large areas faster, experience less overspray, and enjoy easier cleanup compared to traditional compressed air sprayers.

Advertisement

What Are the Disadvantages of Airless Paint Sprayer?

You'll find airless paint sprayers can lead to overspray, wasted material, and longer setup times. They might not provide the precision needed for detailed work, making them less ideal for small touch-ups or intricate projects.

Is an Airless Sprayer Better Than a Paint Sprayer?

When deciding if an airless sprayer's better than a traditional paint sprayer, consider your project size and finish quality. For large jobs, airless sprayers excel, but for detail work, traditional sprayers might suit you better.

Do Airless Sprayers Give a Better Finish?

Airless sprayers can give you a better finish due to their high-pressure operation, which atomizes thicker paints effectively. With practice, you'll achieve a smooth, even coat, but be mindful of potential overspray during application.

Conclusion

In the end, choosing between an airless paint sprayer and paint pods really depends on your specific needs. If you value speed and versatility, an airless sprayer might be your best bet. However, if convenience and ease of use are your priorities, paint pods could be the way to go. So, which one fits your painting style better? Weigh the pros and cons, and you'll find the perfect tool for your next project!

Advertisement
Continue Reading
Advertisement

Affiliate disclaimer

As an affiliate, we may earn a commission from qualifying purchases. We get commissions for purchases made through links on this website from Amazon and other third parties.

Advertisement

Trending